
If you love handmade crafts that are both beautiful and functional, this Learn how to make a spiral coaster-Step by Step Tutorial is perfect for you. Crochet spiral coasters are simple projects that can instantly brighten your table setting, add a cozy touch to your home décor, or make wonderful gifts for friends and family. With just a few basic crochet stitches and a little time, you can create something that looks truly impressive. In this tutorial, we’ll go through every step in detail so that even if you’re a beginner, you’ll have no trouble following along.
The best part of this Learn how to make a spiral coaster-Step by Step Tutorial is that it’s a quick and relaxing project. You can complete a single coaster in one sitting, and it’s a great way to use up leftover yarn. You’ll also get the satisfaction of creating something both decorative and practical. Spiral coasters work perfectly under mugs, glasses, or small bowls and are ideal for any season, especially when made in bright and cheerful colors.
Before we begin the detailed process, let’s talk about what makes this pattern so special. The spiral design creates a fun swirl of colors that stands out from traditional flat coasters. It’s not only visually appealing but also teaches you a new crochet technique that can be applied to other projects like rugs, pot holders, and placemats. By following this Learn how to make a spiral coaster-Step by Step Tutorial, you’ll not only make a beautiful piece but also improve your crochet skills in the process.
Materials You’ll Need for the Spiral Coaster
To start this Learn how to make a spiral coaster-Step by Step Tutorial, gather all the materials you’ll need before beginning. This will make your crocheting process smooth and enjoyable. You won’t need anything fancy — just a few essentials that you might already have if you crochet regularly.
You’ll need cotton yarn in at least two colors. Cotton is perfect for coasters because it’s absorbent and easy to wash. Choose colors that complement your home or add a bit of fun contrast for the spiral effect. The beauty of this project lies in the combination of colors that twist together as you crochet.
Next, choose a suitable crochet hook, usually between 3.5 mm and 4.5 mm depending on your yarn weight. Check your yarn label for the recommended hook size. Using the right hook ensures that your coaster will have the perfect thickness and structure — firm enough to hold a cup but soft enough to protect your table surface.
You’ll also need scissors and a yarn needle for weaving in ends once your coaster is complete. These tools help finish your project neatly, giving it a professional look. If you want to make your coaster non-slip, you can apply a small amount of clear silicone or use non-slip fabric underneath after it’s finished.
Having all these materials ready before you start will save you time and help you stay focused on the creative process. It’s a good idea to organize them on your workspace so everything is within reach. Once everything is ready, you can begin crocheting your spiral coaster.
Step-by-Step Instructions for Making the Spiral Coaster
Now, let’s dive into the main part of our Learn how to make a spiral coaster-Step by Step Tutorial. The spiral coaster may look complex, but it’s created using simple stitches and an easy-to-follow technique. Take your time with each step, and soon you’ll have your first beautiful spiral coaster ready to use or gift.
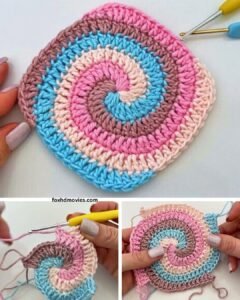
Start by making a magic ring with your first color. This is the base for your coaster. Into the magic ring, crochet six single crochets. Do not close the round completely because the spiral will naturally expand without joining. Insert your hook into the first stitch with your second color yarn and make a single crochet.
The key to the spiral pattern is alternating between the two colors as you increase in each round. Continue crocheting two single crochets in each stitch from the previous round, switching colors as you go. You’ll see the spiral start to form. Don’t worry if it looks uneven at first; as you complete more rounds, the design becomes smoother and more defined.
Keep increasing by adding one extra single crochet in every new round. For example, in round three, make one single crochet in the first stitch and two in the next, repeating this pattern around. Alternate your colors consistently to maintain a clear spiral effect.
When your coaster reaches the desired size — typically around 4 to 5 inches in diameter — you can stop increasing and work one final round without adding any new stitches. This helps the edge lie flat. Cut your yarn, leaving a small tail, and use your yarn needle to weave in the ends neatly.
Finally, gently flatten your coaster with your hands or lightly press it with a warm iron through a cloth to give it a nice, finished appearance. Congratulations, you’ve completed your first spiral coaster!
Creative Variations for Your Spiral Coaster
Once you’ve mastered this Learn how to make a spiral coaster-Step by Step Tutorial, you can start experimenting with different color combinations, yarn textures, and even sizes. The spiral design is highly versatile and looks beautiful in almost any color palette.
Try making coasters with pastel shades for a soft, cozy look, or go bold with vibrant colors like red and yellow for a cheerful touch. You can also use variegated yarn for a unique swirl effect that changes color as you crochet, making each coaster one of a kind.
If you want to make your coasters thicker, simply use two strands of yarn held together. This creates a more substantial base and adds a fun textured effect to the finished piece. For a more elegant design, try metallic or glitter yarns for festive occasions like Christmas or birthdays.
You can also change the size of your spiral coaster by adjusting the number of rounds. Fewer rounds make a smaller coaster perfect for teacups, while more rounds can turn your project into a trivet or placemat. The technique remains the same, only the number of rounds changes.
For an extra decorative touch, consider adding a border. A round of slip stitches or scalloped edging around the outside gives your coaster a more polished and professional look. It also helps the coaster hold its shape.
Lastly, if you plan to gift your coasters, consider making a set in coordinated colors and tying them with a ribbon. Handmade sets like these make thoughtful gifts for any occasion, especially for those who appreciate handmade crafts.
Care and Maintenance of Your Crochet Spiral Coaster
After finishing your Learn how to make a spiral coaster-Step by Step Tutorial, it’s important to know how to care for your handmade coasters so they last for years. Since they’re often exposed to moisture and heat, proper care ensures they stay in good condition and maintain their beauty.
Always use cotton yarn because it can handle washing and drying well. Avoid synthetic yarns for coasters, as they may melt or deform when exposed to hot cups. When your coasters get dirty, simply hand wash them with mild detergent and lukewarm water.
After washing, reshape your coasters while they are still damp. Gently flatten them on a towel and let them air dry completely. Avoid wringing them out, as this could distort their shape or stretch the stitches.
If your coasters lose their crisp shape over time, you can block them again. Lightly spray them with water and pin them to a flat surface until dry. This process restores their neat circular form.
For added protection, you can treat the back of each coaster with a non-slip fabric or silicone dots. This prevents them from sliding around on smooth tabletops. It’s a small step that enhances functionality and safety.
Taking care of your crochet projects helps them last longer and keeps them looking handmade and fresh. With minimal effort, your spiral coasters can remain as beautiful as the day you made them.
Learn how to make a spiral coaster-Step by Step Tutorial
1. Can beginners make this spiral coaster?
Yes, absolutely! This project is beginner-friendly. If you can make a magic ring and single crochet, you’ll be able to complete this coaster easily by following the steps.
2. What is the best yarn for spiral coasters?
Cotton yarn is the best choice because it’s absorbent, heat-resistant, and machine washable. It also keeps the coaster flat and sturdy.
3. How long does it take to make one coaster?
A single coaster usually takes about 30 to 45 minutes to complete, depending on your crochet speed and the size of the coaster you choose to make.
4. Can I make the spiral coaster in more than two colors?
Yes! You can use three or even four colors for a more complex and colorful design. Just be sure to alternate the colors evenly to maintain the spiral pattern.
5. Why is my coaster curling up?
Curling often happens when you forget to increase stitches evenly. Make sure you add one more stitch per round as instructed so your coaster stays flat.
6. Can I sell the coasters I make from this tutorial?
Of course! Handmade spiral coasters are popular at craft fairs and online shops. Just be sure to mention they’re handmade and care for them properly.
Conclusion
Now that you’ve gone through the Learn how to make a spiral coaster-Step by Step Tutorial, you know exactly how to create a beautiful, practical, and durable crochet coaster from start to finish. This project combines simplicity, creativity, and functionality, making it perfect for beginners and experienced crocheters alike.
We hope you enjoyed learning this technique and feel inspired to make more spiral coasters in different colors and sizes. Remember to practice, experiment with color combinations, and most importantly, have fun while crocheting. If you tried this tutorial, please leave your honest opinion and suggestions in the comments — we’d love to hear how your spiral coasters turned out and what creative variations you came up with!