
If you’re looking for a cheerful and creative holiday project, this Easy Crochet Snowman Ornament – Step by Step Tutorial is perfect for you. Handmade ornaments always bring an extra touch of warmth and charm to any Christmas tree, and a cute snowman made from yarn is a delightful addition to your festive décor. Whether you’re a beginner or an experienced crocheter, this project is simple, fun, and rewarding. It’s also a great way to add a personal, handmade touch to your holiday decorations or to make thoughtful gifts for friends and family.
One of the best things about this crochet snowman ornament is its versatility. You can use it as a traditional Christmas tree ornament, a gift tag decoration, or even part of a holiday garland. The materials are minimal, and you can use leftover yarn from previous projects, making this a budget-friendly craft. With just a few stitches and some creativity, you’ll have a cute little snowman that brings smiles wherever it’s displayed.
This Easy Crochet Snowman Ornament – Step by Step Tutorial will guide you through all the stages—from choosing materials to creating the body, face, and accessories that make each snowman unique. It’s a project that can be completed in a short time, but the joy it brings lasts all season. Plus, because it’s a small item, you can make several of them to decorate your entire home or to share with loved ones as meaningful handmade gifts.
Materials and Tools You’ll Need
Before beginning your Easy Crochet Snowman Ornament – Step by Step Tutorial, gather all your supplies to make your crafting process smoother. Preparation ensures a more enjoyable experience and helps you stay focused while crocheting.
First, choose your yarn. For the snowman’s body, white cotton or acrylic yarn works best, as it holds shape well and provides a clean, snowy look. For the hat, scarf, and buttons, you can use colorful yarn scraps—reds, greens, blues, or any festive shades you prefer. This is your chance to play with colors and make each snowman unique.
Next, pick the right crochet hook according to your yarn thickness. Typically, a 3.5 mm or 4 mm hook works well for medium-weight yarn. Make sure your stitches are tight enough so that the stuffing doesn’t show through. If you’re using thinner yarn, opt for a smaller hook to keep the shape compact.
You’ll also need fiberfill stuffing for shaping the body and head, scissors, a yarn needle for sewing parts together, and stitch markers if you prefer to keep track of your rounds. For the eyes and buttons, you can either use black yarn, embroidery thread, or small beads. A touch of orange yarn or felt works perfectly for the carrot nose.
Finally, prepare a small ribbon or loop of yarn to hang your ornament once it’s done. This small detail transforms your snowman into a charming decoration that can hang from trees, gifts, or even doorknobs.
Step by Step Crochet Instructions
Now it’s time to start crocheting! This Easy Crochet Snowman Ornament – Step by Step Tutorial will help you create the body, assemble the parts, and add those charming final touches that give your snowman personality.
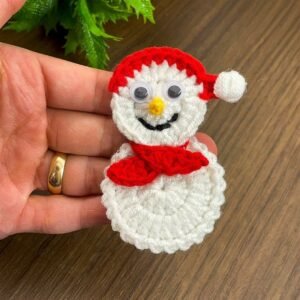
Begin with the head. Make a magic ring and work single crochet stitches into it, gradually increasing each round to form a small sphere. Continue until you have the desired size, then start decreasing to close the ball. Before sealing completely, stuff it lightly with fiberfill to keep it firm and round.
Next, move on to the body. This part is similar to the head but slightly larger. Repeat the same process—crochet in rounds, increase gradually, and stuff before closing. Once both parts are done, sew or crochet them together securely. Make sure they align neatly so your snowman stands evenly when hung.
After the body is assembled, create a hat or beanie. This is where you can let your creativity shine. Use bright colors like red, green, or blue to make it festive. Crochet a small ring that fits around the head, then build up a few rounds to form the hat’s height. Add a tiny pompom or stitch a decorative edge for extra charm.
Now, crochet a mini scarf using a chain of about 20–25 stitches. Work one or two rows of single crochet to make it thick enough, then wrap it around your snowman’s neck. You can add fringe at the ends for a cozy winter look.
Finally, use black yarn or beads to make eyes and buttons. Add a small orange triangle for the nose and, if desired, blush spots on the cheeks for a friendly look. Once all the details are attached, sew a small loop or ribbon on top, and your snowman is ready to hang!
Tips for a Perfect Crochet Snowman Ornament
Even though this Easy Crochet Snowman Ornament – Step by Step Tutorial is beginner-friendly, a few helpful tips can make your finished project look neat and professional.
First, always check your stitch tension. If it’s too loose, the stuffing might peek through; if it’s too tight, the shape may become uneven. Practicing consistent tension will make your stitches look uniform and polished.
Second, use lightweight yarns for the base. This keeps your ornament light enough to hang easily without bending tree branches. Cotton or acrylic yarns work best for their durability and soft texture.
Third, don’t overstuff the snowman. Too much stuffing can distort the shape or stretch your stitches. Add just enough to keep it plump but still flexible.
Another great tip is to secure your attachments well. Since ornaments are handled often during the holidays, make sure the head, scarf, and hat are tightly sewn to prevent them from coming loose.
You can also personalize each snowman for different family members. Use various colors for scarves or hats, add initials with embroidery, or change facial expressions for a playful collection.
Finally, store your snowman ornaments properly after the holidays. Keep them in a dry place and avoid direct sunlight to prevent fading, ensuring they remain in perfect condition year after year.
Creative Uses for Crochet Snowman Ornaments
This Easy Crochet Snowman Ornament – Step by Step Tutorial opens endless creative possibilities beyond the Christmas tree. There are many ways to display and gift these adorable handmade pieces.
You can use them as unique gift toppers. Instead of a regular bow, attach a snowman ornament to a wrapped present—it adds a personal touch that friends and family will appreciate.
Another fun idea is to create a snowman garland. Make several ornaments and connect them with a long crochet chain or ribbon to decorate mantels, windows, or door frames. It’s an eye-catching and cozy winter decoration.
You can also turn your snowman into a keychain or bag charm. Simply attach a metal ring or hook instead of a hanging loop, and you’ll have a cute winter accessory that goes everywhere with you.
These ornaments also make wonderful handmade gifts. Teachers, neighbors, and coworkers will all love receiving something made by hand with care. Pair it with a holiday card or small treat for a thoughtful seasonal gift.
If you enjoy hosting holiday gatherings, you can use the snowman ornaments as table décor or party favors. Place one at each setting with a guest’s name tag for a charming, personalized touch.
Lastly, involve children in the process. Let them choose colors or help with stuffing. Crafting together is a fun way to share creativity and holiday joy while making lasting memories.
Easy Crochet Snowman Ornament
1. What kind of yarn should I use for a crochet snowman ornament?
The best option is cotton or acrylic yarn in white for the body, plus colorful yarns for accessories like hats and scarves.
2. Is this project suitable for beginners?
Yes, this Easy Crochet Snowman Ornament – Step by Step Tutorial is designed with beginners in mind. The stitches are simple, and the instructions are easy to follow.
3. How long does it take to make one ornament?
On average, it takes between one and two hours to complete one snowman, depending on your crochet speed and experience.
4. Can I make the snowman bigger or smaller?
Absolutely! You can adjust the size by changing your yarn weight or hook size, or by adding or removing a few rounds in the body and head.
5. What can I use for the snowman’s eyes and buttons?
You can crochet small black circles, use beads, or embroider them directly with black thread.
6. How do I hang my snowman ornament?
Sew a small ribbon or chain loop at the top of the head so you can easily hang it on a tree, gift, or garland.
Conclusion
This Easy Crochet Snowman Ornament – Step by Step Tutorial is the perfect project to bring warmth, creativity, and joy to your holiday season. From crafting the tiny head and body to adding cheerful scarves and hats, every step lets you express your unique style. Handmade ornaments like these add heart and character to any Christmas decoration and make wonderful keepsakes or thoughtful gifts.
By following the detailed steps in this tutorial, you’ve learned how to create your own snowman from start to finish. Whether you make one or a dozen, each ornament carries a piece of your creativity and holiday spirit.
We hope you enjoyed this tutorial and feel inspired to start your own collection of crochet snowmen! Share your honest opinions and suggestions below—your feedback helps inspire more handmade magic for crafters everywhere.