
If you love sewing, you know that having a good pincushion makes all the difference. In this A pincushion shining like the sun, learn how to make it – Step by Step Tutorial, you will discover how to create a bright and cheerful pincushion that not only serves a practical purpose but also brings warmth and creativity to your craft space. A pincushion shaped like the sun is the perfect way to add color, joy, and positivity to your sewing table.
This handmade pincushion is more than just a sewing tool—it’s a piece of art that reflects your personality and creativity. Making your own pincushion shining like the sun allows you to choose your favorite fabrics, experiment with vibrant colors, and enjoy a relaxing, hands-on project that will make your sewing experience even more delightful. It’s an easy and rewarding craft project suitable for beginners and experienced crafters alike.
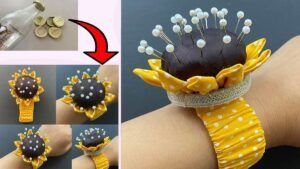
In this step-by-step tutorial, you’ll learn how to create a round, soft pincushion that looks just like a radiant sun, complete with fabric rays and a fluffy, golden center. The project requires only a few materials and can be completed in a short amount of time, making it perfect for an afternoon of creativity. Whether you make it for yourself or as a thoughtful handmade gift, your sun pincushion will certainly bring a little extra brightness to any sewing room.
Materials Needed for a Pincushion Shining Like the Sun
Before starting this A pincushion shining like the sun, learn how to make it – Step by Step Tutorial, let’s gather all the necessary materials. Having everything prepared will make the process smooth and enjoyable.
First, you’ll need some fabric in sunny shades. Yellow, orange, and golden tones work perfectly for this project. You can mix patterns, such as polka dots or floral prints, to make your pincushion even more unique. Cotton fabric is the best choice because it’s easy to sew and holds its shape well.
Next, prepare thread in matching colors. You’ll also need a needle or a sewing machine, depending on your preference. A sewing machine makes the work faster, but you can easily sew this pincushion by hand if you prefer a more relaxed and detailed approach.
For stuffing, use polyester fiberfill or any soft filling you have available. The goal is to make your pincushion firm enough to hold pins securely but soft enough to insert them easily. A small amount of stuffing goes a long way, so start with less and add more if needed.
You will also need a scissors, fabric marker, and pins for assembling the pieces. For decoration, you can add small embellishments such as beads, sequins, or embroidery details to make your sun truly shine.
Having these simple materials ready ensures your crafting process will be smooth from start to finish. Once you have your tools and fabrics organized, you’re ready to begin crafting your cheerful, handmade pincushion shining like the sun.
Step-by-Step Guide to Making Your Sun Pincushion
Now that you have everything ready, let’s dive into the fun part of this A pincushion shining like the sun, learn how to make it – Step by Step Tutorial. We’ll create the base, add the sun rays, and finish it with a soft and bright look.
Start by cutting two fabric circles of equal size—about 4 to 5 inches in diameter works well for a standard pincushion. These will form the front and back of your sun. You can use a cup or small bowl as a guide to trace perfect circles onto your fabric.
Next, cut out several triangular pieces of fabric to form the rays of the sun. The number of rays depends on how full and bright you want your sun to look, but usually 8–10 rays work beautifully. Each triangle should be around 2 inches long and 1 inch wide at the base.
Place the triangles evenly around the edge of one fabric circle, with their pointed ends facing inward. Secure them in place with pins. Then, carefully place the second fabric circle on top, right sides facing each other, and pin them together so that the rays are sandwiched in between.
Sew around the edge, leaving a small opening of about 1 inch so you can turn it right side out. After sewing, gently turn your pincushion right side out through the opening. You’ll now see your sun shape coming to life, complete with rays all around.
Stuff your pincushion with fiberfill until it’s firm but soft. Once you’re satisfied with the fullness, close the opening with small, neat stitches using a needle and matching thread. Now your basic sun pincushion is complete, and it already looks bright and joyful.
For an extra touch, you can embroider a small smiley face in the center or add decorative stitches for texture. Your pincushion shining like the sun is now ready to light up your sewing corner.
Adding Decorative Details and Personal Touches
The most enjoyable part of this A pincushion shining like the sun, learn how to make it – Step by Step Tutorial is personalizing your creation. Small details can make your pincushion truly one-of-a-kind and full of personality.
Start by adding embroidery details in the center of the sun. You could stitch small spirals or swirls to represent the sun’s glow or even create a cute, smiling face using black thread for the eyes and red for the cheeks.
If you enjoy a bit of sparkle, add sequins or beads to the rays to make them shimmer like real sunlight. Just be sure to secure them tightly so they don’t come loose while using the pincushion.
For extra texture, consider using felt or textured fabric for the rays. Mixing different fabrics creates an interesting, dimensional look. You can alternate between smooth cotton and soft felt for a playful design.
If you want your pincushion to be practical and decorative, sew a small loop or ribbon on one side. This allows you to hang your sun pincushion near your sewing area or attach it to a sewing basket.
Another lovely idea is to create a scented version of your pincushion by adding a few drops of essential oil or a small sachet of dried lavender inside. It keeps your sewing area smelling fresh and adds a relaxing touch to your crafting time.
Remember, creativity has no limits. This project gives you the freedom to express your style while still being easy and beginner-friendly. Every version of the pincushion shining like the sun can be completely unique depending on your imagination.
Practical Uses and Benefits of a Handmade Sun Pincushion
Now that your pincushion shining like the sun is complete, it’s time to explore all the ways you can use it in your daily crafting routine. While it looks like a cheerful decoration, it’s also a highly functional sewing tool.
The primary purpose of any pincushion is to keep your pins and needles organized. Having them stored safely in a cushion prevents them from getting lost and keeps your workspace tidy. The soft stuffing allows pins to go in easily and stay secure until you need them again.
A round pincushion like this one is also great for pressing pins into while sewing or quilting. The firm but gentle surface prevents the pins from dulling or bending. Plus, the bright design makes it easy to spot on your worktable.
Handmade pincushions are also wonderful for personal gifts. A sun-shaped pincushion brings warmth and joy, making it a perfect gift for someone who loves sewing or crafts. You can customize the colors and decorations to match their personality.
If you’re into decorating your sewing corner, this pincushion adds a cozy and creative vibe. It serves as a functional decor piece, brightening up your table or shelf while reminding you of the happiness that handmade crafts bring.
Finally, this project helps you practice basic sewing skills in a fun and relaxing way. Cutting shapes, stitching edges, and adding details all contribute to improving your craftsmanship. Whether you’re a beginner or experienced, making something beautiful by hand is always fulfilling.
FAQ – A Pincushion Shining Like the Sun, Learn How to Make It
1. Is this pincushion suitable for beginners?
Yes! This project is simple and doesn’t require advanced sewing skills. It’s perfect for beginners who want to learn basic stitching and enjoy a creative activity.
2. What is the best fabric to use?
Cotton fabric is ideal because it’s durable, easy to sew, and comes in many colors. Felt also works great for decorative parts like the sun rays.
3. Can I sew it by hand or do I need a sewing machine?
You can do it entirely by hand. A sewing machine just speeds up the process but isn’t necessary.
4. How can I make the pincushion firmer?
Add more fiberfill or use a small piece of sponge inside. This helps maintain the shape and keeps pins steady.
5. Can I wash my pincushion?
Yes, but it’s best to spot-clean it gently with mild soap and let it air dry. Avoid soaking it completely.
6. Can I make different shapes instead of the sun?
Absolutely! Once you learn this technique, you can adapt it to create flowers, hearts, or stars.
Conclusion
Making a pincushion shining like the sun is a joyful and satisfying craft that brightens your workspace and improves your sewing organization. Throughout this step-by-step tutorial, you’ve learned how to select materials, sew the sun shape, add decorative touches, and explore creative uses for your finished pincushion.
This project reminds us that even small handmade items can bring warmth and beauty into our daily lives.
So grab your fabric and thread, let your imagination shine, and enjoy creating your own sunny masterpiece. Don’t forget to leave your sincere opinion and share suggestions for future tutorials—I’d love to know how your bright and beautiful pincushion turned out!