
If you are looking for a fun, creative, and practical crochet project, this Crochet Lily Coaster Step by Step – Step by Step Tutorial is the perfect guide for you. Handmade coasters not only protect your furniture but also add a beautiful, personalized touch to your home décor. This particular crochet lily coaster design brings an elegant floral detail that will impress anyone who sees it. Whether you’re a beginner or an experienced crocheter, following this detailed tutorial will help you craft stunning coasters with ease and confidence.
Crocheting is more than just a hobby—it’s a form of relaxation and self-expression. When you create something like the crochet lily coaster, you combine creativity with practicality. The floral pattern gives your table setting a delicate charm that suits both everyday use and special occasions. Plus, they make wonderful handmade gifts that showcase your skill and attention to detail. Imagine serving drinks to your guests on top of your own crocheted lilies—it’s sure to spark admiration!
In this Crochet Lily Coaster Step by Step – Step by Step Tutorial, you’ll learn how to create this delightful piece from start to finish. We’ll go through the materials you’ll need, the essential stitches, and a step-by-step breakdown of the process. Even if you’ve never tried making a crochet coaster before, this guide will walk you through every step carefully. So, grab your crochet hook and yarn, and let’s begin this creative journey together!
Materials Needed for Crochet Lily Coaster
Before starting your Crochet Lily Coaster Step by Step – Step by Step Tutorial, it’s important to gather all the necessary materials. Having everything ready will make your project smoother and more enjoyable from start to finish.
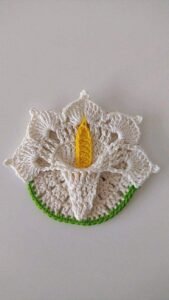
You’ll need cotton yarn in your favorite colors. Cotton is ideal because it absorbs moisture and maintains its shape well. For the lily coaster, you can choose white or pink for the petals, yellow for the center, and green for the leaves. This color combination creates a natural, fresh look that truly stands out.
Next, you’ll need a crochet hook that matches the yarn weight. Typically, a 3.0 mm or 3.5 mm hook works perfectly for medium-weight cotton yarn. Always check the yarn label to confirm the best hook size. Using the correct hook ensures your coaster has the right texture and doesn’t turn out too loose or too tight.
You’ll also need a pair of scissors, a yarn needle for weaving in ends, and a stitch marker if you want to keep track of your rounds easily. These simple tools will make the process organized and neat. Remember that small details like proper finishing can make a big difference in how professional your work looks.
A measuring tape can help ensure your coaster comes out evenly sized, especially if you’re making a set. Keeping your stitches consistent is the key to creating coasters that not only look beautiful but also fit perfectly under cups and glasses.
Finally, keep a comfortable workspace with good lighting. Crocheting small items like coasters requires attention to detail, so a well-lit and cozy area will make the process more enjoyable and relaxing.
Step by Step Instructions for Crochet Lily Coaster
Now that your materials are ready, let’s begin the exciting part of this Crochet Lily Coaster Step by Step – Step by Step Tutorial. Follow these simple yet detailed steps to create your own lovely coaster.
Start with a magic ring and make six single crochets inside it. Pull the ring tight and join with a slip stitch. This forms the base circle for your flower’s center. It’s a common technique in crochet projects that start from the middle, like flowers or mandalas.
In the second round, make two single crochets in each stitch from the previous round. This helps your coaster lay flat and builds a solid foundation. You should have twelve stitches at the end of this round.
For the third round, start shaping the petals. You can chain five, then work one double crochet, one treble crochet, and one double crochet back into the same stitch. Skip one stitch and slip stitch into the next to form the petal’s tip. Repeat this around the circle until you have six petals. The pattern will naturally form a beautiful flower shape.
Once the petals are complete, fasten off the yarn and weave in the ends. Now, switch to your green yarn to add a leaf border. Attach the green yarn behind one of the petals, chain four, and make a half-double crochet into the base of the next petal. Continue this process all around the flower to give it that lovely leaf effect.
To finish your crochet lily coaster, gently block it using a damp cloth or steam to ensure it lies flat and maintains its shape. This step makes a big difference, giving your coaster a clean and polished look that’s ready to use or gift.
Tips and Tricks for a Perfect Lily Coaster
Even though this Crochet Lily Coaster Step by Step – Step by Step Tutorial is simple to follow, there are always small tips that can help you achieve better results. Paying attention to these details will make your coasters look more professional and durable.
First, focus on tension control. Keeping your stitches consistent ensures that all your coasters are the same size and thickness. If your tension is too tight, the coaster might curl; if it’s too loose, it might not hold its shape well.
Another great tip is to use stitch markers, especially if you are a beginner. They help you keep track of where each round begins and ends, preventing mistakes that could affect the symmetry of your flower.
Try to experiment with colors to make your crochet lily coasters unique. You can create sets in various shades—pastel tones for a soft, romantic look, or bright colors for a fun, modern touch. Color combinations can completely change the personality of your project.
Always block your coasters once finished. Blocking enhances the shape and makes your project look neat and professional. It’s a small step that truly elevates your work.
If you plan to sell or gift your coasters, consider adding a label or small tag with your name or brand. It gives your handmade product a personal and professional finish that people love.
Lastly, practice patience. The more you practice crocheting flowers and coasters, the more refined your technique will become. Each piece you make adds to your experience and confidence as a crocheter.
Creative Uses for Crochet Lily Coasters
Once you’ve completed your Crochet Lily Coaster Step by Step – Step by Step Tutorial, you might find yourself wanting to make more. Luckily, these beautiful coasters can be used in many creative ways beyond just holding drinks.
Use them as table decorations for special occasions such as birthdays, weddings, or tea parties. Their floral design adds a delicate and elegant touch to any setting.
You can also use them as wall art by joining several coasters together to form a decorative piece. Simply attach them to a canvas or frame for a creative, handmade display.
Another idea is to make them into gift sets. Combine a few coasters tied with a ribbon, and you’ll have a lovely handmade gift that shows thoughtfulness and care. Handmade gifts always carry a special charm that store-bought ones can’t match.
If you’re into eco-friendly living, these coasters are a perfect sustainable choice. Made from cotton, they are reusable, washable, and biodegradable—making them a planet-friendly craft project.
You can even turn them into ornaments by adding a small loop or string to hang them as seasonal decorations or use them in wreaths. The possibilities are endless when you let your creativity flow.
Finally, if you run a small craft business, crochet lily coasters are great products to sell. They’re quick to make, low-cost, and very popular among handmade home décor lovers.
About Crochet Lily Coaster Step by Step – Step by Step Tutorial
1. Can beginners make the crochet lily coaster?
Yes! This project is suitable for beginners. The stitches used are basic and easy to learn, and the tutorial provides clear step-by-step guidance.
2. What type of yarn should I use?
Cotton yarn is the best choice because it’s durable, absorbent, and easy to clean. It also gives your coaster a smooth and sturdy texture.
3. How long does it take to make one coaster?
On average, one coaster takes about 30 to 45 minutes to complete, depending on your crochet speed and skill level.
4. Can I wash crochet lily coasters?
Yes, they are washable! Hand wash them gently with mild soap and let them air dry flat to maintain their shape and color.
5. What can I do if my coaster curls or won’t lie flat?
If your coaster curls, it’s usually due to tight stitches. You can fix this by gently blocking it with steam or a damp cloth.
6. Can I use different colors for the petals?
Absolutely! Experimenting with colors is part of the fun. Try making a rainbow set or using shades that match your home décor.
7. Do I need to use a specific hook size?
Follow the recommendation on your yarn label. Usually, a 3.0 mm to 3.5 mm hook works best for medium-weight cotton yarn.
Conclusion
This Crochet Lily Coaster Step by Step – Step by Step Tutorial has shown you everything you need to create a stunning, practical, and decorative crochet project. From gathering your materials to mastering each petal and leaf, you’ve learned techniques that will not only help you make coasters but also inspire you to try more floral designs.
Crochet is a relaxing and rewarding hobby, and making your own lily coasters adds a personal touch to your home or handmade gifts. Now it’s your turn—grab your hook, choose your colors, and start crafting your own beautiful crochet lilies today.
If you enjoyed this tutorial, please leave your honest opinion and share your suggestions in the comments below. Your feedback helps improve future projects and inspires other crocheters to join in on the fun! 🌸