
Make this adorable crochet bow-Step by Step Tutorial is a perfect guide for anyone who wants to learn how to make cute, handmade accessories with yarn. Whether you’re a crochet beginner or someone with experience looking for a quick and creative project, this tutorial will show you how to crochet a bow that you can use in many ways — from hair clips and headbands to gift decorations or even as a touch of charm for your home crafts. In this article, we’ll explore all the steps and techniques you need to create your own crochet bow with confidence and style.
Learning how to make this adorable crochet bow-Step by Step Tutorial is not only fun but also a great way to express creativity. Crochet bows are simple yet elegant pieces that can be made in just a few minutes once you master the basics. They are versatile, lightweight, and can be crafted using leftover yarn from previous projects. You can make them in different colors, sizes, and textures to match any outfit or occasion. This tutorial will teach you everything you need to know — from choosing the right materials to finishing your bow beautifully.
Crocheting small items like bows helps you improve your crochet skills, especially when working on shapes, tension, and neat edges. This crochet bow tutorial will cover each step in detail so that even if you’ve never made one before, you’ll be able to follow along easily. We’ll also give some creative ideas on how to use your finished bows. So, let’s begin this Make this adorable crochet bow-Step by Step Tutorial and create something cute, simple, and rewarding!
Materials Needed to Make Your Crochet Bow
To begin this Make this adorable crochet bow-Step by Step Tutorial, you’ll need a few basic crochet supplies. The beauty of this project is that it requires very little material, making it a budget-friendly and beginner-friendly craft. The first thing you’ll need is some yarn. For small bows, lightweight yarn like cotton or acrylic works perfectly. These yarns provide structure without being too bulky, giving your bow a clean, crisp look.
Next, you’ll need a crochet hook that matches the size of your yarn. Most yarn labels include a recommended hook size, so check before starting. A 3.5mm to 4mm hook is typically ideal for medium-weight yarns. If you use thinner yarn, go for a smaller hook to keep your stitches tight and neat. The hook size plays a big role in how firm or soft your bow will be.
You will also need a yarn needle for weaving in the ends, and a pair of sharp scissors to cut your yarn cleanly. These basic tools are essential for achieving a polished and professional finish on your crochet bow. Always keep them close while working.
Optional but helpful tools include stitch markers and measuring tape. Stitch markers are useful if you want to keep track of rows or ensure your bow’s sides are even. A measuring tape can help you maintain consistent size if you’re making multiple bows.
When choosing colors, go for vibrant shades for a playful look or pastel tones for something more delicate. Multicolored yarn can create unique and eye-catching patterns too. The yarn color and texture you select can transform your bow from simple to stunning.
Lastly, you may want to have some embellishments like buttons, beads, or small gems if you want to add extra details to your crochet bow. These accessories can give your creation a personalized touch, making each bow unique.
Step-by-Step Guide to Crochet Your Adorable Bow
Now let’s move into the core of this Make this adorable crochet bow-Step by Step Tutorial. This process is simple and beginner-friendly. Even if you’re new to crochet, you can follow along and create a beautiful bow with just a few steps.
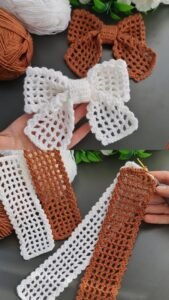
To start, create a slip knot and chain a small number of stitches depending on the size of the bow you want. For a medium bow, chaining about 25–30 stitches is ideal. This will form the base of your bow. Make sure your chain is not too tight, as you’ll be working stitches into it.
Next, work single crochet stitches (sc) across your foundation chain. Once you reach the end, chain one and turn your work. Continue making single crochets for about 5 to 8 rows. This creates a neat rectangle that will later become the body of your bow. Keep your tension even to ensure smooth edges.
Once your rectangle is finished, cut the yarn, leaving a long tail. Thread the tail through your yarn needle and wrap it tightly around the center of the rectangle to form the bow shape. Wrap several times to create a cinched middle, which gives your bow its signature look.
Secure the end of the yarn at the back by tying a small knot and weaving in the remaining ends. Make sure it’s tight enough that the bow keeps its shape but not too tight that it warps. The goal is a nice balance between firmness and flexibility.
If you’d like, you can crochet a small band to wrap around the middle instead of using yarn. This gives the bow a more defined and elegant appearance. To do this, make a short chain of about 10 stitches and work a few rows, then sew it around the center of your bow.
Creative Ways to Use Your Crochet Bow
Now that you’ve learned the main steps in this Make this adorable crochet bow-Step by Step Tutorial, it’s time to explore fun and creative ways to use your bows. One of the most popular options is turning them into hair accessories. Simply attach your finished bow to a hair clip or elastic band using hot glue or needle and thread. You’ll instantly have a stylish and unique hairpiece.
Another cute idea is to use crochet bows for gift wrapping. Instead of using traditional ribbons, try tying your handmade bows around presents. They add a warm, handmade touch that makes any gift extra special. Plus, the receiver can reuse the bow afterward!
You can also use crochet bows as appliqués on clothing, hats, or bags. Sew them onto a baby hat, a tote bag, or even a scarf for a personalized look. The possibilities are endless, and each project can reflect your style and creativity.
If you enjoy home decor, crochet bows make charming embellishments for items like cushions, curtains, and wall hangings. Add them to children’s rooms or nurseries to give a playful, cheerful vibe. They’re lightweight, easy to attach, and make a big visual impact.
For those who love crafting seasonal items, you can create crochet bows in festive colors. Make red and green bows for Christmas, orange and black for Halloween, or pastel colors for Easter. These bows can be part of your decoration or used to adorn handmade gifts.
Finally, crochet bows can be a wonderful item to sell or gift. Handmade crafts have great sentimental value, and a crochet bow can be a quick project to sell at fairs or online stores. With unique colors and combinations, you can turn a simple craft into a small business opportunity.
Tips and Tricks for a Perfect Crochet Bow
Even though this Make this adorable crochet bow-Step by Step Tutorial is simple, there are small details that can elevate your work. The first tip is to always block your finished bow. Blocking helps shape your crochet and gives it a neat, flat finish. Lightly steam or press your bow with a warm iron under a cloth for best results.
Keep your stitches even and consistent throughout. Uneven tension can make one side of the bow larger or more stretched than the other. Practice makes perfect — after making a few bows, your technique will naturally improve.
Try experimenting with different yarn textures. Using velvet yarn makes your bow soft and luxurious, while cotton gives a crisp and structured look. Each material changes the final result dramatically.
Don’t be afraid to mix colors. You can crochet the base of the bow in one color and the center wrap in another for a bold, contrasting design. Color combinations add charm and variety to your creations.
If you’re making multiple bows, consider creating a small pattern reference or template for size consistency. This is especially helpful if you plan to sell or gift them.
Lastly, take your time with finishing touches. Weaving in ends neatly and securing the middle tightly makes all the difference in how professional your crochet bow looks. Attention to these details will make your bows look clean and polished.
Make this adorable crochet bow-Step by Step Tutorial
1. Can beginners make this crochet bow easily?
Yes! This project is perfect for beginners because it uses basic stitches like chain and single crochet. It’s a great way to practice while creating something beautiful.
2. What type of yarn works best for crochet bows?
Cotton yarn is ideal because it holds its shape well. However, acrylic and blended yarns also work if you prefer a softer texture.
3. How long does it take to make one bow?
Typically, it takes about 15–30 minutes depending on your speed and the size of the bow. It’s a quick and satisfying project.
4. Can I make larger bows using this tutorial?
Absolutely! Simply increase the number of chains and rows to make a bigger rectangle before forming the bow.
5. How can I attach my crochet bow to other items?
You can sew it directly onto fabric or glue it to accessories like clips, headbands, or gift wraps.
6. Is this project suitable for kids to try?
Yes, with adult supervision. It’s an easy and safe introduction to crochet crafts for children.
Conclusion
In this Make this adorable crochet bow-Step by Step Tutorial, you’ve learned how to create a simple yet charming crochet bow from start to finish.
From gathering materials to shaping and decorating your bow, every step was designed to help you make something beautiful and personal. These bows are versatile, quick to make, and perfect for adding a handmade touch to everyday items.
We hope this tutorial has inspired you to start creating your own collection of crochet bows in different colors and styles. Don’t forget to share your thoughts and let us know what you think of this project. Leave a sincere opinion and suggestions for future tutorials — your feedback helps inspire new ideas for fellow crochet lovers!