
How to make crochet turkey coasters-Step by Step Tutorial is a fun and creative way to add a handmade, festive touch to your home decor. These adorable turkey-shaped coasters are perfect for Thanksgiving, autumn gatherings, or simply adding a cozy, rustic feel to your table setting. Whether you are an experienced crocheter or a beginner looking for a simple and rewarding project, this tutorial will walk you through everything you need to know to make your own crochet turkey coasters with ease.
Making crochet turkey coasters is not just about crafting—it’s about bringing warmth and creativity to your home. Crocheting these little turkeys can also be a great way to relax and use leftover yarns from previous projects. Each coaster can be personalized with different colors, giving your table a charming, handmade look. Plus, they make wonderful gifts during the holiday season, especially for friends and family who appreciate handmade crafts.
In this How to make crochet turkey coasters-Step by Step Tutorial, you’ll learn how to create the body, feathers, and details of the turkey, combining fun design with practical functionality. These coasters are easy to make, durable, and can protect your furniture from heat or moisture while adding a cute decorative element. Follow along as we explore materials, techniques, and creative ideas to make your own set of turkey coasters that will impress your guests and bring joy to your crafting time.
Materials Needed to Make Crochet Turkey Coasters
To begin this How to make crochet turkey coasters-Step by Step Tutorial, let’s gather all the necessary materials. One of the best things about this project is that you don’t need much to start. You can use leftover yarn, basic crochet tools, and a little creativity to achieve beautiful results.
The most important material is the yarn. Choose 100% cotton yarn, as it’s absorbent and durable—perfect for coasters. Cotton also holds its shape well and is easy to clean. Select warm, autumn-themed colors such as brown, orange, red, yellow, and beige to reflect the turkey’s natural tones and the cozy feel of Thanksgiving.
Next, you’ll need a crochet hook that matches your yarn size. A 3.5mm or 4mm hook usually works great for medium-weight cotton yarn. Using the correct hook ensures that your stitches are tight and the coaster lays flat, preventing wobbling or curling.
Other essential tools include a yarn needle for sewing the parts together and weaving in the ends, and a pair of sharp scissors for cutting the yarn cleanly. Keeping your tools organized and within reach will make the process much smoother and enjoyable.
You may also want a few stitch markers to help you track your rounds, especially if you’re new to crocheting in circles. Stitch markers help prevent mistakes and make your work look neat and symmetrical.
Finally, if you want to add extra detail, consider using safety eyes or embroidery thread for the eyes and beak. Small embellishments like felt or buttons can also bring personality and life to your turkey coasters, making them even more unique.
Step-by-Step Instructions to Crochet Turkey Coasters
Now that you have your materials ready, let’s dive into the core of this How to make crochet turkey coasters-Step by Step Tutorial. Don’t worry if you’re new to crochet—this pattern is simple and easy to follow, and you’ll have fun making it from start to finish.
Start by making the turkey body, which will also serve as the base of your coaster. Begin with a magic ring and make six single crochets (sc) into it. Pull the ring tight to close, then continue increasing each round by adding one extra stitch between increases. For example, the second round will have 12 stitches (2 sc in each), the third round 18, and so on until your circle reaches the desired coaster size—about 4 to 5 inches in diameter.
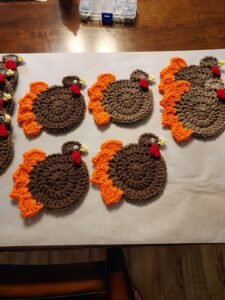
Once the base is ready, you’ll create the turkey feathers. These are made by working a combination of half double crochets (hdc), double crochets (dc), and treble crochets (tr) along the edge of the coaster using different yarn colors. Alternate between warm shades like orange, yellow, and red to create a layered feather effect. These stitches form the beautiful “fan” that represents the turkey’s tail.
Next, make the head of the turkey. Start with a small circle using brown yarn—just like you did for the body but smaller. Once the head is finished, sew or crochet it onto the upper part of the coaster. Make sure it’s centered so your turkey looks balanced.
After that, it’s time to add facial details. Use yellow yarn or embroidery thread to create a small beak, and red yarn to make the turkey’s wattle (the hanging part under its beak). You can embroider or sew these details directly onto the head. Add safety eyes or use black thread to make small stitches for eyes, giving your turkey its adorable expression.
Finally, weave in all yarn ends neatly using your yarn needle. Flatten your coaster gently with your hands to shape it evenly. You can lightly steam it or block it if needed to ensure it stays flat and round. Your crochet turkey coaster is now complete and ready to use!
Creative Ideas for Using Your Crochet Turkey Coasters
Now that you’ve learned How to make crochet turkey coasters-Step by Step Tutorial, it’s time to think of creative ways to use them. These little turkeys are not only practical but also make wonderful decorations and gifts. Here are a few fun ideas to get you inspired.
First, use them as table decorations during Thanksgiving dinner. Place one under each cup, glass, or plate to add a festive and personal touch to your table setting. Guests will love the handmade detail and appreciate your creative effort.
You can also turn these coasters into holiday gifts. Handmade presents are thoughtful and meaningful. Bundle a few coasters together with a ribbon and a small thank-you note for friends, neighbors, or coworkers. It’s a simple yet charming gift idea that’s sure to be appreciated.
Another idea is to use your crochet turkeys as ornaments or wall hangings. Simply attach a small loop of yarn to the top and hang them on your kitchen wall, or use them as decorations around your home during the fall season. Their warm colors will make your space feel cozy and inviting.
For crafters who enjoy personalization, try making custom variations of your turkey coasters. Experiment with different yarn textures, mix bright colors, or even add small embellishments like beads or embroidery details. Each coaster can reflect your personal style.
If you’re into selling handmade crafts, these turkey coasters can be a great market item. They’re quick to make, use minimal materials, and are perfect for seasonal fairs and online stores. Their cheerful appearance makes them appealing to customers looking for unique handmade decor.
Lastly, crochet turkey coasters can also be a fun family project. If you have kids or relatives who enjoy crafts, you can involve them in choosing colors or helping with simple steps. It’s a fun and meaningful activity to share together during the holidays.
Tips for a Perfect Crochet Turkey Coaster
Even though How to make crochet turkey coasters-Step by Step Tutorial is beginner-friendly, a few extra tips can help your project turn out beautifully every time. Paying attention to small details will make your coasters look professional and long-lasting.
First, make sure your stitches are consistent. Even tension throughout the coaster ensures that it lays flat and keeps its shape. Uneven stitches can cause it to curl or look uneven.
When changing colors for the feathers, secure your yarn ends tightly. You can weave them in as you go or use a yarn needle afterward. This keeps the back of your coaster neat and prevents unraveling.
If you want your coaster to be more durable, consider adding a second layer. Simply make another round base of the same size and stitch it to the back. This gives extra thickness and makes it more absorbent for hot or cold drinks.
Experiment with color placement to achieve different looks. For instance, start the feathers with lighter colors in the middle and darker shades toward the edges for a gradient effect.
To ensure your coaster stays flat, block your finished piece. Lightly steam or press it using a damp cloth over the surface. Blocking helps relax the yarn fibers and gives a polished appearance.
Lastly, remember to enjoy the process. Crochet is not just about the final product—it’s about relaxing, expressing creativity, and taking pride in handmade art.
How to make crochet turkey coasters-Step by Step Tutorial
1. Are crochet turkey coasters beginner-friendly?
Yes! This project is perfect for beginners. It uses basic stitches like single crochet, half double crochet, and double crochet.
2. What type of yarn is best for turkey coasters?
Cotton yarn is the best choice because it’s durable, absorbent, and easy to wash.
3. How long does it take to make one crochet turkey coaster?
It usually takes about 30–45 minutes, depending on your skill level and speed.
4. Can I wash my crochet turkey coasters?
Yes, you can hand wash or machine wash them on a gentle cycle. Lay flat to dry to maintain their shape.
5. Can I use different colors for my turkeys?
Absolutely! Feel free to experiment with color combinations to match your decor or the season.
6. How many coasters should I make for a set?
Typically, a set of four or six is ideal for a dining table, but you can make as many as you like.
Conclusion
In this How to make crochet turkey coasters-Step by Step Tutorial, we’ve explored how to create these adorable and practical coasters from start to finish.
You learned about the materials, stitches, and creative ways to use them for decorating or gifting. This simple crochet project brings warmth, personality, and handmade charm to your home.
Now that you know how to make your own crochet turkey coasters, it’s time to grab your hook, pick your favorite yarn colors, and start crafting! We hope this tutorial has inspired you to create something special for your next celebration. Don’t forget to leave your sincere opinion and suggestions below—we’d love to hear your thoughts and ideas for future crochet projects!