
When winter arrives, few things are more charming than handmade decorations that capture the magic of the season. In this Learn How to Crochet a Snowman – Step by Step Tutorial, you’ll discover an easy and enjoyable way to create your very own snowman using yarn and a crochet hook. This project is perfect for beginners, families, and anyone who loves to crochet adorable seasonal crafts. With just a few basic materials and a bit of creativity, you can make a cute snowman that adds warmth and character to your home during the holidays.
Creating a crochet snowman is not only a fun hobby but also a wonderful way to give personalized gifts. Imagine gifting a soft, handmade snowman to a friend or placing a few around your home for winter décor. This Learn How to Crochet a Snowman – Step by Step Tutorial will guide you through the process from start to finish — including choosing the right yarn, shaping the snowman’s body, assembling the parts, and adding the final adorable details.
The beauty of this pattern lies in its versatility. Whether you’re making a simple snowman for a child’s toy collection or a decorative piece for your mantel, this guide will help you succeed. Using simple stitches and easy-to-follow instructions, you’ll be amazed at how quickly your crochet snowman comes to life. Let’s begin this creative journey and bring a little piece of winter magic into your hands.
Materials and Tools Needed
Before starting this Learn How to Crochet a Snowman – Step by Step Tutorial, it’s important to gather all your materials. Having everything ready makes the process smoother and more enjoyable.
Start with the most important item: yarn. White yarn is used for the snowman’s body, but you can add colorful accents such as red for the scarf, black for the hat, and orange for the carrot nose. Acrylic yarn works well for this project because it holds its shape and is soft to the touch. Choose a medium-weight yarn for a standard-size snowman.
Next, select an appropriate crochet hook. A size 3.5 mm or 4.0 mm hook is ideal for most yarn types used in amigurumi projects. Make sure your hook feels comfortable in your hand since you’ll be working with small, tight stitches.
You’ll also need some stuffing material to fill your snowman and give it its round shape. Polyester fiberfill is perfect because it’s lightweight and easy to work with. Don’t forget to have a yarn needle for sewing parts together and weaving in loose ends.
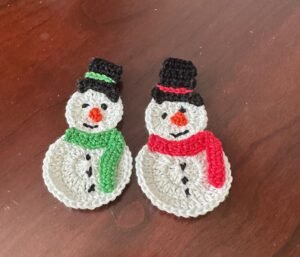
Other small accessories can make your snowman extra special. You can use small buttons for the front of the snowman, safety eyes or black yarn for the eyes, and a tiny piece of felt or yarn for the mouth. Finally, a bit of red or blue yarn will make a cozy scarf that completes the snowman’s winter look.
Once all these tools and materials are ready, you’re all set to begin crocheting your adorable snowman. Preparation is key — it ensures a smooth and stress-free crafting experience.
Step-by-Step Instructions to Crochet the Snowman
Now that you’ve gathered your materials, let’s dive into the fun part of this Learn How to Crochet a Snowman – Step by Step Tutorial. Follow each step carefully, and soon you’ll have a cute handmade snowman to admire.
Start by crocheting the snowman’s head. Begin with a magic ring and make six single crochets (sc) inside it. In the next few rounds, increase evenly to form a small sphere. As you go, gently stuff the head with fiberfill to keep it firm and round. Continue until it reaches the desired size, then set it aside.
Next, crochet the body. This part is slightly larger than the head, so you’ll need to add more rounds and increases. Start again with a magic ring, build the base, and expand the number of stitches evenly. As you near the top of the body, begin decreasing to give it a rounded shape. Fill it firmly with stuffing to maintain structure.
Once both the head and body are done, it’s time to join them together. Use your yarn needle and white yarn to sew the pieces securely, making sure they align well. Adjust the stuffing if necessary to keep your snowman’s shape balanced.
After assembling the main structure, it’s time to add the snowman’s features. Use black yarn to embroider two small eyes or attach safety eyes. Then, make a small orange cone-shaped nose by crocheting a few stitches into a narrow triangle and sewing it in place. Add a smile with a few short black stitches.
For the arms, you can crochet two thin tubes using brown yarn or use small twigs for a rustic look. Attach them to the sides of the snowman’s body. Finally, crochet a small scarf using any color you like — a simple row of single crochets will do. Wrap it around the snowman’s neck, and you’re done with the main design!
Creative Variations and Personal Touches
This part of the Learn How to Crochet a Snowman – Step by Step Tutorial is where your creativity can truly shine. There are endless ways to personalize your snowman, making each creation unique and full of charm.
You can start by experimenting with different yarn textures. A fluffy or sparkly yarn can give your snowman a frosty, wintery look, while cotton yarn offers a smoother finish. Mixing textures adds depth and visual interest.
Try creating different sizes of snowmen for a cute family set. Make one large snowman and two smaller ones to resemble a cheerful snow family. They look beautiful as Christmas decorations or gifts for loved ones.
You can also add colorful accessories such as hats, scarves, or mittens. Crochet a small top hat using black yarn or a beanie with stripes for a cozy touch. The more details you include, the more personality your snowman will have.
For a festive theme, add holiday embellishments like mini bells, snowflakes, or even a small crochet broom. These details make your snowman stand out as a decorative piece during the holidays.
If you love crafting with kids, encourage them to choose their own colors for the accessories. This makes the activity more engaging and personal, while helping them learn basic crochet skills.
Lastly, consider turning your snowman into an ornament by adding a loop of yarn on top. Hang it on your Christmas tree, or use it as a cute gift topper. This simple touch transforms your crochet creation into a meaningful keepsake.
Finishing Touches and Maintenance Tips
As you reach the final stage of this Learn How to Crochet a Snowman – Step by Step Tutorial, let’s talk about how to finish your project neatly and take care of it so it lasts for many seasons.
Before you declare your snowman complete, make sure all parts are securely sewn. Tug gently on the arms, nose, and accessories to ensure they won’t come loose over time. Reinforce any weak spots with a few extra stitches.
Take a moment to shape your snowman properly. Adjust the stuffing inside so the body and head look balanced and smooth. Sometimes a gentle roll between your hands helps to even out the fiberfill and give the snowman a perfect roundness.
Next, consider adding light embellishments. You can sew on small buttons for the snowman’s front, embroider snowflake details, or even attach a tiny pom-pom to its hat. Simple decorations can bring your snowman to life.
For long-lasting results, store your snowman carefully during off-season months. Keep it in a cool, dry place away from direct sunlight to prevent the yarn from fading. Place it in a soft cloth bag or box to protect it from dust.
If your snowman gets a little dusty, clean it gently with a lint roller or a soft brush. Avoid washing it in water unless absolutely necessary, as moisture can damage the stuffing or distort the shape.
Finally, if you’re making multiple snowmen as gifts, add a personal tag or message to each one. This thoughtful gesture turns your handmade snowmen into heartfelt presents that will be cherished for years.
Learn How to Crochet a Snowman
1. Is this crochet snowman suitable for beginners?
Yes! This Learn How to Crochet a Snowman – Step by Step Tutorial is designed for all skill levels. Even beginners can follow the instructions easily, as it uses basic stitches like single crochet and simple increases.
2. What type of yarn should I use?
Acrylic yarn is ideal because it’s affordable, durable, and comes in many colors. Cotton yarn can also be used if you prefer a firmer texture.
3. How long does it take to make a crochet snowman?
On average, it takes about 3–4 hours to complete one snowman, depending on your speed and the size you choose.
4. Can I make my snowman bigger or smaller?
Absolutely! You can adjust the number of rounds in the head and body to make different sizes. Larger hooks and thicker yarn create bigger snowmen, while smaller ones are perfect as ornaments.
5. What if I don’t have safety eyes?
You can easily embroider eyes using black yarn or sew on small black buttons for an equally cute look.
6. Can I sell my finished crochet snowmen?
Yes, as long as it’s your handmade work, you can sell them at craft fairs or online. Just remember to take beautiful photos and describe your snowmen clearly.
Conclusion
Making a snowman from yarn is a joyful way to celebrate winter and creativity. In this Learn How to Crochet a Snowman – Step by Step Tutorial, you’ve learned how to gather materials, crochet each part, assemble your snowman, and personalize it with fun accessories. Every detail, from the carrot nose to the tiny scarf, adds charm and warmth to your handmade creation.
This project proves that even simple crochet stitches can create something magical and meaningful. Whether you make one snowman or a whole family of them, each will bring smiles and cozy holiday cheer.
Now that you’ve completed this tutorial, we’d love to hear from you! Please share your honest opinions and suggestions — tell us what you enjoyed most or what other crochet tutorials you’d like to see next. Your feedback helps inspire more creative projects for everyone to enjoy! ⛄💙