
If you have ever wanted to create a beautiful and delicate accessory with your own hands, this How to make a crochet earring – Step by Step Tutorial is the perfect place to start. Crochet earrings are not only stylish but also allow you to express your creativity in a unique way. They make wonderful handmade gifts, or you can even sell them as part of a small business. This tutorial will walk you through each step with clear and friendly guidance so you can craft your own stunning pair of crochet earrings effortlessly.
Crochet earrings are versatile and can be made using different yarn colors, bead accents, and shapes to match any outfit or occasion. By following this How to make a crochet earring – Step by Step Tutorial, you’ll learn how to combine simple crochet stitches to produce elegant designs that look professional. Even if you are a beginner, you’ll find this guide approachable and easy to follow. The key is patience, attention to detail, and enjoying the creative process.
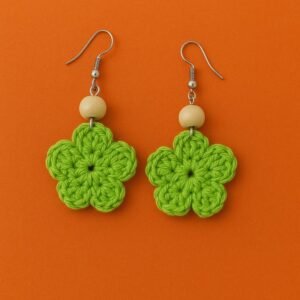
One of the best things about crochet earrings is how little material they require. With just a small amount of yarn or thread, a crochet hook, and earring hooks, you can create lightweight and fashionable accessories that catch everyone’s eye. This How to make a crochet earring – Step by Step Tutorial will show you how to craft earrings that are not only beautiful but also durable. Once you understand the basics, you can experiment with different shapes such as hearts, flowers, or geometric designs to suit your personal style.
Materials Needed for Crochet Earrings
Before we start crocheting, it’s important to gather all the materials required for this How to make a crochet earring – Step by Step Tutorial. Having everything ready will make the process smoother and more enjoyable. The good news is that crochet earrings require very few supplies, most of which you may already have if you enjoy crafting.
First, you’ll need a lightweight yarn or crochet thread. Cotton thread is an excellent choice because it gives your earrings a neat and delicate finish. Next, choose a small crochet hook that matches the thickness of your yarn; size 1.5 mm or 2.0 mm usually works well. You’ll also need earring hooks or studs, which can be easily attached to your finished crochet pieces using jewelry pliers.
A small pair of scissors and a yarn needle will come in handy for trimming and weaving in the ends. Some people like to add beads or small charms to their crochet earrings for extra sparkle and personality. You may also consider using fabric stiffener or a mixture of water and glue to make your earrings more rigid and maintain their shape. Having all these materials ready ensures that your How to make a crochet earring – Step by Step Tutorial runs smoothly from start to finish.
Once your materials are gathered, it’s a good idea to prepare a comfortable workspace. Good lighting and a clean surface will help you see your stitches clearly. Make sure to wash your hands before handling your yarn to keep your work looking neat. Remember, crochet is not just about making something pretty—it’s also about enjoying the peaceful and creative process.
With your tools in place, you’re ready to start crocheting. This How to make a crochet earring – Step by Step Tutorial will take you step by step through creating a simple yet elegant earring pattern. Don’t worry if your first pair isn’t perfect; with practice, your skills will improve quickly.
Step-by-Step Guide to Making Crochet Earrings
Now that we have everything we need, let’s begin this exciting How to make a crochet earring – Step by Step Tutorial. We’ll start with a simple circular design, which is perfect for beginners and can easily be adapted to more complex styles.
Start by making a slip knot and chaining four stitches. Then, join the chain with a slip stitch to form a small ring. This ring will serve as the base of your earring. Inside this ring, crochet twelve double crochets (or single crochets if you prefer a tighter look). Join the round with a slip stitch at the end.
In the next round, increase the number of stitches by crocheting two stitches into each stitch from the previous round. This will make your circle larger and give it a flat, even shape. If you want your earrings to be slightly bigger, you can continue to add more rounds, increasing evenly as you go.
Once you’ve reached the desired size, fasten off the yarn and weave in the ends neatly. To attach the earring hook, simply use your yarn needle or pliers to thread the hook through one of the stitches at the top of your circle. Make sure it’s secure so it won’t fall off.
If you’d like, you can decorate your earring by sewing on beads or tiny pearls around the edge. This adds an elegant touch and makes your earrings stand out even more. Finally, you can apply a small amount of fabric stiffener to help your earrings hold their shape.
Remember that the most important part of this How to make a crochet earring – Step by Step Tutorial is to have fun while creating. Don’t worry if your stitches aren’t perfect; what matters is the effort and the love you put into your handmade piece.
Creative Variations and Style Ideas
One of the great things about this How to make a crochet earring – Step by Step Tutorial is that once you learn the basics, you can customize your designs endlessly. The pattern can be modified to create various shapes, such as hearts, flowers, stars, or even teardrops.
Try using metallic or multicolored threads for a more festive look. You can also play with size—larger earrings make a bold statement, while smaller ones are elegant and subtle. Experimenting with different colors will help you create earrings that complement any outfit.
If you want to make your earrings even more special, add small embellishments. Beads, sequins, or crystals can be worked into the stitches as you crochet or sewn on afterward. This is an excellent way to give your earrings a touch of sparkle.
You can also make matching sets with necklaces or bracelets using the same design. This way, your handmade jewelry will look coordinated and stylish. Handmade crochet earrings make perfect gifts for birthdays, holidays, or even as bridesmaid accessories.
Another creative idea is to make seasonal designs. For example, use red or pink for Valentine’s Day, green and gold for Christmas, or pastel shades for springtime. Each color scheme brings a different personality to your earrings.
By following this How to make a crochet earring – Step by Step Tutorial, you’ll gain the skills and confidence to explore countless design variations and express your creativity through every stitch.
Care Tips and Finishing Touches
Once you’ve completed your beautiful earrings using this How to make a crochet earring – Step by Step Tutorial, it’s essential to know how to take care of them. Proper maintenance will ensure that your handmade jewelry lasts for years and continues to look beautiful.
To clean crochet earrings, gently wipe them with a damp cloth and let them air dry. Avoid soaking them in water, especially if they have metal hooks or added beads. You can also store them in a jewelry box or hang them on a holder to prevent tangling.
If your earrings lose their stiffness, you can reapply a thin layer of fabric stiffener. This will help them maintain their shape and look fresh again. Make sure to let them dry completely before wearing.
It’s also a good idea to keep your earrings away from perfumes or lotions, as these can damage the yarn or thread. When traveling, store them in a small pouch to protect them from being crushed.
Crochet earrings are delicate, so treat them with care and love—just as you did while making them. Following these simple tips ensures that the effort you put into your How to make a crochet earring – Step by Step Tutorial continues to shine through every time you wear them.
Lastly, always feel free to experiment. Try new patterns, mix textures, or create sets that reflect your unique taste. The art of crochet is endless, and each piece you create tells a story of patience and passion.
FAQ
1. What materials do I need to make crochet earrings?
You’ll need lightweight yarn or thread, a small crochet hook, earring hooks, scissors, a yarn needle, and optional beads or charms.
2. Can beginners make crochet earrings?
Absolutely! This How to make a crochet earring – Step by Step Tutorial is designed to be beginner-friendly, with easy stitches and clear instructions.
3. How long does it take to make a pair of crochet earrings?
On average, it takes about 30 minutes to one hour, depending on the complexity of your design and your crochet speed.
4. How do I make my earrings stiff enough to hold their shape?
You can apply fabric stiffener or a water-glue mixture to your finished earrings and let them dry flat.
5. Can I wash my crochet earrings?
It’s best to gently wipe them clean with a damp cloth instead of soaking them, especially if they contain metal parts.
6. What are the best threads to use for crochet earrings?
Cotton thread is ideal because it’s durable, lightweight, and holds its shape beautifully.
Conclusion
In this How to make a crochet earring – Step by Step Tutorial, we’ve explored everything from gathering your materials to crafting and styling your own crochet earrings. You’ve learned the basic stitches, creative variations, and how to care for your finished pieces. Handmade crochet earrings are a delightful way to express your creativity and add a personal touch to your accessories.
Now that you’ve completed this tutorial, it’s your turn to bring your unique ideas to life. Whether you make them for yourself, as gifts, or to sell, each pair carries a special charm. We hope this guide inspires you to keep experimenting and improving your crochet skills.
If you enjoyed this How to make a crochet earring – Step by Step Tutorial, please share your honest opinion and suggestions below. Your feedback helps us continue creating helpful and inspiring tutorials for crochet lovers like you.