
When the holiday season arrives, it’s the perfect time to get creative and fill your home with handmade decorations. One of the most beautiful and festive crafts you can make is a Crochet Christmas Tree – Step by Step Tutorial. This project is ideal for beginners and experienced crocheters alike, offering a fun and rewarding experience that results in a stunning Christmas centerpiece. Whether you want to decorate your home, give a thoughtful handmade gift, or sell your creations, this crochet Christmas tree will capture everyone’s heart.
Making a crochet Christmas tree is not only a joyful way to celebrate the season but also an eco-friendly and reusable alternative to store-bought decorations. You can customize it in endless ways—by changing the yarn colors, adding ornaments, or even making an entire collection of trees in different sizes. Each one becomes a charming piece of art that brings warmth and holiday cheer to any space. It’s a great project for families, as even children can help decorate the finished trees.
In this step-by-step tutorial, you’ll learn how to crochet a Christmas tree from start to finish, including choosing materials, understanding the stitches, shaping the tree, and adding festive embellishments. The instructions are simple, detailed, and designed to help you create something truly special. Get ready to immerse yourself in the magic of crochet and make this Christmas extra memorable with your own handmade touch.
Materials and Preparation for the Crochet Christmas Tree
Before starting your Crochet Christmas Tree – Step by Step Tutorial, you’ll need to gather all your materials. The great thing about this project is that it doesn’t require much—just basic crochet supplies and your imagination. For this project, you’ll need green yarn (or any color of your choice), a crochet hook that matches the yarn weight, scissors, a yarn needle, and some small decorations like beads, ribbons, or sequins to give your tree that festive sparkle.
When selecting yarn, choose one that has good texture and structure. Cotton yarn provides a neat, crisp look, while acrylic yarn gives your tree a softer, fluffier appearance. You can also mix different shades of green to create a realistic and dimensional effect. Metallic or glitter yarns work beautifully if you want a shimmering Christmas glow.
The crochet hook size will depend on your yarn thickness. If you use thinner yarn, choose a smaller hook for tighter stitches. For thicker yarn, use a larger hook for a chunkier and faster project. Always check the label on your yarn for recommendations, but remember—tight stitches make your tree stand sturdier.
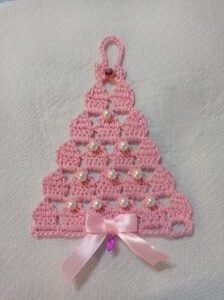
You’ll also need stuffing material if you want your crochet Christmas tree to be 3D and stand upright. Fiberfill works perfectly for this purpose. Alternatively, you can make a flat version for wall decorations, garlands, or Christmas cards. Both versions look equally beautiful and festive.
Lastly, before you start crocheting, prepare your working area. Have good lighting, a comfortable chair, and keep your materials organized. Crocheting is relaxing and meditative, so setting up a cozy workspace will help you enjoy the process even more.
Step by Step Tutorial: How to Crochet the Christmas Tree
Now, let’s get into the Crochet Christmas Tree – Step by Step Tutorial itself. Start by making a magic ring. This technique is commonly used in amigurumi and helps create a tight, closed center for the base of your tree. Once your magic ring is ready, crochet six single crochets into it and pull it tight. This forms the foundation of your Christmas tree.
Next, begin increasing in each round to shape the base. In the second round, make two single crochets in each stitch (for a total of 12 stitches). In the third round, crochet one single crochet in the first stitch, then two in the next—repeat this pattern around the circle. Continue increasing gradually until your circle reaches the desired base width.
Once your base is ready, it’s time to start forming the cone shape. To do this, you’ll crochet in continuous rounds without increasing anymore. The tree will start to narrow naturally as you crochet upward. Keep working in single crochets, round after round, until the height of your tree feels right. You can adjust it depending on whether you want a tall, slender tree or a short, cute one.
If you want your tree to stand upright, stop when you reach the top and stuff it lightly with fiberfill. Then, close the top by making single crochet decreases in each round until it’s completely closed. If you’re making a flat version, simply crochet two identical triangles and join them together with single crochets around the edges, leaving an opening for stuffing before sealing it.
Now for the fun part—decorating your crochet Christmas tree! You can crochet tiny ornaments like stars, balls, or candy canes, or use small beads and sequins to mimic Christmas lights. A golden star on top completes the look perfectly. This step is where your creativity can truly shine.
Decorating and Personalizing Your Crochet Christmas Tree
The decorating stage is what truly brings your Crochet Christmas Tree – Step by Step Tutorial to life. There are countless ways to make your tree unique and festive. Whether you prefer a minimalist style or love colorful and shiny decorations, every choice you make adds personality to your project.
One simple yet charming idea is to crochet miniature garlands using metallic thread or contrasting yarn colors. You can chain-stitch a long string and wrap it around your tree in a spiral. This adds movement and texture, making your tree look lively and elegant.
Adding small crochet ornaments is another fun option. You can crochet mini stars, bells, hearts, or snowflakes and attach them with a needle. For extra sparkle, sew small beads or pearls between the branches. They’ll catch the light beautifully and give your tree a magical touch.
If you’re gifting your crochet tree, consider personalizing it. You can embroider initials, attach tiny name tags, or use the recipient’s favorite colors. Handmade gifts carry special meaning, and these thoughtful details make them unforgettable.
Don’t forget the tree topper—it’s the crown of your creation. A crocheted star, angel, or bow can make your project stand out. You can even add a small loop at the top if you want to hang it as an ornament on your real Christmas tree.
Finally, arrange your crochet trees in different sizes to create a charming display. A set of three—small, medium, and large—looks wonderful on shelves, mantels, or as a festive centerpiece. You’ll find that these little trees instantly fill your home with holiday spirit.
Tips for Selling or Gifting Crochet Christmas Trees
Once you finish this Crochet Christmas Tree – Step by Step Tutorial, you’ll likely want to share your creations. Handmade crochet trees are perfect for selling at local craft fairs or online markets, as they appeal to people who love unique, handmade holiday décor.
To make your products more appealing, focus on presentation. Package your crochet Christmas trees in clear wrapping with a festive ribbon or tag. Add a handwritten note or a small thank-you card to make each purchase feel personal and special. Presentation plays a huge role in attracting customers.
If you’re selling online, take clear, bright photos from different angles. Show how your trees look in real holiday settings—next to candles, gifts, or garlands. People love to imagine how handmade items will look in their homes.
You can also create themed collections. For example, make trees inspired by winter colors—white, silver, and blue—or create a rustic collection using brown, beige, and green tones. Limited editions and themed collections often encourage buyers to purchase multiple items.
For gifting, consider pairing your crochet tree with other handmade items like crochet snowflakes, coasters, or stockings. These sets make wonderful presents that show care and creativity. Recipients will treasure them for years to come.
And if you’re crocheting with kids or friends, make it a fun group activity! Everyone can create their own version of a crochet Christmas tree. It’s a beautiful way to spend quality time together during the holidays while spreading joy and creativity.
FAQ
1. Is this Crochet Christmas Tree suitable for beginners?
Yes, this Crochet Christmas Tree – Step by Step Tutorial is beginner-friendly. The stitches are basic, and the steps are easy to follow.
2. What type of yarn works best for this project?
You can use cotton, acrylic, or even glitter yarn. Choose based on your desired texture—cotton gives structure, while acrylic gives softness.
3. How long does it take to make one tree?
It usually takes about 1–2 hours for a small tree, depending on your skill level and design complexity.
4. Can I make the tree without stuffing?
Yes, you can make a flat version for hanging or garlands. Just skip the stuffing step and sew the two sides together.
5. How do I keep the tree upright?
Stuff it firmly with fiberfill and place a small weight at the base, such as a flat stone or a few pebbles wrapped in fabric.
6. Can I wash my crochet Christmas tree?
Yes, gently hand wash it with mild soap and cold water, then let it air dry completely to maintain its shape.
7. Is it possible to sell crochet Christmas trees online?
Absolutely! They are popular holiday items, especially when beautifully photographed and well-presented.
Conclusion
Creating a Crochet Christmas Tree – Step by Step Tutorial is one of the most enjoyable and rewarding holiday projects you can do. It combines creativity, craftsmanship, and the festive spirit of Christmas all in one. Whether you’re making them for yourself, for loved ones, or to sell, each crochet tree becomes a symbol of warmth, joy, and handmade love.
Through this tutorial, you’ve learned how to choose materials, crochet the structure, decorate it beautifully, and even turn your craft into a small business opportunity. The possibilities for personalization and creativity are endless.
Now it’s your turn to pick up your crochet hook and start creating your own festive magic! I’d love to hear your thoughts—share your honest opinion and suggestions about this tutorial. Did you enjoy making your crochet Christmas tree? Your feedback inspires others and helps keep the Christmas spirit alive all year round!