
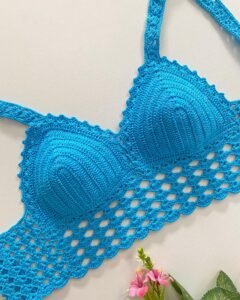
If you have ever wanted to create a handmade and stylish gift that brings a smile to someone’s face, you’ll absolutely love this project. In this I made this crochet crop top for my niece and she loved it – Step by Step Tutorial, I’ll show you how to craft a beautiful, trendy crop top that is not only fun to make but also easy enough for beginners. Crochet crop tops are timeless pieces that combine creativity, comfort, and personal touch, making them perfect for gifts, personal use, or even small business ideas.
When I first decided to make this project, I wanted something youthful, lightweight, and versatile that my niece could wear during the summer. The best part about this crochet crop top is that it requires minimal materials and can be customized with different colors, yarn textures, and decorative details. Whether you prefer a classic look or a more modern boho style, this Step by Step Tutorial will guide you through everything you need to know to achieve a stunning result.
Making this crochet crop top reminded me of how rewarding handmade creations can be. Watching my niece’s excitement when she tried it on was priceless! With this I made this crochet crop top for my niece and she loved it – Step by Step Tutorial, I’ll help you experience that same joy. So, grab your crochet hook, choose your favorite yarn color, and get ready to make something beautiful, functional, and heartfelt.
Materials and Preparation
Before diving into crocheting, it’s essential to have all the right materials ready. The success of this crochet crop top largely depends on choosing suitable yarn and hook sizes. For this project, a medium-weight cotton yarn works best. Cotton is breathable, comfortable, and ideal for warm weather. You’ll also need a 4 mm crochet hook, scissors, measuring tape, and a yarn needle for finishing touches.
Start by measuring the bust area of the person you are making the crop top for. This ensures the top fits perfectly. One of the advantages of this Step by Step Tutorial is that it allows for easy customization — whether you’re making it for a child, teen, or adult. Take note of the measurements because they’ll guide you through each stage of your work.
Color choice plays a big role in the final look of your crop top. I used soft pastel shades to give it a gentle and feminine touch, but you can go bold with bright or gradient yarns if that fits your style. The versatility of this crochet crop top pattern means you can adapt it for any occasion.
Next, make a small swatch to check your gauge. This step ensures that your stitches match the measurements correctly. It might seem unnecessary, but it helps prevent your top from ending up too tight or too loose. Once your gauge is perfect, you’re ready to begin the base chain.
Remember to keep your tension consistent throughout the project. Consistent tension ensures a neat and professional finish. If your stitches are too tight, the fabric will feel stiff, while loose stitches may make it saggy. Practice a few rows until you feel confident.
Lastly, organize your workspace before starting. A clean, well-lit area helps you stay focused and enjoy the process. Having everything you need nearby — yarn, hook, scissors — will make your I made this crochet crop top for my niece and she loved it – Step by Step Tutorial even smoother.
Step by Step Instructions
Begin by creating a foundation chain that matches the bust measurement. This chain will form the base of your crop top. Ensure it’s not too tight, as it needs to stretch slightly for comfort. Once you’ve made the chain, join the ends with a slip stitch to form a circle. This circular base will be the body of your crochet crop top.
Work single crochet stitches for the first few rows to create a stable edge. After that, switch to double crochet or half double crochet stitches for the body. These stitches provide flexibility and allow the top to drape beautifully. If you want to add a textured look, alternate between double crochet and shell stitches in each row.
As you continue crocheting, stop occasionally to check the fit. One of the benefits of this Step by Step Tutorial is that you can adjust the pattern as you go. If the top feels too short, add more rows. If it’s too long, you can easily remove a few stitches before finishing.
Once you reach the desired length, it’s time to work on the straps. Crochet two chains of equal length and attach them to the front and back of the top using slip stitches. Make sure they are symmetrical. You can choose between halter-style straps or regular shoulder straps, depending on your preference.
To enhance the design, consider adding small decorative touches such as scalloped edges, picot trims, or even small flower appliques. These details make your crochet crop top stand out and give it a unique personality.
After finishing the body and straps, weave in all loose ends using a yarn needle. This not only makes your work look tidy but also prevents unraveling. Your handmade crop top is now almost ready to wear!
Customizing Your Crochet Crop Top
One of the best parts of this I made this crochet crop top for my niece and she loved it – Step by Step Tutorial is how customizable it is. You can adjust it to fit any age or body type simply by modifying the foundation chain and number of rows. If you’re making it for a child, use finer yarn and a smaller hook to achieve a delicate texture. For adults, thicker yarn will make the project faster and give a bolder look.
Play with color combinations to make your crop top unique. Try using gradient yarn for a beautiful ombre effect or alternate two contrasting colors for a striped pattern. You can also add beads or buttons to give your design extra charm. Creativity has no limits when it comes to crochet!
If you want to create a boho-inspired crop top, use fringe details at the bottom. Crochet a few extra strands of yarn and attach them evenly along the lower edge. The result is a playful, festival-ready style that pairs perfectly with high-waisted jeans or skirts.
Another idea is to make a matching accessory, such as a crochet headband or bracelet, using leftover yarn. This small addition completes the outfit and adds a handmade touch that your loved one will adore.
You can also modify the neckline to create different looks. For example, a square neckline gives a modern vibe, while a V-neck feels classic and flattering. Experimenting with shapes helps you develop your own crochet style.
Lastly, remember that handmade items make excellent gifts. Making this crochet crop top for my niece was a meaningful gesture, and the joy it brought her made every stitch worthwhile. Creating something by hand is always more personal and heartfelt.
Tips for Beginners and Common Mistakes to Avoid
If you’re new to crochet, don’t worry! This Step by Step Tutorial was designed with beginners in mind. The pattern uses basic stitches that you can easily master with a bit of practice. The key is patience and consistency — your skills will improve with every project.
A common mistake is forgetting to count your stitches. This can cause your work to become uneven or lopsided. Always check your stitch count at the end of each row to maintain a balanced shape.
Another issue many beginners face is uneven tension. Practice holding your yarn comfortably to keep your stitches uniform. If you notice the fabric curling, you may be crocheting too tightly — try loosening your grip slightly.
Be sure to measure often. Crocheted fabric stretches, so stopping occasionally to check the size will save you from having to unravel your work later. Adjustments are much easier to make mid-project than after finishing.
Choose good-quality yarn that feels soft on the skin. Since crop tops are worn close to the body, comfort is essential. Avoid rough or scratchy yarns, especially if making the top for children.
Lastly, don’t rush. Enjoy the process of creating. Each stitch represents your time, care, and creativity. The satisfaction of seeing your niece — or anyone you gift it to — wearing your handmade piece is truly special.
FAQ
1. What yarn is best for a crochet crop top?
Cotton yarn is ideal because it’s soft, breathable, and durable, perfect for warm weather.
2. How long does it take to make a crochet crop top?
Depending on your speed, it can take between 4 to 8 hours to complete this project.
3. Can beginners make this crop top?
Yes! This Step by Step Tutorial uses simple stitches, making it perfect for beginners.
4. How do I adjust the size?
You can adjust by increasing or decreasing the foundation chain and adding or reducing rows.
5. Can I wash my crochet crop top in the machine?
Handwashing is recommended to maintain the yarn’s shape and color, but gentle machine washing is possible if you use a mesh bag.
6. What hook size should I use?
A 4 mm hook works well with medium-weight cotton yarn for this crochet crop top pattern.
Conclusion
This I made this crochet crop top for my niece and she loved it – Step by Step Tutorial showed you how to make a beautiful, comfortable, and customizable handmade piece.
From choosing the right materials to adding unique touches, you now have all the tools you need to create your own crochet fashion. Crocheting is not just about crafting — it’s about expressing love, creativity, and personal style.
I hope this guide has inspired you to pick up your crochet hook and start creating. If you try this pattern, share your experience and leave a sincere opinion or suggestions. I’d love to know how your crochet crop top turned out and what creative ideas you added to make it your own!