
If you’re looking for a quick, adorable, and satisfying crochet project, this Easy Mini Crochet Bow-Step by Step Tutorial is just what you need. Crochet bows are small yet stylish accessories that can be added to hair clips, headbands, gift wraps, or even clothing. They’re perfect for using up leftover yarn and ideal for crafters of all skill levels. Whether you’re a beginner wanting to practice your stitches or an experienced crocheter searching for a fun side project, this pattern will guide you through creating perfect mini bows every time.
The beauty of an easy mini crochet bow lies in its simplicity. With just a few stitches and a small amount of yarn, you can make something charming that looks professional and polished. You can make a bunch of these in one sitting and use them for different purposes—decorate your crochet hats, add them to amigurumi animals, or make cute garlands for special occasions. This Easy Mini Crochet Bow-Step by Step Tutorial is not only fun but also helps improve your crochet precision and tension control.
Another great advantage of this pattern is how customizable it is. You can experiment with various yarn colors, textures, and sizes to match your projects. The bows can be made using cotton yarn for a structured finish or acrylic for a softer, more flexible look. Plus, because they’re small, these bows are perfect for selling at craft fairs or giving as handmade gifts. In this tutorial, you’ll learn everything you need to know—from materials to finishing touches—to make your easy mini crochet bow look neat and elegant.
Materials Needed for the Easy Mini Crochet Bow
Before starting your Easy Mini Crochet Bow-Step by Step Tutorial, it’s important to gather all the materials. This project requires only basic tools, making it perfect for beginners or anyone wanting a fast crochet fix. With just a few supplies, you can create as many bows as you’d like.
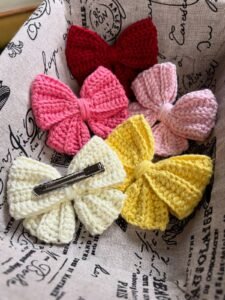
Start with yarn selection. The best yarn type for this project is light or medium-weight yarn, such as cotton or acrylic. Cotton yarn gives your bow a crisp and defined look, while acrylic yarn results in a softer and more flexible finish. Choose colors that match your intended use—pastel shades for a delicate look or bright hues for a cheerful touch.
You’ll also need an appropriate crochet hook. For most yarns, a 3mm to 4mm hook works well, but always check your yarn label for recommendations. Using the correct hook size ensures that your easy mini crochet bow has the right structure and doesn’t come out too loose or stiff.
Other essentials include scissors for trimming yarn and a tapestry needle for weaving in ends. If you plan to use your bows as hair clips or brooches, have glue or sewing thread ready to attach them securely to accessories.
Optional but helpful tools include a measuring tape for ensuring consistent bow sizes and stitch markers if you want to keep track of your stitches. Once everything is set up, you’re ready to start the Easy Mini Crochet Bow-Step by Step Tutorial and bring your mini creations to life.
Step-by-Step Guide to Making the Easy Mini Crochet Bow
Now comes the exciting part—actually crocheting your bow. This Easy Mini Crochet Bow-Step by Step Tutorial will walk you through the entire process, from creating the foundation to tying the bow shape. It’s simple, fast, and fun.
To start, make a slip knot and chain between 10 and 15 stitches, depending on how big you want your bow to be. The longer your starting chain, the wider your bow will turn out. This base will form the main band of the bow.
Next, crochet a few rows of single crochet or half double crochet stitches. Usually, 3 to 5 rows are enough for a small bow. Keep your stitches even and consistent; this ensures your easy mini crochet bow looks tidy and symmetrical. Once your rectangle is complete, fasten off and leave a long tail for sewing.
Now, fold or pinch the center of the rectangle to create the bow shape. You can wrap the yarn tail around the center several times to hold the shape securely. This step gives your bow its signature look. Adjust the loops and center until you’re happy with the proportions.
Secure the wrapped center by knotting the yarn at the back, then weave in any loose ends neatly with your tapestry needle. You can also add a small piece of yarn in a contrasting color around the center for decoration. This little detail makes your easy mini crochet bow even more unique.
Finally, attach your bow to whatever accessory you like. You can glue it onto a hair clip, sew it to a hat, or even use it to embellish a handmade card. Once you’ve finished, you’ll have a beautiful crochet bow ready to show off or give as a thoughtful gift.
Creative Ways to Use Your Mini Crochet Bows
After completing your Easy Mini Crochet Bow-Step by Step Tutorial, you’ll probably want to make dozens of these tiny bows—they’re just that addictive! The great thing is, there are countless creative ways to use them around your home or in your crafts.
One popular option is turning them into hair accessories. Simply glue or sew your bow onto a hair clip, barrette, or headband. These make adorable gifts for children or stylish accents for adults. The versatility of the easy mini crochet bow allows it to match almost any fashion style.
You can also use your crochet bows as embellishments for clothing and bags. Add them to sweaters, hats, or tote bags for a personalized touch. They instantly elevate plain items into something charming and handmade.
If you love decorating, try using these bows in your home décor projects. They look beautiful attached to pillows, blankets, or as part of a decorative garland. A string of mini crochet bows across a wall or shelf adds a cozy and creative vibe to any room.
Another fun use is adding them to gift wraps or cards. Instead of using paper ribbons, tie your gifts with yarn and finish with a crochet bow. It shows extra care and makes your presents even more special.
For those who sell handmade crafts, mini bows can be an excellent addition to your inventory. They’re quick to make, lightweight, and perfect for selling in sets. Everyone loves small, affordable handmade items that show craftsmanship and attention to detail.
Tips and Tricks for Perfect Mini Crochet Bows
To ensure your Easy Mini Crochet Bow-Step by Step Tutorial results in neat and polished bows every time, here are some helpful tips and tricks. These little details can make a big difference in the quality and appearance of your finished work.
First, pay attention to your tension. Keeping your stitches even ensures that both sides of your bow are symmetrical. Loose stitches can make your bow floppy, while overly tight ones can make it hard to shape. Aim for a balanced tension throughout the project.
Choose the right yarn texture. Smooth yarns create clean and defined bows, while fuzzy or textured yarns give a softer, fluffier look. Experiment with different yarn types until you find the finish you like best.
If you’re making multiple bows, measure your starting chain and rows to ensure consistency. This will make your easy mini crochet bow collection look uniform, especially if you plan to sell or gift them as a set.
For extra durability, consider adding a small drop of clear fabric glue to the center after wrapping the yarn. This keeps the bow securely in shape and prevents it from unraveling over time.
Don’t be afraid to experiment with color combinations. Try dual-colored bows by changing yarn midway or using a contrasting yarn for the center wrap. The more creative you get, the more unique your bows will be.
Lastly, always finish your project neatly by weaving in ends carefully. A clean finish gives your bow a professional look and makes it last longer. These small touches show craftsmanship and elevate the final product.
FAQ
1. Can beginners make this Easy Mini Crochet Bow-Step by Step Tutorial?
Yes! This pattern is perfect for beginners since it uses only basic stitches and simple construction.
2. What type of yarn is best for mini crochet bows?
Cotton or acrylic yarns work best because they hold their shape well and are available in many colors.
3. How long does it take to make one crochet bow?
It usually takes between 10 to 20 minutes to complete a bow, depending on your skill level and size preference.
4. Can I make the bow larger or smaller?
Absolutely! Just increase or decrease your starting chain and the number of rows to adjust the size.
5. How can I use these crochet bows?
You can attach them to hair clips, clothing, gift wraps, cards, or even use them as decorative accents for home décor.
6. How do I make sure my bow doesn’t lose its shape?
Wrap the center tightly and, if desired, apply a small amount of fabric glue to keep it secure. Store your bows flat when not in use.
Conclusion
The Easy Mini Crochet Bow-Step by Step Tutorial is one of the most enjoyable and rewarding projects for crochet lovers of all levels. It’s quick, versatile, and full of creative potential. From gathering simple materials to shaping the bow perfectly, each step allows you to express your personality through color, texture, and style.
This project teaches valuable crochet skills such as maintaining tension, finishing neatly, and shaping fabric—all while creating something cute and functional. Whether you use your bows for accessories, gifts, or decorations, they’re guaranteed to bring smiles to anyone who sees them.
Now that you know every detail, grab your yarn and hook, and start crafting your collection of easy mini crochet bows today! If you enjoyed this tutorial, don’t forget to share your honest opinion and suggestions. Your feedback helps inspire more creative projects and encourages others to join the joy of crochet.