
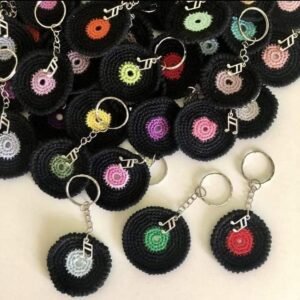
Crochet discs to use as keychains-Step by Step Tutorial is a creative and beginner-friendly project that allows you to make something both practical and adorable using just a few materials. Whether you are new to crocheting or looking for a quick handmade gift idea, these crochet discs are perfect. They are small, portable, and customizable, making them ideal for personalizing your accessories or gifting to friends. Throughout this Crochet discs to use as keychains-Step by Step Tutorial, you will learn how to crochet the perfect round disc, add keychain attachments, and finish your piece with style and precision.
Making these crochet discs can also be a relaxing hobby. Because the project requires minimal yarn, it’s an excellent way to use leftover yarn from previous crafts. You can experiment with different color combinations, textures, and even patterns to create truly unique keychains. This simple tutorial will guide you through each step carefully, ensuring that even a complete beginner can follow along and achieve satisfying results. The best part? You’ll end up with a beautiful and functional accessory that showcases your crochet skills.
If you enjoy small crochet projects that can be completed in one sitting, this Crochet discs to use as keychains-Step by Step Tutorial is perfect for you. It’s a fun and quick craft that you can make while watching TV or relaxing on a weekend afternoon. The finished product can also be used as a bag charm, a zipper pull, or a thoughtful handmade gift. So, grab your hook, some colorful yarn, and let’s dive into the creative world of crochet keychains!
Materials You Will Need
To start this Crochet discs to use as keychains-Step by Step Tutorial, you will need just a few essential materials that are easy to find. The first thing is your choice of yarn. Cotton yarn is recommended for this project because it provides a firm texture and neat finish. However, you can use acrylic yarn if that’s what you have available. Choose bright and cheerful colors to make your keychains more eye-catching.
Next, you’ll need a crochet hook that matches your yarn’s weight. Most medium-weight yarns work best with a 3.5mm to 4mm hook. You’ll also need a pair of scissors, a yarn needle for weaving in ends, and of course, some keychain rings or lobster clasps to attach your discs. These can be purchased at any craft store or online in bulk for convenience.
Having stitch markers can be helpful, especially if you are new to crocheting in the round. They help keep track of where your round begins and ends, ensuring your disc maintains an even shape. You may also want to have some small embellishments on hand, such as beads, buttons, or embroidery thread, to personalize your discs once finished.
Before you start crocheting, make sure your yarn and tools are all set up and ready to use. A well-prepared workspace makes the process smoother and more enjoyable. Organize your materials in a small tray or box to keep everything in one place. Having a clean, comfortable area to work in can greatly improve your focus and creativity.
Lastly, it’s important to remember that tension plays a key role in crochet. Keep your stitches even and not too tight. This ensures your Crochet discs to use as keychains-Step by Step Tutorial produces flat, neat, and professional-looking discs. With everything ready, let’s move to the fun part—starting your first crochet round!
Starting Your Crochet Disc
To begin your Crochet discs to use as keychains-Step by Step Tutorial, start by creating a magic ring. This technique allows you to pull the center tight, leaving no hole in the middle of your disc. Wrap the yarn around your fingers, insert the hook, and pull up a loop to start your chain. If you find the magic ring tricky, you can also begin with a chain of four stitches joined into a loop.
Once your ring is ready, chain two (this counts as your first stitch) and then make ten double crochets into the ring. Pull the yarn tail gently to close the center. Slip stitch into the top of the starting chain to complete your first round. You now have a small circle that forms the foundation of your keychain.
In the second round, you’ll increase the circle’s size by adding two double crochets in each stitch around. This will give you a total of twenty stitches. Make sure to count carefully to keep the shape symmetrical. As you continue, use your stitch marker to identify the start of each round.
For the third round, alternate between one double crochet in the first stitch and two in the next. This gradual increase helps maintain the flatness of your disc. Continue this pattern until your disc reaches the desired size. Typically, three to four rounds create a perfect small disc for keychains.
Keep your stitches even throughout the process. If your disc begins to curl or wave, adjust your tension slightly or redo the round. Crocheting in the round can take some practice, but with patience, you’ll get a smooth and balanced result. Remember, the goal is to make a neat, symmetrical disc that will hold its shape when attached to the keychain ring.
Once you finish the final round, cut your yarn and fasten it off securely. Weave in the ends using a yarn needle to keep your work tidy. Congratulations! You’ve completed the base of your Crochet discs to use as keychains-Step by Step Tutorial project.
Adding Finishing Touches
After completing your crochet disc, it’s time to add decorative details that make your project stand out. You can use contrasting yarn to create a border around the edge of the disc. Simply join the new color with a slip stitch and work single crochets evenly around the edge. This not only gives your piece a polished look but also reinforces the shape.
You can also personalize your discs with small embroidery designs such as hearts, flowers, or initials. Use a tapestry needle and thin yarn or embroidery thread for the detailing. This step transforms your simple disc into a unique, handmade accessory that reflects your creativity.
If you want your disc to have a bit of sparkle, consider adding a small bead or button in the center. Beads can be sewn securely through the middle to add charm and texture. Just make sure they are attached firmly, especially if the keychain will be used frequently.
Another fun option is to make two discs and sew them together with a bit of stuffing inside to create a small, soft charm. This gives your keychain a 3D effect and makes it even more adorable. You can also experiment with layering different colors of discs to create a vibrant, playful look.
Once all decorative elements are in place, use your yarn needle to tidy up any loose ends. Secure all threads properly to prevent unraveling. Your crochet disc is now ready for the final assembly step, where you’ll attach the keychain ring.
Attaching the Keychain
Now comes the most exciting part of the Crochet discs to use as keychains-Step by Step Tutorial—turning your crochet piece into a functional keychain. Take a metal keychain ring or lobster clasp and a small jump ring to connect your crochet disc to it.
Use your crochet hook or a small metal ring to create a loop on top of the disc. Attach the jump ring through this loop and then connect it to the keychain ring. Make sure the connection is tight and secure so the disc doesn’t fall off during use.
If you want a more decorative finish, you can crochet a small chain of ten to fifteen stitches and attach it between the disc and the keychain ring. This creates a hanging effect and makes the keychain look more dynamic.
Once everything is connected, test the durability of your keychain by gently pulling on the parts. Adjust if necessary to ensure everything is firm. You now have a fully functional, handmade crochet keychain that’s ready to use or gift!
This step completes your Crochet discs to use as keychains-Step by Step Tutorial, and what’s left now is to admire your creation. Each piece you make will be unique, reflecting your personal color choices and creativity.
Ideas and Variations
Once you master the basics, you can use this Crochet discs to use as keychains-Step by Step Tutorial to experiment with endless designs. Try using multicolored yarn or create striped patterns for a vibrant effect. Gradient yarns also look beautiful and give the illusion of color blending naturally.
You can make themed discs for holidays or special events—like red and green for Christmas, or pastel tones for spring. Adding small appliqués such as flowers or stars can make them even more festive.
If you prefer minimalist styles, stick to neutral colors like white, beige, or gray. You can use metallic thread accents to make them more elegant. These designs make great gifts for adults and can be used as bag charms or small favors for parties.
Another creative idea is to turn your crochet discs into scented keychains. Simply add a drop of essential oil to the yarn or a small piece of cotton inside before closing. This gives your keychain a pleasant scent and a touch of uniqueness.
You can also make sets of these keychains in different colors and give them as handmade presents. They are lightweight, affordable, and thoughtful. Every time the receiver uses the keychain, they’ll be reminded of your effort and creativity.
The possibilities are truly endless, and once you’ve completed this Crochet discs to use as keychains-Step by Step Tutorial, you’ll have a pattern you can easily adapt for any style or occasion.
FAQ
1. What type of yarn works best for crochet keychain discs?
Cotton yarn is the most recommended because it provides structure and durability. However, acrylic yarn also works well if you want a softer texture.
2. Can beginners follow this tutorial easily?
Yes! This Crochet discs to use as keychains-Step by Step Tutorial is perfect for beginners. It uses basic stitches and simple rounds that are easy to learn.
3. How long does it take to make one crochet disc keychain?
Typically, it takes about 30 to 45 minutes, depending on your experience level. Once you get used to the pattern, you can make several in one sitting.
4. How can I make my keychain more durable?
Ensure all stitches are tight, use good-quality yarn, and secure all attachments firmly. You can also add a layer of fabric stiffener for extra firmness.
5. Can I sell these crochet keychains?
Absolutely! Handmade crochet keychains are popular at craft fairs and online marketplaces. Just make sure each one is finished neatly and packaged attractively.
Conclusion
This Crochet discs to use as keychains-Step by Step Tutorial taught you how to create a simple, beautiful, and functional crochet accessory.
From gathering materials to adding finishing touches and variations, each step brings you closer to mastering a fun crochet project that’s perfect for any occasion. Whether you make them for yourself, as gifts, or for sale, these little creations carry a lot of charm and creativity.
Now that you’ve completed your first crochet disc keychain, we’d love to hear your thoughts! Share your honest opinions and suggestions in the comments. Tell us which colors or designs you tried and what ideas you have for future projects. Your feedback inspires creativity and helps others discover the joy of crochet too.