
If you’re looking for a fun, colorful, and easy crochet project, this Easy Crochet Pinwheel Tutorial for Beginners-Step by Step Tutorial is the perfect choice to start with. This pattern is not only beginner-friendly but also an excellent way to practice basic crochet stitches while creating something charming and decorative. Crochet pinwheels can be used in many creative ways—from appliqués on blankets and hats to wall hangings, garlands, and even gift toppers. In this tutorial, you’ll learn how to make your own pinwheel step by step, ensuring that even those new to crochet can follow along easily and enjoy the process.
The beauty of the Easy Crochet Pinwheel Tutorial for Beginners-Step by Step Tutorial lies in its simplicity. You don’t need advanced skills or fancy tools—just a hook, some yarn in your favorite colors, and a bit of patience. What makes the pinwheel so special is its spiral shape that’s achieved through clever use of color changes and increases. Once you’ve made one, you’ll find it hard to stop because they’re quick to complete and incredibly satisfying to see come together. Plus, this project is a great way to use up leftover yarn scraps from other crochet creations.
Whether you’re making these as cute decorations or planning to use them in a larger project like a blanket or pillow, this Easy Crochet Pinwheel Tutorial for Beginners-Step by Step Tutorial will guide you through every step. By the end, you’ll understand the structure of a crochet pinwheel, how to combine colors effectively, and how to shape your work to get that perfect swirling look. Let’s begin this creative journey together and bring your colorful crochet pinwheel to life!
Understanding the Basics of Crochet Pinwheels
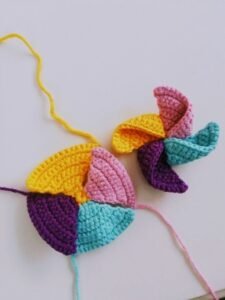
Before we jump into making the Easy Crochet Pinwheel Tutorial for Beginners-Step by Step Tutorial, it’s important to understand what a crochet pinwheel is and how it’s structured. A pinwheel design consists of multiple triangular sections that twist around a center point, giving it that signature spinning look. These sections are usually made by alternating colors in each round, creating the illusion of motion. The design is visually appealing, yet it’s easy enough for beginners to make without feeling overwhelmed.
When creating your first pinwheel, focus on choosing yarn colors that contrast well to emphasize the swirl effect. Bright and bold combinations like blue and yellow, pink and white, or even rainbow tones can make your project pop. On the other hand, pastel or monochrome palettes offer a softer, elegant finish. The versatility of color choice is one reason why so many crocheters love this project—it’s easy to customize for any occasion.
Another advantage of learning this Easy Crochet Pinwheel Tutorial for Beginners-Step by Step Tutorial is that it builds your confidence with circular crochet. You’ll practice making a magic ring or chain circle, working in rounds, and increasing stitches evenly. These are essential skills you’ll use in many other crochet patterns. By mastering the pinwheel, you’ll strengthen your foundation for future crochet projects such as coasters, mandalas, or amigurumi.
A key tip for beginners is to keep your tension consistent throughout the work. Uneven tension can distort the shape of the pinwheel and make it look uneven. It’s best to start slowly, making sure each stitch is neat and uniform. Using a smooth, medium-weight yarn helps you see your stitches clearly and makes crocheting easier overall.
As you continue working on this project, you’ll notice how relaxing and meditative crochet can be. Watching your pinwheel grow round by round gives a great sense of accomplishment. You can even experiment by making pinwheels in different sizes—small ones for appliqués or larger ones for decoration pieces.
Once you understand these basics, you’ll be fully prepared to move on to the step-by-step process and bring your pinwheel to life.
Materials and Tools You’ll Need
To complete this Easy Crochet Pinwheel Tutorial for Beginners-Step by Step Tutorial, you’ll need just a few simple materials. These are likely items you already have if you’ve tried crochet before, but they’re also inexpensive and easy to find for beginners. Having the right tools ensures a smooth experience and beautiful results.
Start by choosing your yarn. A lightweight or medium-weight yarn works best for this project. Cotton yarn is an excellent choice because it provides good stitch definition and helps your pinwheel hold its shape. If you prefer something softer or fluffier, acrylic yarn will also work nicely. Just make sure all your colors are the same type and thickness of yarn for a consistent look.
Next, you’ll need a crochet hook that matches your yarn weight. Usually, a 3.5mm to 4.5mm hook is perfect for medium yarns, but always check your yarn label for the recommended hook size. Using the correct hook prevents your stitches from becoming too tight or too loose.
You’ll also need scissors to cut your yarn and a yarn needle to weave in the ends once your project is complete. A stitch marker is optional but can be helpful for marking the beginning of each round.
If you plan to use your pinwheel as part of a larger decoration or gift, consider adding embellishments such as buttons, beads, or ribbons. These can be sewn in the center or around the edges to make your pinwheel extra special.
Before starting, prepare your workspace by laying out your materials neatly. Good lighting and a comfortable chair can make a big difference when crocheting for long periods. Once you’re ready, you can begin your first round and see your pinwheel take shape!
Step-by-Step Instructions to Make the Crochet Pinwheel
Now we arrive at the most exciting part of this Easy Crochet Pinwheel Tutorial for Beginners-Step by Step Tutorial—actually creating your pinwheel! Follow these steps carefully, and you’ll soon have a beautiful spiral pattern in your hands.
Begin with a magic ring or chain four and join with a slip stitch to form a small circle. This will be the center of your pinwheel. Chain two (or three if you’re using double crochet), and make a few stitches of your first color—these will form the first triangular section of your pinwheel. Remember to keep your stitches even and not too tight.
Next, change to your second color and repeat the same process, working around the circle. Each color block should end just before the previous one to create that swirling, windmill effect. Keep alternating your colors until you’ve completed a full round. The more colors you use, the more dynamic your pinwheel will look.
For the next round, you’ll start increasing. Work two stitches into each previous stitch at certain intervals, depending on your pattern’s structure. This helps the pinwheel grow evenly while maintaining its shape. Continue alternating colors each round and make sure the transitions are smooth.
As your pinwheel gets larger, you’ll notice the swirl becoming more defined. Take your time during this stage to ensure your increases line up properly. A misplaced increase can cause the pinwheel to twist unevenly. Counting your stitches after each round is a good habit to avoid mistakes.
Once your pinwheel reaches the desired size, you can finish it off by working a final round in one color to form a border. Fasten off and weave in all ends securely using a yarn needle. You can block your pinwheel lightly if you want it to lay perfectly flat.
That’s it—you’ve completed your Easy Crochet Pinwheel Tutorial for Beginners-Step by Step Tutorial! You can now use your finished pinwheel for various crafts or as a cheerful handmade gift.
Creative Ideas for Using Crochet Pinwheels
After finishing this Easy Crochet Pinwheel Tutorial for Beginners-Step by Step Tutorial, you might be wondering what to do with your beautiful creations. The good news is that crochet pinwheels are incredibly versatile, and there are countless ways to incorporate them into your crafts and decorations.
One popular option is to use them as appliqués. You can sew or glue pinwheels onto tote bags, hats, blankets, or even baby clothes. They instantly add a cheerful, handmade touch to any fabric item. If you enjoy decorating your home, you can string several pinwheels together to make a colorful garland or mobile.
Pinwheels also make excellent coasters. Just make a few using cotton yarn and a slightly larger hook to achieve the right size. You’ll have a set of unique, reusable coasters that will impress guests and brighten your table.
Another creative use is turning them into ornaments or keychains. Simply attach a keyring or some string to the top and you’ve got a lovely accessory. These make great handmade gifts that are small but full of character.
If you’re making gifts for holidays or special occasions, crochet pinwheels can be the perfect finishing touch. Tie one onto a wrapped present, or use it as a decoration for greeting cards. They show effort and thoughtfulness—qualities people truly appreciate in handmade gifts.
Lastly, you can experiment with different yarn textures and sizes to create a whole collection of pinwheels. Some crocheters like to frame their pinwheels as wall art, while others use them to decorate cushions or curtains. The possibilities are endless!
Easy Crochet Pinwheel Tutorial for Beginners
1. Is the crochet pinwheel suitable for absolute beginners?
Yes! The Easy Crochet Pinwheel Tutorial for Beginners-Step by Step Tutorial is designed specifically for beginners. It uses basic stitches and simple techniques, making it a great introduction to crocheting in the round.
2. How long does it take to complete one crochet pinwheel?
It depends on your skill level, but most people can finish one in about 30 to 60 minutes. The more pinwheels you make, the faster you’ll become.
3. What type of yarn works best for a crochet pinwheel?
Cotton yarn is ideal because it holds its shape well and shows off the stitches clearly. Acrylic yarn can also be used if you prefer a softer texture.
4. Can I make larger or smaller pinwheels?
Absolutely! You can adjust the size by using a different hook size or adding more rounds to your pinwheel.
5. How do I keep my pinwheel flat instead of curling?
Blocking your finished pinwheel with a bit of moisture and a flat surface will help it stay perfectly even. Consistent tension also prevents curling.
6. Can I use more than two colors?
Yes! Using three or more colors makes your pinwheel even more eye-catching. Just be sure to change colors at the same point in each round for a neat effect.
Conclusion
In this Easy Crochet Pinwheel Tutorial for Beginners-Step by Step Tutorial, you learned how to create a simple yet stunning crochet design using basic stitches and color changes.
We covered everything—from understanding the basics and gathering materials to following the step-by-step instructions and exploring creative ways to use your finished pinwheels. This project is not only fun but also an excellent way to improve your crochet skills while creating something unique and handmade.
Now that you’ve completed your pinwheel, we’d love to hear your thoughts! Leave a sincere opinion or suggestion about your experience following this tutorial. Did you find it easy to follow? What color combinations did you try? Your feedback helps inspire future crochet projects and encourages others to join in the fun of crafting!