
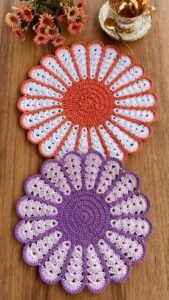
If you’re looking for a project that combines beauty, functionality, and creativity, this Crochet flower placemat – Step by Step Tutorial is the perfect guide for you. Handmade placemats bring charm and personality to your dining table while also serving a practical purpose. By learning how to crochet a floral placemat, you can create something that’s not only decorative but also durable and customizable in your favorite colors. This tutorial is beginner-friendly yet detailed enough for experienced crocheters who want to add a floral touch to their home décor.
The Crochet flower placemat – Step by Step Tutorial will walk you through the process of creating a lovely piece that resembles a blooming flower. With its soft textures and vibrant petals, it instantly brightens up any mealtime setting. These placemats also make wonderful handmade gifts for family and friends, especially when paired with matching coasters or table runners. Whether you choose classic colors or bold modern tones, this crochet project will quickly become a centerpiece on your dining table.
Crocheting flower placemats is more than just a craft—it’s an art form that allows you to express your personality through yarn. Each stitch you make builds the petals, forming a radiant flower that seems to come alive with every round. In this Crochet flower placemat – Step by Step Tutorial, you’ll learn how to choose the right yarn, create a perfect circular base, and shape beautiful petals that will impress anyone who sees them. Let’s begin by exploring the materials and tools you’ll need before diving into the crochet process.
Materials You’ll Need for the Crochet Flower Placemat
Before starting your Crochet flower placemat – Step by Step Tutorial, it’s important to gather all your materials. Choosing the right supplies will make your project easier and your results more professional. For this design, you’ll need medium-weight cotton yarn. Cotton is ideal for placemats because it’s sturdy, washable, and holds its shape well, even after repeated use. You can mix and match different colors to make the petals pop or go with a single tone for a more minimalist look.
Next, you’ll need a crochet hook suitable for your yarn thickness, usually between 3.5mm and 4.5mm. If you tend to crochet tightly, go for a slightly larger hook to keep the fabric flexible. Scissors, a yarn needle, and stitch markers will also be essential for cutting yarn, weaving in ends, and keeping track of your rounds. Having everything ready before you start ensures a smooth and uninterrupted crocheting experience.
When choosing colors, think about your dining setup or kitchen style. Bright and cheerful colors like pink, yellow, or turquoise make the placemat look lively, while neutral tones such as beige, gray, or cream create an elegant, timeless appearance. The beauty of this Crochet flower placemat – Step by Step Tutorial is that you can personalize it completely to suit your taste.
It’s also helpful to have a flat surface where you can lay your placemat as you work. This allows you to check that it remains even and symmetrical. A slightly uneven stitch tension can cause the placemat to ripple, but don’t worry—blocking the finished piece at the end will help flatten and shape it beautifully.
Finally, keep your workspace organized. Crocheting a floral pattern involves frequent color changes, and having each yarn ball neatly arranged prevents tangling. With your materials prepared, you’re ready to move on to the exciting part—creating your crochet flower placemat from scratch!
Step-by-Step Instructions to Crochet the Flower Placemat
To start your Crochet flower placemat, begin with a magic ring. This technique forms a tight and neat center for the flower. Chain three stitches to count as your first double crochet, then make eleven more double crochets into the ring. Pull the yarn tail to close the circle and join with a slip stitch at the top of the starting chain. You now have your flower’s center foundation.
In the second round, chain three and make one double crochet in the same stitch, then two double crochets in each stitch around. Join with a slip stitch. This creates the round base that will support your petals. For the third round, change to your second color—usually a bright tone for the flower petals. Chain three, skip one stitch, and make a double crochet in the next. Continue this pattern around, creating spaces for the petals.
The fourth round is where the petals begin to take shape. Into each chain space, crochet five double crochets, then slip stitch into the next space. This forms beautiful curved petals that radiate outward. Continue this pattern around the entire circle, ending with a slip stitch to join the final petal. The Crochet flower placemat – Step by Step Tutorial emphasizes taking your time on this step to make sure each petal is even and smooth.
For a layered flower effect, you can add another round of petals in a contrasting color. Work in the back loops of the previous round to make the new petals sit slightly behind the first layer. This technique gives the flower extra depth and texture, making it look more realistic and vibrant.
Once you’ve completed your petals, switch to a neutral or green shade to crochet a few rounds of single or half-double crochet stitches around the flower’s edges. This will give your placemat a clean, finished border. Keep checking that the placemat remains flat by gently pressing it on your workspace. If it starts to curl, you may need to adjust your stitch count slightly.
To finish, fasten off and weave in all yarn ends with a tapestry needle. Gently block your placemat by pinning it flat and lightly spraying it with water. Allow it to dry completely before use. You’ll be amazed by how professional and crisp your finished placemat looks!
Creative Design Ideas and Variations
One of the best things about this Crochet flower placemat – Step by Step Tutorial is how customizable it is. You can make your flower placemats as simple or as detailed as you like, depending on your style and skill level. Try experimenting with color gradients, where each round of petals slightly changes in tone for a soft ombré effect.
For a seasonal touch, use colors that match different holidays or times of the year. Pastel tones work beautifully for spring and Easter, while deep reds and golds bring a festive feeling during the winter holidays. You can also crochet a set of placemats in coordinating shades for an elegant dining table setup.
If you want to add more dimension, consider using textured stitches like puff or popcorn stitches in the flower’s center. These create a raised, decorative look that makes your placemat stand out. Adding a small border of picot or scallop stitches also enhances the floral aesthetic and gives the edges a delicate finish.
Another creative idea is to turn your placemat into a wall hanging or decorative centerpiece. Simply attach a wooden hoop or frame around it to create beautiful home décor. The floral shape makes it versatile enough for many uses beyond the dining table.
You can even create matching items, such as crochet flower coasters or napkin rings, using the same stitch pattern. This helps create a cohesive and stylish dining theme. Handmade sets like these make thoughtful gifts for housewarmings, weddings, or birthdays.
Don’t forget to play with yarn types! Metallic or shiny yarns can give your placemats a luxurious shimmer, while natural fibers like jute or bamboo create a rustic charm. The Crochet flower placemat – Step by Step Tutorial encourages creativity, so every piece you make can have its own unique personality.
Helpful Tips for Perfect Results
Creating a perfect Crochet flower placemat takes patience and attention to detail. One of the most important tips is to maintain consistent tension throughout your work. Uneven tension can cause the placemat to ruffle or become misshapen, so try to keep your stitches uniform. If needed, take short breaks to relax your hands and avoid tightening the yarn too much.
Blocking your placemat after finishing it is a simple but powerful step that can dramatically improve its appearance. To block, dampen the placemat, pin it in shape on a flat surface, and let it dry completely. This helps even out the stitches and enhances the flower shape.
When changing colors, always fasten off neatly and weave the yarn tails securely. Loose ends can unravel over time, especially with frequent washing. The Crochet flower placemat – Step by Step Tutorial recommends weaving in ends in the direction of the stitches to keep the back clean and professional.
If your placemat starts to ripple, check your stitch count. Adding too many or too few stitches can affect the circular shape. Don’t be afraid to undo a round if necessary—correcting small mistakes early ensures a better final result.
Using quality yarn is another important factor. Cotton or cotton blends provide durability, easy care, and resistance to heat, making them ideal for placemats. Avoid very stretchy yarns, as they can lose shape over time.
Finally, have fun and enjoy the process! Crocheting should be relaxing and creative. Don’t worry if your first placemat isn’t perfect—each project improves your skill and confidence. Soon, you’ll be able to make sets of matching placemats effortlessly.
FAQ
1. What type of yarn is best for making crochet flower placemats?
Cotton yarn is the best choice because it’s sturdy, washable, and holds its shape. Acrylic yarn can also work for a softer texture.
2. Can beginners follow this Crochet flower placemat – Step by Step Tutorial?
Yes! This tutorial is beginner-friendly, and even if you’re new to crochet, you’ll learn all the basic stitches needed to make a beautiful placemat.
3. How can I make my placemat flat and even?
Ensure you maintain consistent stitch tension and correct stitch count. Blocking the placemat after finishing also helps achieve a flat shape.
4. Can I use the same pattern for smaller coasters?
Absolutely! Just stop crocheting after a few rounds to make smaller versions that match your placemats perfectly.
5. How do I clean crochet placemats?
Hand wash or use a gentle machine cycle in cold water, then lay flat to dry to prevent stretching or distortion.
Conclusion
Crocheting your own placemats is a rewarding and enjoyable experience. With this Crochet flower placemat – Step by Step Tutorial, you’ve learned how to create a stunning, practical piece that adds warmth and color to your dining space.
From selecting materials and working each petal to finishing with a professional touch, every step helps you develop your crochet skills while expressing your creativity.
Now that you’ve mastered this project, you can make matching sets, play with new color combinations, and even gift your handmade creations to loved ones. We hope you enjoyed this tutorial and feel inspired to start crocheting today. Please share your honest opinions and suggestions—we’d love to hear how your crochet flower placemat turned out and what creative twists you added to it!