
The Easy-to-make crochet pig-Step by Step Tutorial is a fun and creative project that allows you to bring a touch of cuteness into your crochet collection. Whether you’re an experienced crocheter or someone new to the craft, making a little pig out of yarn is both simple and rewarding. The process involves basic stitches, colorful yarn, and a bit of imagination. This guide is designed to help you through every stage of creating your own adorable crochet pig — from choosing materials to adding those final charming details that make it unique.
This Easy-to-make crochet pig-Step by Step Tutorial is perfect for anyone looking to explore the art of amigurumi, the Japanese technique of crocheting small stuffed animals. The beauty of this project lies in its simplicity — it doesn’t require advanced techniques, only patience and a love for handmade crafts. By following this guide, you’ll not only learn how to crochet a pig but also develop skills that can be applied to many other animal-themed creations.
Crocheting a pig can serve many purposes — it can be a toy for a child, a lovely decoration for your home, or a heartfelt handmade gift for someone special. The process itself is relaxing and therapeutic, offering a creative escape from the busy pace of daily life. As you follow along with this Easy-to-make crochet pig-Step by Step Tutorial, you’ll see how each stitch contributes to building something adorable, full of character, and made with love.
Choosing Materials for Your Crochet Pig
Before starting the Easy-to-make crochet pig-Step by Step Tutorial, it’s essential to gather all the materials you’ll need. Choosing the right supplies will make your crochet experience smooth and enjoyable.
First, select your yarn. A soft pink color is classic for a pig, but you can always be creative and choose any shade you prefer — pastel tones or even bright colors for a playful version. Cotton or acrylic yarns are ideal choices since they are durable and easy to handle. If you want a plush look, opt for velvet yarn, which gives a soft, fluffy finish.
Next, pick a suitable crochet hook. The size of the hook should match your yarn, but for amigurumi projects like this, it’s usually best to go slightly smaller than the recommended size. This ensures your stitches are tight enough to keep the stuffing from showing through. Typically, a 2.5 mm or 3 mm hook works well for this type of crochet pig.
You’ll also need some polyester stuffing to fill your pig and give it a nice round shape. Be sure to have a yarn needle to sew the different parts together neatly. For the details, such as the eyes, nose, and mouth, you can use small safety eyes, buttons, or simply embroider them with black yarn. Always make sure that if your crochet pig is meant for children, you avoid small detachable parts for safety reasons.
Finally, have your scissors and stitch markers ready. Stitch markers are helpful for keeping track of your rounds, especially if you are crocheting in continuous spirals. With your materials prepared, you’re ready to begin the creative process and enjoy every step of the Easy-to-make crochet pig-Step by Step Tutorial.
Step-by-Step Instructions
Let’s dive into the practical part of this Easy-to-make crochet pig-Step by Step Tutorial and start bringing your little pig to life. The process is simple and can be easily followed, even by beginners.
Start by making a magic ring and crochet six single crochets into it. This forms the base of the pig’s head. Then, increase gradually in each round by adding stitches until the piece forms a round ball shape. Once the head reaches the size you want, continue crocheting even rounds to create depth before decreasing to close it. Before closing completely, fill it with soft stuffing.
Next, crochet the body in a similar way but make it slightly larger. You can start with a magic ring again and increase each round until it’s big enough to match the proportions of the head. When you reach the right size, crochet a few rounds without increases to give the body a smooth cylindrical shape. Then, stuff it and close the end securely.
The pig’s ears are small and triangular. To make them, crochet short chains and work a few rows to form a tiny triangle. You can adjust the size according to your preference. Once finished, sew them on top of the head.
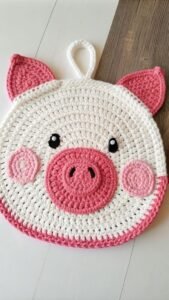
For the snout, use a slightly darker pink yarn. Crochet a small oval piece and sew it to the front of the head. Add two small embroidered or safety eyes above it and a stitched smile to give your pig its adorable expression.
Finally, crochet four small cylindrical shapes for the legs and a little curly tail using a chain and a few slip stitches. Attach all parts carefully with your yarn needle. Once everything is sewn together, your cute crochet pig will start to take form, full of charm and personality.
Adding Creative Touches
One of the most enjoyable parts of following the Easy-to-make crochet pig-Step by Step Tutorial is customizing your creation. Every crocheter has their own touch, and this project offers endless possibilities for creativity.
You can personalize your pig by changing the yarn colors. Instead of the classic pink, try making a white, gray, or even pastel blue pig for a unique variation. Add little accessories, like a crocheted bow, a flower, or a tiny scarf, to give it character. Each small addition transforms your crochet pig into something truly your own.
If you’re making multiple pigs, consider creating a family — a larger pig for the parent and smaller ones for the piglets. This makes an adorable display or an excellent gift set for baby showers and children’s parties. You can even use different yarn textures to create a mix of soft and fuzzy looks.
For those who enjoy seasonal crafts, your crochet pig can easily fit into any theme. During holidays, add festive accessories such as a Santa hat for Christmas or bunny ears for Easter. This makes your handmade pigs suitable for decorations throughout the year.
Experimenting with facial expressions is another way to add life to your creation. You can give your pig a smiling face, sleepy eyes, or even a playful wink. A few small embroidery stitches can make a big difference in how your pig’s personality shines through.
Don’t be afraid to use bright, cheerful colors or to add small details like polka dots on the body. Remember, the Easy-to-make crochet pig-Step by Step Tutorial encourages fun and creativity — it’s not just about following instructions but about expressing yourself through yarn and stitches.
Display and Gift Ideas
Once you finish your crochet pig, you’ll probably want to show it off or share it with others. Luckily, there are plenty of ways to use and display your creation.
Your crochet pig can make an adorable addition to your home decor. Place it on a shelf, desk, or even in the kitchen to bring a bit of handmade charm to your space. Its soft, friendly appearance adds warmth wherever it sits.
Crochet pigs are also fantastic handmade gifts. Because they’re small, cute, and easy to customize, they make perfect presents for birthdays, holidays, or baby showers. Add a little tag with your name as the maker to give it a personal touch.
If you enjoy making crafts to sell, this Easy-to-make crochet pig-Step by Step Tutorial can help you create beautiful items for craft fairs or online shops. Handmade amigurumi toys are always popular because of their unique, artistic value.
Another idea is to use your crochet pig as part of children’s playtime. They can be used as storytelling props, helping spark creativity and imagination in young minds. Just be sure to secure all parts well if it’s meant for small children.
You can also create themed sets — for example, a farm animal collection with a crochet cow, chicken, and pig. Displaying them together can make your handmade creations even more eye-catching.
Lastly, your crochet pig can serve as a small token of love or good luck. Giving someone a handmade item carries a special meaning; it’s a sign of care, effort, and creativity.
FAQ
1. What materials do I need to make a crochet pig?
You’ll need yarn (preferably cotton or acrylic), a crochet hook, stuffing, scissors, a yarn needle, and safety eyes or embroidery thread for details.
2. Is this project suitable for beginners?
Yes! The Easy-to-make crochet pig-Step by Step Tutorial is designed for all skill levels, especially beginners who want to practice simple stitches while making something fun.
3. How long does it take to make a crochet pig?
Depending on your speed and experience, it can take between three to five hours to complete one pig. Smaller versions might take even less time.
4. Can I wash my crochet pig?
Yes, but always hand wash gently using mild soap and let it air dry to preserve its shape and texture.
5. How can I make my crochet pig unique?
You can use different yarn colors, add accessories, or change facial expressions. Customizing is what makes this project truly special.
6. What type of yarn works best for this project?
Soft cotton or acrylic yarn is ideal. For a fluffy or plush texture, you can try velvet or chenille yarn.
Conclusion
In this Easy-to-make crochet pig-Step by Step Tutorial, you’ve learned how to craft an adorable and fun crochet pig from start to finish.
From choosing your materials to adding creative details, every step allows you to explore your artistic side while creating something truly heartwarming.
Whether you make it for yourself, as a gift, or even to sell, this little crochet pig brings joy and charm wherever it goes. Now that you’ve mastered the basics, experiment with colors, sizes, and accessories to make your pigs even more unique. Don’t forget to share your finished creations and leave your honest opinion and suggestions below — your feedback helps inspire more crochet enthusiasts to join this wonderful handmade journey.