
If you are looking for a cute and creative project to celebrate Easter, this Easy Crochet Easter Bunny – Step by Step Tutorial is the perfect choice. This handmade bunny is not only fun to make but also adds a personal touch to your holiday decorations. Whether you are a beginner or an experienced crocheter, this guide will walk you through every step in a simple and enjoyable way. Making your own crochet Easter bunny allows you to express your creativity while creating something meaningful that can be cherished for years.
The Easy Crochet Easter Bunny – Step by Step Tutorial focuses on simplicity and charm. You can customize your bunny’s colors, size, and style to match your Easter decor or to make adorable gifts for friends and family. Each stitch you make brings your bunny to life, creating a soft and cuddly figure that spreads joy wherever it’s placed. Crocheting bunnies can also be a relaxing hobby that helps relieve stress while improving your crafting skills.
This project is ideal for using leftover yarn and requires only basic crochet techniques. With patience and attention to detail, anyone can complete this project and enjoy a sense of accomplishment. In this guide, you’ll learn the materials you need, the steps to follow, and the best techniques to make your bunny look beautiful and professional. Follow along with this Easy Crochet Easter Bunny – Step by Step Tutorial and discover how rewarding it can be to create something with your own hands.
Materials Needed for the Easy Crochet Easter Bunny
To start your Easy Crochet Easter Bunny – Step by Step Tutorial, gather the essential materials. Having everything ready before you begin helps make the process smoother and more enjoyable. You’ll need yarn, a crochet hook, stuffing, and a few additional accessories to bring your bunny to life.
Choose soft yarn for your bunny, such as cotton or acrylic, to make it comfortable and easy to work with. Lighter colors like white, pink, or beige work well for Easter themes, but you can use any color combination you prefer. Select a crochet hook that matches your yarn’s thickness to ensure consistent stitches and the right tension.
You’ll also need a pair of scissors, a yarn needle, and some stuffing to fill your bunny. The stuffing gives shape and volume, making your creation soft and huggable. Optional materials include safety eyes or embroidery thread for the face details and ribbons or buttons for decoration.
A stitch marker can be useful if you’re working in continuous rounds, helping you keep track of your progress. Beginners will appreciate how these small tools make the process easier and more organized. Preparing your materials before starting saves time and helps you stay focused on the fun part—crocheting your adorable bunny.
Lastly, ensure that you work in a well-lit and comfortable area. A calm environment allows you to enjoy the process and notice small details that make your bunny unique. Once you have all the materials, you’re ready to begin the Easy Crochet Easter Bunny – Step by Step Tutorial and start creating your new favorite Easter decoration.
Step-by-Step Instructions for Making the Bunny
The heart of the Easy Crochet Easter Bunny – Step by Step Tutorial lies in carefully following each stage of the process. Even if you’re new to crocheting, these instructions will guide you clearly and patiently through every stitch.
Start by creating a magic ring and crocheting several single crochet stitches into it to form the bunny’s head base. This circular beginning is essential for shaping the head evenly. As you continue, you’ll increase the stitch count gradually to build volume and then decrease it later to close the shape.
Once the head is finished, move on to crocheting the body. The process is similar—begin with a small circle, increase for width, and then crochet evenly to create the desired length. Remember to keep your stitches tight to prevent gaps when adding stuffing. The body should be firm but not overly stuffed to maintain a natural look.
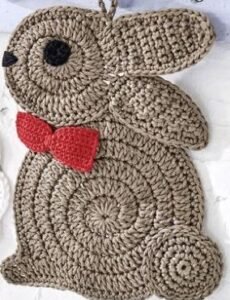
The next step is making the ears, which are the most recognizable part of your bunny. Crochet two identical pieces, slightly elongated with a gentle curve. You can choose to make them floppy or upright depending on your preference. Sew them securely onto the head using the yarn needle.
Now, crochet the arms and legs, ensuring they are proportionate to the body. Attach them neatly to create a balanced figure. At this stage, your bunny will start to take shape, and you’ll see your effort come to life. Finish by adding the tail, a small fluffy ball that completes the adorable design.
Throughout the Easy Crochet Easter Bunny – Step by Step Tutorial, take your time to check your work and adjust any uneven stitches. This attention to detail will make your final piece look clean and professional, ready to be admired or gifted.
Adding the Details and Personal Touches
Once your bunny’s structure is complete, it’s time to personalize it. This part of the Easy Crochet Easter Bunny – Step by Step Tutorial allows you to express your creativity. Adding details transforms your crochet bunny from a simple craft to a unique handmade treasure.
Start by creating the bunny’s face. You can sew or glue small safety eyes, or embroider them using black thread for a softer, child-friendly design. Add a small pink or brown triangle for the nose and a curved line for the mouth. Take your time to position the features symmetrically to keep your bunny cute and balanced.
Next, consider dressing your bunny or adding accessories. You could crochet a small bow, scarf, or even a miniature basket for an Easter-themed touch. Adding these simple elements enhances the character and makes your bunny stand out as a one-of-a-kind decoration.
If you’re making multiple bunnies, try varying the colors and expressions to give each one its own personality. You can create a whole family of bunnies—parents and little ones—to display as a centerpiece or gift set.
For extra charm, you can brush the yarn slightly on the tail to make it fluffy and realistic. Some crafters even add light blush on the cheeks with fabric-safe coloring to give a soft, warm look. Each small addition brings more life and personality to your bunny.
Decorating your finished bunny is where your imagination can shine. With a few thoughtful touches, your Easy Crochet Easter Bunny – Step by Step Tutorial creation will look both festive and professional, ready to spread Easter cheer.
Displaying and Caring for Your Crochet Bunny
After completing your Easy Crochet Easter Bunny – Step by Step Tutorial, you’ll want to display your handmade creation proudly. These bunnies make perfect Easter decorations and heartfelt gifts for loved ones. Whether you place them in baskets, on tables, or in children’s rooms, they bring a touch of warmth and happiness to any space.
If you plan to give your bunny as a gift, consider wrapping it in soft tissue paper or placing it in a small basket with decorative straw. This presentation enhances the handmade charm and makes it more special for the recipient.
To keep your crochet bunny in great condition, handle it gently and avoid exposing it to moisture. If it collects dust, lightly brush it with a clean, dry cloth or use a soft hand vacuum. Proper care will help maintain the shape and color for years.
For families with pets or small children, remember to secure any small accessories or eyes firmly. Safety is important when gifting handmade toys, and ensuring durability will make your creation safe for all ages.
Crochet bunnies can also be used as seasonal decor for many years. Simply store them in a cool, dry place when Easter is over and bring them back out each spring to refresh your home with their charm.
By following the Easy Crochet Easter Bunny – Step by Step Tutorial, you’ve created not just a decoration, but a symbol of love, patience, and creativity that will brighten your celebrations every year.
FAQ
1. What type of yarn is best for making a crochet Easter bunny?
Soft cotton or acrylic yarns work best because they are comfortable to handle and create a smooth finish. Choose light, pastel colors to match the Easter theme.
2. Can beginners make the Easy Crochet Easter Bunny?
Yes! This Easy Crochet Easter Bunny – Step by Step Tutorial is perfect for beginners. It uses basic stitches like single crochet and simple shaping, making it an excellent learning project.
3. How long does it take to complete a crochet bunny?
Depending on your skill level, it may take between two and five hours to complete one bunny. Beginners may take longer, but the process is enjoyable and rewarding.
4. Can I make the bunny in different sizes?
Absolutely. You can adjust the hook size or yarn thickness to create larger or smaller bunnies. The pattern adapts easily to different sizes.
5. What can I use the crochet bunny for?
You can use it as a decoration, gift, or even a toy for children. Many people also use them as Easter basket fillers or collectibles.
Conclusion
Creating your own Easy Crochet Easter Bunny – Step by Step Tutorial is a joyful and rewarding experience that combines creativity, skill, and holiday spirit.
You’ve learned how to prepare materials, follow each step carefully, and add personal touches that make your bunny truly special. Whether you make one or a whole collection, these adorable bunnies will bring happiness wherever they go.
Now that you’ve completed this fun project, I’d love to hear your thoughts. Did you enjoy making your Easter bunny? Share your honest opinion and suggestions so that more crochet lovers can learn and create together. Happy crocheting and have a wonderful Easter!