
If you love handmade crafts, this Easy Chicken Keychain – Step by Step Tutorial is a delightful and simple project that combines fun, creativity, and functionality. Creating a cute little chicken keychain is a perfect way to practice crochet or basic crafting skills while producing something useful and adorable. Whether you’re looking for a handmade gift idea, a unique accessory, or a project to sell at craft fairs, this tutorial is ideal for crafters of all levels.
The Easy Chicken Keychain – Step by Step Tutorial focuses on helping beginners achieve a beautiful result without complicated techniques. Using simple stitches and easy-to-follow instructions, you can make a charming chicken that can hang on your keys, bags, or even serve as a decorative piece. This is a great introduction to small-scale crochet or crafting, allowing you to complete a project quickly while learning valuable skills.
Another advantage of this Easy Chicken Keychain – Step by Step Tutorial is that it requires minimal materials and time. You can use leftover yarn or small fabric scraps, making it an eco-friendly and budget-friendly craft. Plus, this cute little chicken adds a touch of personality and color wherever you go. Let’s dive into the materials, steps, and creative tips to make your very own chicken keychain.
Materials Needed for the Easy Chicken Keychain
Before you start the Easy Chicken Keychain – Step by Step Tutorial, gather all the materials you’ll need. Preparation is key to ensuring your crafting process goes smoothly and efficiently.
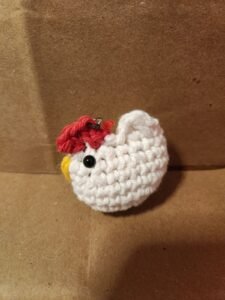
For crochet lovers, you’ll need small amounts of yarn in white, yellow, red, and orange (or any colors you prefer). Cotton yarn is a great choice because it provides structure and a neat finish. For those who prefer sewing or felt crafts, you can also use small pieces of colored felt instead of yarn.
You’ll need a crochet hook that matches your yarn thickness, typically a 2.5 mm to 3.5 mm hook for this kind of small project. Additionally, have scissors, a yarn needle for sewing, a keychain ring, and stuffing material such as polyester fiberfill ready. The stuffing helps give your chicken its cute, plump shape.
If you’re using felt, you’ll need a needle and thread, some glue (optional), and the same keychain ring. You can also use safety eyes, beads, or buttons for the eyes to give your chicken an adorable expression.
Once all your materials are organized, make sure your workspace is well-lit and comfortable. Keeping your supplies nearby will help you focus and enjoy every moment of this Easy Chicken Keychain – Step by Step Tutorial.
Step-by-Step Instructions to Make the Chicken Keychain
Now that you have everything ready, it’s time to begin the Easy Chicken Keychain – Step by Step Tutorial. Follow these easy instructions to create your mini chicken from start to finish.
Start by making the main body. Using white or yellow yarn, create a magic ring and make six single crochet stitches into it. Gradually increase each round until your piece forms a small, rounded ball. This will serve as the chicken’s body. If you’re using felt, cut out two identical oval shapes and sew them together, leaving a small opening for stuffing.
Once the body reaches the desired size, stuff it gently with fiberfill. Don’t overfill, as you want the chicken to remain soft but still hold its shape. Close the top by decreasing stitches or sewing the opening shut. This simple shape will form the base of your chicken keychain.
Next, crochet or cut out the details. For the beak, use orange yarn to create a tiny triangle. For the comb on the head, use red yarn to make small bumps or loops that resemble feathers. Sew or glue these parts onto the head area. These details are what transform the simple ball into a recognizable chicken.
Add eyes using safety eyes, black beads, or by embroidering small black circles. Position them evenly to create a cute and friendly expression. Finally, attach a small metal ring or keychain hook to the top of the chicken’s head. Make sure it’s securely fastened, as this will be used to hang your keychain.
Once assembled, your Easy Chicken Keychain – Step by Step Tutorial project is almost complete. Take a moment to shape and adjust the features to ensure everything looks neat and proportional. A few extra stitches here or there can make a big difference in the final appearance.
Decorating and Customizing Your Chicken Keychain
One of the best parts about the Easy Chicken Keychain – Step by Step Tutorial is that you can personalize your design however you like. This project is a great opportunity to get creative with colors, accessories, and finishes.
You can make your chicken in traditional white and yellow colors or experiment with fun, unexpected shades. For example, try pink, blue, or pastel tones for a more whimsical look. Using multicolored yarn can also create a unique gradient effect.
If you want to make your keychain extra cute, consider adding small wings or a tail. Crochet or cut out tiny shapes and attach them to the sides or back of your chicken. Even small details like these can make your creation stand out.
You can also decorate your chicken with a mini bow, a ribbon, or even a tiny flower. These extra touches make your Easy Chicken Keychain – Step by Step Tutorial creation more personalized and suitable for gifts.
Another fun idea is to make a set of chickens in different colors and styles. You could have a whole family of keychains, each with its own expression or accessory. These also make great craft fair products or small thank-you gifts for friends.
If you’re giving it as a present, wrap your chicken keychain in a small bag or box to make it even more special. Handmade gifts like these are thoughtful and show the time and care you’ve put into creating them.
Tips for Success and Common Mistakes to Avoid
Even though this is an Easy Chicken Keychain – Step by Step Tutorial, a few helpful tips can make your project turn out even better. Avoiding common mistakes will save you time and help you create a polished, professional-looking result.
First, always check your stitch tension. If your stitches are too tight, the chicken’s body will be stiff and hard to shape. Too loose, and it might look floppy. Try to keep your stitches even throughout the project.
If you’re a beginner, use stitch markers to keep track of your rounds. This small habit can prevent mistakes when increasing or decreasing stitches. It also helps maintain the correct shape.
When attaching the parts—like the beak, comb, and eyes—make sure they’re sewn or glued securely. Small parts can come loose if not fastened properly, so take your time to do this step carefully.
If your chicken doesn’t look exactly like the one in the pictures or patterns, don’t worry. Handmade crafts are all about creativity, and each piece will have its own unique charm. Your version might even turn out cuter than expected!
Lastly, keep practicing. The first few attempts might not be perfect, but you’ll get better with every project. The key is to enjoy the process and learn from each step of this Easy Chicken Keychain – Step by Step Tutorial.
FAQ
1. What materials do I need for this Easy Chicken Keychain?
You’ll need yarn or felt, a crochet hook or needle, stuffing, scissors, and a keychain ring. Optional decorations include safety eyes, ribbons, and small bows.
2. Can beginners make this keychain easily?
Yes! This Easy Chicken Keychain – Step by Step Tutorial is designed for beginners and uses basic techniques that are easy to learn and follow.
3. How long does it take to make one chicken keychain?
On average, it takes about 1 to 2 hours, depending on your skill level and speed.
4. Can I sell these chicken keychains?
Absolutely! Handmade chicken keychains are great for selling at markets, fairs, or online. They’re quick to make and very popular as gifts.
5. What’s the best type of yarn for this project?
Cotton yarn is ideal because it’s durable, holds its shape well, and gives a neat, smooth texture.
6. How can I make my chicken look more detailed?
Add small embellishments like tiny wings, a comb, or even a little bow tie. You can also use embroidery thread for fine details like eyebrows or blush spots.
Conclusion
This Easy Chicken Keychain – Step by Step Tutorial is the perfect project for anyone who loves crafting, crocheting, or creating handmade gifts. It’s simple, quick, and offers endless possibilities for creativity. From choosing colors to adding personal touches, every step allows you to express your unique style.
By following this tutorial, you’ll learn basic crafting techniques, improve your skills, and end up with an adorable accessory that brings joy wherever you take it. Whether for personal use or as a gift, this cute chicken keychain is sure to make people smile.
Now that you know how to create your very own Easy Chicken Keychain – Step by Step Tutorial, we’d love to hear your thoughts! Share your honest opinions, suggestions, or ideas for improving this project. Your feedback helps other craft enthusiasts and keeps the creative spirit alive. Enjoy your crafting journey and keep spreading handmade happiness—one chicken keychain at a time!