
Learning a beautiful crochet stitch can completely transform your handmade projects into works of art. In this Beautiful crochet stitch-Step by Step Tutorial, you’ll discover how to create elegant patterns that add texture, charm, and sophistication to your creations. Whether you are a beginner or an experienced crocheter, mastering new stitches opens the door to endless design possibilities. This tutorial will guide you through each step with patience and clarity, helping you achieve a stunning result you can be proud of.
Crochet is a relaxing and rewarding craft that combines creativity and technique. When you learn a beautiful crochet stitch, you can use it to make blankets, scarves, pillow covers, table runners, and many other decorative items. The beauty of crochet lies in how easily you can personalize your designs—changing the yarn color, the hook size, or even the pattern can give a unique finish. In this tutorial, we will focus on one special stitch that looks intricate but is actually simple once you learn the right sequence of steps.
Before we dive into the Beautiful crochet stitch-Step by Step Tutorial, it’s important to remember that every stitch you learn adds to your crochet skill set. With a bit of practice and patience, you’ll be amazed at how quickly your fingers start to move naturally through the motions. This article will not only teach you the technique but also provide practical tips for perfecting your tension, choosing the right materials, and making your finished piece look professional.
Understanding the Basics Before Starting
Before you begin this Beautiful crochet stitch-Step by Step Tutorial, make sure you’re comfortable with basic crochet techniques. You’ll need to know how to create a slip knot, chain stitch, and single or double crochet. These foundational skills will make the process much smoother. If you’re just starting out, take your time to master these simple moves. They’re the building blocks of every crochet project you’ll ever make.
The key to creating a beautiful crochet stitch lies in your yarn and hook selection. For this tutorial, choose a medium-weight yarn and a hook that matches the yarn label’s recommendation. Using a lighter color will help you see your stitches clearly as you work. Smooth-textured yarns are also ideal because they make it easier to identify each loop.
Good lighting and a comfortable working position are essential for success. Sit somewhere bright and make sure your yarn flows freely from the skein. Avoid sitting in a position that strains your hands or shoulders, as crocheting for long periods can lead to discomfort. Taking short breaks will help prevent fatigue and keep your work neat.
Gauge is another important concept when following a Beautiful crochet stitch-Step by Step Tutorial. It determines how tight or loose your stitches are. Practicing your gauge ensures your finished project comes out the right size. You can easily adjust your tension by changing your grip or using a different hook size.
One more tip before starting: always keep your yarn consistent. Switching between different yarn brands or textures can alter the look of your final piece. Consistency gives your crochet stitch a professional appearance and helps the design stand out beautifully.
Finally, before moving on to the next step, create a small swatch of about 20 chains and practice the base rows. This will allow you to get a feel for the pattern and make any necessary adjustments before committing to a full project.
Step-by-Step Instructions for the Beautiful Crochet Stitch
Now that you’re ready, let’s begin this Beautiful crochet stitch-Step by Step Tutorial. Start by making a foundation chain with an even number of stitches. The exact number depends on the size of your project, but for practice, you can start with 24 chains.
In the first row, work one single crochet in the second chain from your hook. Continue making single crochets across the entire row, then chain one and turn your work. This forms the base for the decorative stitch we’ll build next.
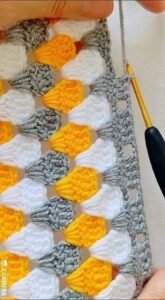
For the second row, start by making one single crochet in the first stitch. Then, yarn over, insert your hook into the next stitch, and pull up a loop. Yarn over again and pull through all the loops on the hook. This creates a textured effect known as a puff stitch. Continue alternating between single crochet and puff stitch across the row.
Chain one and turn your work again. In the third row, make one single crochet in each puff stitch and one puff stitch in each single crochet. This alternating pattern creates a lovely texture that resembles small petals or stars—perfect for a beautiful crochet stitch design.
Repeat this sequence until your project reaches the desired length. Remember to keep your tension even and your stitches uniform. If your rows start to lean or curve, check that you’re not adding or skipping stitches by accident. Counting your stitches at the end of each row helps maintain the proper structure.
To finish, make one final row of single crochets to give your piece a clean edge. Fasten off and weave in the ends with a yarn needle. Gently block your work by pinning it flat and lightly misting it with water to help it hold its shape.
Creative Ways to Use the Beautiful Crochet Stitch
One of the best things about learning the Beautiful crochet stitch-Step by Step Tutorial is how versatile it is. You can use it in a variety of projects, from home décor to fashion accessories. The texture adds a luxurious and handcrafted feel to any piece, making it a favorite among crafters.
A cozy throw blanket made with this stitch can transform your living space, giving it warmth and charm. Choose colors that match your interior, or create a gradient effect by blending multiple shades. Because this stitch is slightly thicker than standard ones, your blanket will also be soft and warm.
You can also make scarves, shawls, or cowls using this beautiful crochet stitch. The raised pattern adds depth, making the fabric look elegant even with simple yarns. Try experimenting with cotton for lightweight pieces or wool for a cozier winter accessory.
Home décor items like table runners, cushion covers, or placemats look amazing with this stitch. The pattern creates a rich texture that can elevate the look of any table or couch. You can even add a border or fringe to make it more decorative.
For smaller projects, consider making mug cozies, bookmarks, or dishcloths. These quick makes are great for practicing the stitch while creating functional and pretty items. They also make thoughtful handmade gifts that people will appreciate.
Lastly, don’t be afraid to combine this stitch with others. Mixing different stitches in one project can create stunning contrasts and highlight your creativity. This flexibility makes crochet one of the most enjoyable and expressive crafts.
Tips for Perfecting Your Crochet Stitch
Even though the Beautiful crochet stitch-Step by Step Tutorial is easy to follow, achieving a polished result takes practice. Start slowly, paying close attention to your yarn tension. Uneven tension can make the pattern look irregular, so try to maintain a steady rhythm as you crochet.
If you’re struggling to keep your stitches even, mark the first and last stitch of each row with a stitch marker. This simple tool can prevent accidental increases or decreases. It’s also helpful for beginners learning how to identify where each row begins and ends.
Another useful trick is to count your stitches frequently. Even one missing or extra stitch can change the shape of your work. Counting after every few rows helps you correct mistakes before they become hard to fix.
Blocking is also key to achieving a professional finish. Once you’ve completed your crochet piece, pin it to a flat surface and mist it lightly with water. Let it dry completely before removing the pins. This process smooths out uneven edges and highlights the beautiful texture of your stitches.
Choosing the right yarn fiber can also make a big difference. For example, cotton yarn provides crisp stitch definition, while acrylic gives more flexibility. Experiment with different materials to find what works best for your specific project.
Finally, remember that patience is the secret to success in crochet. Don’t rush through the process—enjoy each step of creating your beautiful stitch. With time and practice, you’ll be able to crochet confidently and effortlessly.
Beautiful Crochet Stitch Step by Step Tutorial
1. What materials do I need to make the beautiful crochet stitch?
You’ll need yarn, a matching crochet hook, scissors, and a yarn needle for weaving in the ends. A medium-weight yarn works best for beginners.
2. Can beginners follow this beautiful crochet stitch tutorial?
Yes! This stitch is perfect for beginners who already know basic stitches like single and double crochet. It’s easy to learn and rewarding to make.
3. How long does it take to complete a project using this stitch?
It depends on the size of your project. A small sample can take less than an hour, while a blanket may take several days.
4. Can I use different yarn types for this crochet stitch?
Absolutely! Cotton yarn gives great definition, while acrylic or wool provides warmth and elasticity. Choose based on your project’s purpose.
5. Why does my stitch look uneven?
Uneven tension or incorrect stitch counts are common causes. Make sure your yarn flows smoothly and count your stitches regularly.
6. How do I finish off my crochet project neatly?
After your final row, fasten off the yarn and weave in the ends securely using a yarn needle. Blocking your project helps it look polished.
Conclusion
In this Beautiful crochet stitch-Step by Step Tutorial, you learned how to create a stunning textured pattern that can enhance any crochet project. From understanding the basics to perfecting your technique, every step builds your confidence and creativity. This versatile stitch can be used in blankets, scarves, home décor, and much more.
Crochet is more than just a hobby—it’s a way to express your personality through art and craft. By practicing and experimenting, you’ll continue to improve and discover your unique style. We hope this tutorial has inspired you to pick up your crochet hook and start creating today.
If you enjoyed this guide, please leave your honest opinion and suggestions below. Your feedback helps make future tutorials even better. Happy crocheting!