
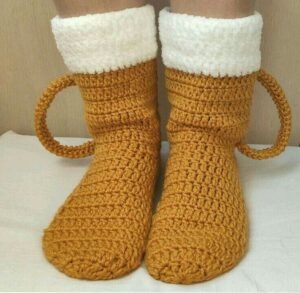
Fun crocheted beer mug boots, perfect as a gift.-Step by Step Tutorial is a charming and creative project that combines humor, functionality, and craftsmanship into one delightful piece. These beer mug boots are not just adorable; they are also practical, warm, and comfortable to wear around the house. Whether you are making them as a thoughtful handmade present, a funny novelty item for a friend, or simply a cozy accessory for yourself, this tutorial will help you create something that is both amusing and useful. The best part is that you don’t need to be an expert in crochet to achieve a beautiful result—just patience and attention to detail.
These fun crocheted beer mug boots are perfect for birthdays, holidays, or special celebration moments. Handmade gifts often carry more emotional value than store-bought items, especially when they showcase creativity and personal care. When you give someone a handmade gift like these boots, you are giving them comfort and warmth—both literally and figuratively. The playful beer mug design adds an element of humor and uniqueness, making it a memorable present that stands out from traditional footwear gifts. Crafting them also allows you to choose your favorite colors and yarn textures, ensuring that the final result matches your personal aesthetic or your friend’s personality.
Before we begin the Step by Step Tutorial, it’s important to gather the right materials and understand the basic stitches used in this project. Even though the boots look elaborate, they are actually made using simple crochet techniques that are easy to learn and repeat. With patience and practice, you will enjoy the process and feel proud of the final result. These boots are crafted primarily using single crochet, half double crochet, and slip stitch techniques. The handle of the mug, the foam detail, and the base of the boot are constructed separately and then assembled to create the final beer mug effect. So, let’s explore how to bring this playful and unique idea to life.
Materials and Preparation
To start creating your fun crocheted beer mug boots, you will need a few basic materials that are easy to find at craft stores or online. Choose yarn that is soft but durable, as the boots will be worn on the feet and should offer some comfort and resistance. Acrylic or cotton blends work well because they are washable and maintain their shape after repeated use. Consider selecting colors that resemble a beer mug, such as golden yellow or brown for the body and white for the foam.
Next, you will need a crochet hook appropriate for the yarn thickness you choose. Check the yarn label for recommended hook sizes. Using the correct hook ensures that your stitches are even and your boots maintain the right texture and tension. You will also need a yarn needle to sew pieces together, along with scissors to trim excess yarn. Some crafters also like to include soft insoles inside the boots for extra comfort.
The base of the boot will form the sole, which should be sturdy enough to support the foot. If you want a firmer sole, consider adding a second layer or using a slightly thicker yarn for the bottom portion. The key is to maintain comfort while ensuring the boot structure remains intact. The beer mug shape is built upward from the sole, and as you add height, you will begin to see the shape take form.
Once the main body is complete, you will create the characteristic handle of the mug. This handle should be crocheted firmly so it holds its shape without collapsing. You can also lightly stuff the handle with leftover yarn to help reinforce it. After the handle is attached, the final detail will be creating the foam effect at the top. This can be achieved with fluffy textured yarn or by adding loops and decorative stitch textures.
Take your time with assembly and shaping. Properly joining the foam and handle to the boot is essential for the final appearance. Make sure to sew securely and weave in all ends neatly. The beauty of handmade crochet pieces lies in their finished detail, so patience is key.
Once your beer mug boots are complete, try them on and make any adjustments necessary. Sometimes small changes in stitch tension or yarn selection result in slight variations in size, so feel free to customize the pattern to suit your comfort. You might decide to make multiple pairs in different colors once you see how fun and cozy they are.
Creating the Base of the Boots
To craft the base of the fun crocheted beer mug boots, you will begin by forming an oval or foot-shaped sole using single crochets. Work in the round, increasing gradually to achieve a shape that fits your desired foot size. Make sure the sole feels comfortable and thick enough for indoor wear. You may add an extra round or two for wider feet.
Once the sole is complete, you will build up the sides to create the body of the boot. Continue working in the round but without increasing your stitch count. This will naturally cause the fabric to rise upward, forming the cylinder that resembles the body of a beer mug. Crochet this section to the height you desire, depending on whether you want ankle boots or calf-height boots.
At this point, you will add ribbing or texture if desired. Some crafters choose to add lines around the mug to give it a more realistic mug-like look. You can achieve this with front post and back post stitches, which give depth and dimension.
After shaping the boot body, you will work on forming the heel and top edge. The foam detail will come later, so do not worry yet about the fluffy top. For now, just ensure the upper edge is neat and even. A row of slip stitches or single crochet provides a smooth finish.
If you want additional comfort, now is a good time to stitch or glue soft insoles into place. This step is optional but can greatly enhance the feel of the boots. Even basic felt works well and is easy to cut and fit.
With the main boot body complete, set it aside while working on the handle and foam pieces. The next steps will transform the boots into recognizable beer mugs.
Crafting the Handle and Foam Detail
The handle of the fun crocheted beer mug boots is what truly gives it character. To create the handle, crochet a long tube or curved strip that will later be attached to the side of the boot. Adjust the width and length so that it looks proportional and stands out visually.
Once the handle is crocheted, lightly stuff it with a bit of yarn or fiberfill to help it hold its shape. Do not overfill, as the handle should remain flexible but firm. Use a yarn needle to sew the handle securely to the side of the boot. Make sure to attach it at two points: the top edge and mid-level on the side body. This ensures durability and prevents the handle from sagging.
Now it’s time to add the foam detail. Using white or ivory yarn, crochet a fluffy border around the top of the boot that resembles beer froth. You can use textured or loop stitches to create a bubbly effect. The foam should extend slightly over the edge to create a playful overflowing foam look.
Continue adding layers of foam texture until you are satisfied with the visual appearance. Take your time shaping and positioning the foam as it contributes significantly to the realistic beer mug look.
After attaching all details, go over the entire boot to check for loose ends, uneven seams, or shape adjustments. Weave in all yarn tails neatly.
At this point, your beer mug boots should look incredibly charming and ready to gift or wear.
Styling and Gifting Ideas
These fun crocheted beer mug boots make playful and memorable gifts. You can personalize them by choosing colors that match the recipient’s favorite drink—amber tones for lager, dark browns for stout, or even fun pastel versions for a whimsical twist.
Consider packaging the boots in a festive gift box or adding a small tag with a humorous message like “Cheers to Cozy Feet!” This adds a personal touch that enhances the gifting experience.
If you are giving them for Father’s Day, birthdays, or holiday gatherings, you might pair them with a matching crocheted accessory such as a beer mug hat or themed coaster. Creative pairings make the gift feel even more thoughtful.
These boots are also great conversation starters at parties or gatherings. They express personality, humor, and crafting talent all at once. When worn, they bring smiles and laughter and help create warm memories.
You can also make these boots to sell at craft fairs or online. Handmade novelty items often attract attention and can become a signature product. Just ensure your finishing work is neat and professional.
Most importantly, enjoy the process of making and sharing. Crocheting is not just about the final product; it is about expressing creativity and spreading joy.
FAQ
1. Are these beer mug boots suitable for beginners?
Yes, this project is simple enough for beginners who know basic crochet stitches. The tutorial involves repetition, making it a great skill-building project.
2. What type of yarn should I use?
Acrylic or cotton blend yarn works well. Choose soft but sturdy yarn that holds shape while remaining comfortable on the feet.
3. Can I wash these boots?
Yes, hand washing is recommended to preserve shape and details. Use mild detergent and let them air dry.
4. Can I adjust the size?
Absolutely. Simply adjust the length and width of the sole and the height of the boot body to fit different foot sizes.
5. How long does it take to make a pair?
This varies based on experience, but most crafters can complete a pair within a few evenings of relaxed crocheting.
Conclusion
In this Fun crocheted beer mug boots, perfect as a gift.-Step by Step Tutorial, we explored how to create a cozy and humorous pair of boots that bring joy to both maker and wearer.
We discussed materials, construction techniques, handle and foam details, and creative gifting ideas. These boots are a charming project that turns a simple idea into something special, memorable, and practical.
If you decide to make your own pair, I would love to hear your experience! Please leave a sincere opinion and share suggestions to help improve future tutorials. Your feedback is always welcome.