
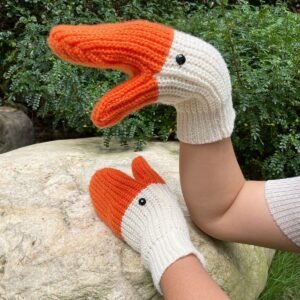
Crocheted duck-shaped gloves-Step by Step Tutorial is a fun and adorable project that brings together creativity, comfort, and unique style. These crocheted duck-shaped gloves are not only practical for keeping your hands warm, but they also add charm and personality to your outfit. Whether you are making them for yourself, for a child, or as a gift, these gloves are sure to make anyone smile. Throughout this tutorial, we will learn how to create these cute gloves from scratch using simple crochet techniques that are easy to follow and enjoyable to make.
Handmade gloves always carry a special kind of value because they represent dedication and care. With this Crocheted duck-shaped gloves-Step by Step Tutorial, you will be able to craft gloves that look playful and unique, making them perfect for birthdays, holidays, or as a cozy everyday accessory. The duck design adds a touch of fun, especially with the little beak and eyes that give the gloves personality. The final result is a piece that combines warmth, softness, and adorable visual appeal, making it loved by both kids and adults.
Before beginning, it’s important to understand that these gloves can be made even if you are not an advanced crocheter. The stitches used are mostly basic, including chain stitch, slip stitch, single crochet, and half double crochet. The shaping and construction are straightforward, and with patience, you can achieve a polished and charming finish. The key to success is taking your time, especially when forming the duck face and securing all decorative elements neatly. So, gather your supplies and let’s dive into the step-by-step process of making your very own crocheted duck-shaped gloves.
Materials and Preparation
To begin the Crocheted duck-shaped gloves-Step by Step Tutorial, you will need to choose your yarn. Soft acrylic or cotton blend yarns work well because they are comfortable on the hands and easy to handle while crocheting. Choose a bright yellow shade for the main body of the glove to represent the duck, and an orange tone for the beak. You will also need a small amount of black yarn to embroider or crochet the eyes.
Selecting the right hook size is important, as it will affect the size and texture of your gloves. Most yarn labels recommend a suitable hook, but generally, a medium-sized hook works well for gloves. If your tension is naturally tight, you may use a slightly larger hook to ensure flexibility. Having a yarn needle on hand will help with sewing parts together and weaving in loose ends.
You should also measure the hand size of the person who will be wearing the gloves. This ensures the gloves fit comfortably and are not too tight or too loose. To measure, simply wrap a measuring tape around the knuckles and measure from the base of the palm to the fingertips. Adjust length and width accordingly when crocheting.
Consider whether you want the gloves to be full-coverage or fingerless. Fingerless gloves are easier to make and are great for everyday activities such as typing or using your phone. If making full gloves, extra shaping will be necessary for each finger section. Both styles work wonderfully with the duck design.
Finally, prepare a clean and comfortable workspace. Crocheting is meant to be enjoyable and relaxing, so take your time. Having good lighting and all your materials close by will make the process smoother and more enjoyable.
Once you have everything ready, you can begin crocheting the base glove shape. After that, you will add decorative elements like the beak and eyes that transform the gloves into adorable duck characters.
Crocheting the Body of the Gloves
The foundation of the Crocheted duck-shaped gloves-Step by Step Tutorial begins with forming the wristband. Start by making a chain that fits comfortably around the wrist. Join the chain to form a loop and crochet around to create a stretchy ribbed band. This ensures the gloves stay snug without feeling tight.
Once the wristband is complete, you will begin crocheting the hand portion. Work in the round to build height, shaping the glove to fit the curve of the palm. For fingerless gloves, stop crocheting just below the fingers. For full gloves, continue to shape each finger individually by dividing stitches into smaller sections.
To keep the gloves comfortable and flexible, avoid crocheting too tightly. Loose and consistent stitches will create a soft texture that feels good to wear. Remember to test the fit as you go along to prevent having to undo work later.
If you are making gloves for children, reduce the number of stitches in the foundation and hand section. Children’s hands are smaller and need less material. It’s always helpful to check measurements before finalizing stitch counts.
The thumb opening can be shaped by skipping stitches during one round and then picking them back up later to build the thumb column. This provides a comfortable fit and keeps the glove shape natural.
Once the main hand shape is done, trim any extra yarn and prepare for the fun part—turning the glove into a duck.
Creating the Duck Face and Features
This is where the Crocheted duck-shaped gloves-Step by Step Tutorial becomes especially enjoyable. Start by creating the beak using orange yarn. Crochet a small oval or triangular shape that will sit on the top of the glove where the knuckles are. Stuff the beak lightly if you want a three-dimensional look.
Sew the beak securely to the glove using a yarn needle. Make sure it is positioned evenly and centered so that the duck face looks symmetrical when worn. Keeping your stitches neat will give a polished appearance.
Next, create or embroider the eyes. You may crochet tiny black circles or simply embroider eyes directly onto the glove. Position them above the beak to form an expressive face. The distance between the eyes affects the duck’s expression—closer eyes create a cute, baby-duck look.
You can also add small feather-like details by attaching short pieces of yarn on top of the glove or making a small crest shape that resembles a tuft of feathers. This adds charm and extra personality to your gloves.
If desired, add rosy cheeks using small circles of pink yarn. This gives the duck a sweet and playful appearance, especially for children’s versions. Make sure all decorative details are securely fastened.
Once the face is complete, you will start to truly see the transformation from a simple glove to a fun and expressive duck character.
Finishing Touches and Personalization
To make your crocheted duck-shaped gloves even more special, consider customizing them based on the recipient’s preferences. You can change the duck’s expression by adjusting the eyes or shaping the beak differently. Every variation gives the gloves a different personality.
For added warmth, you may line the inside of the gloves with fleece fabric. This is optional but provides extra comfort for cold weather. Simply sew the lining to the inside, ensuring that the gloves maintain flexibility.
If you want to make matching sets, consider crocheting a duck-shaped hat or scarf to go along with the gloves. Matching accessories make great gift sets for birthdays and winter holidays.
These gloves are also excellent for craft fairs and handmade gift markets. Fun animal-themed accessories are always popular, especially when they are practical and wearable.
To ensure longevity, remind the wearer to hand wash the gloves gently. Handmade items need care to stay in good condition over time.
Once all final touches are complete, your adorable duck-shaped gloves are ready to be worn or gifted. Enjoy the joy and warmth this handmade project brings.
FAQ
1. Are these gloves beginner-friendly?
Yes, this project uses basic crochet stitches and is suitable for beginners with patience.
2. Can I make these gloves in different sizes?
Absolutely. Adjust the chain length and stitch count to fit any hand size, including children and adults.
3. What yarn works best?
Soft acrylic or cotton blends are ideal because they are comfortable and easy to care for.
4. Can I make them fingerless?
Yes, many crafters prefer fingerless designs because they are easier to make and practical for daily use.
5. How long does the project take?
Depending on your speed, a pair can be completed in one to three evenings of relaxed crocheting.
Conclusion
This Crocheted duck-shaped gloves-Step by Step Tutorial has shown how to create a pair of adorable and functional gloves that bring warmth and joy.
From choosing materials to shaping the gloves and adding charming duck details, each step is an opportunity to express creativity.
These gloves make delightful gifts and are enjoyable to wear. If you try this project, please leave your sincere opinion and suggestions. Your feedback helps inspire more handmade creativity and future tutorials.