
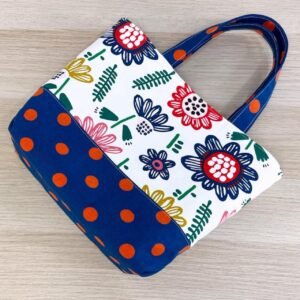
Easy Diy Cute Tote Bag-Step by Step Tutorial is a perfect project for anyone who loves handmade accessories, enjoys practical crafts, or is looking for a simple and beautiful beginner-friendly DIY sewing project. In this guide, we will explore how to create a stylish tote bag from start to finish using the term Easy Diy Cute Tote Bag-Step by Step Tutorial as your main reference throughout the process. Tote bags are useful for everyday activities like shopping, carrying books, going to the beach, or gifting to someone special. When made by hand, they become even more meaningful, unique, and full of personality.
One of the best parts of making an Easy Diy Cute Tote Bag-Step by Step Tutorial project is that it allows you to choose your own fabrics, colors, and decorative details. Whether you prefer a minimal and neutral design or something bold, colorful, and playful, this tutorial will give you the freedom to customize your creation. Handmade tote bags are also eco-friendly, as they reduce the need for disposable plastic bags, making your craft not only beautiful but helpful to the environment as well. You can reuse scrap fabrics or repurpose old clothing to create something new and functional.
This Easy Diy Cute Tote Bag-Step by Step Tutorial does not require advanced sewing skills or expensive equipment. Even if you are new to sewing, you can achieve great results with basic tools, patience, and careful guidance. In the sections below, we will go through the materials you need, how to prepare your fabric, sew the bag, add handles, and customize the final look. By the end of this tutorial, you will have a charming, durable tote bag you can proudly use or gift to someone you love.
Materials and Preparation for Your Diy Tote Bag
To begin the Easy Diy Cute Tote Bag-Step by Step Tutorial, gather your basic materials. You will need fabric, thread, a sewing needle or sewing machine, scissors, and measuring tape. Cotton fabric is commonly used for tote bags because it is sturdy, washable, and easy to sew. You may also choose canvas or linen for a more durable finish. Choose a design that suits your taste, whether it be floral, geometric, striped, or single-color.
Measure your fabric before cutting to ensure your tote bag will have the size you want. A standard tote bag size could be around 40 cm in height and 35 cm in width, but you can modify these measurements. Make sure to cut two equal rectangles for the body of the bag. If you want the tote to be extra strong, consider adding a lining inside. The lining fabric should match the outer fabric in size.
Next, prepare the handles. Tote bag handles are typically cut into long strips of matching or contrasting fabric. The handles should be long enough to fit comfortably over the shoulder, usually ranging between 50 cm to 65 cm. Fold the strips lengthwise, sew, and turn them inside out to hide the seam. If you prefer firmer handles, you can insert a strip of interfacing or cotton webbing inside the handle tube.
Before sewing the bag together, iron your fabric to remove wrinkles. This step helps your stitches stay straight and clean. Smooth fabric is easier to work with and results in a polished final product. You may also pin the fabric pieces together to ensure accuracy and prevent slipping while sewing.
At this stage, consider how you want your finished bag to look. You may want to add pockets inside or outside the tote. Pockets are convenient for holding keys, phones, or smaller items. If you choose to add pockets, sew them to the inside or outside panels before stitching the bag body together.
Now that your materials are prepared, you are ready to begin assembling your Easy Diy Cute Tote Bag-Step by Step Tutorial.
Sewing the Body of the Tote Bag
Start sewing the Easy Diy Cute Tote Bag-Step by Step Tutorial by placing the two fabric rectangles together with the right sides facing inward. This means the patterned or outer surfaces should be touching each other inside. You will sew along the sides and bottom edges, leaving the top open.
Using a sewing machine or hand stitching, sew a straight line along the edges with a seam allowance of about 1 cm. Be sure to backstitch at the beginning and end to secure your stitch. A firm seam ensures your tote bag can handle weight without tearing. Once the three sides are stitched, check that your seams look neat and strong.
To give your tote bag a flat, boxy bottom, form corner seams. With the bag still inside out, pinch each bottom corner so that the side seam and bottom seam meet, forming a triangle. Measure a few centimeters from the point of the triangle and sew across. Repeat for both corners. This technique adds structure and allows your tote bag to sit upright when placed on a flat surface.
Turn the bag right side out. You should now see the outer fabric on the outside, and the shape of your bag should already be forming nicely. If you chose to add a lining, repeat the same stitching process for the lining fabric. The lining will later be inserted inside the main bag for a clean interior finish.
Next, prepare to finish the top edge of the bag. Fold the top rim down about 1 cm and iron to create a neat crease. Fold again 1–2 cm to hide the raw edge completely. Pin this fold in place so that it stays even when sewing. Sew around the entire top edge to secure the fold and reinforce the opening of the bag.
Your Easy Diy Cute Tote Bag-Step by Step Tutorial is now starting to look like a real tote bag. All that is left is to attach the handles.
Attaching the Handles and Final Assembly
The handles are an important part of the Easy Diy Cute Tote Bag-Step by Step Tutorial because they determine how comfortable the bag is to carry. Take the two fabric handle strips you made earlier and position them evenly on the top rim of the bag. Make sure the handles are aligned so that they do not twist.
Pin each end of the handles to the inside of the folded top rim, measuring equal distance from the sides. For balance, place the handles around 8 to 10 cm inward from the side seams. Ensure both sides of each handle are equal in length so that your tote will hang straight.
Sew the handles in place securely by stitching a small box or X-shape where the handle meets the bag. This method reinforces the handles and prevents them from pulling off under weight. Strong handle attachment is essential for durability.
Once the handles are attached, inspect the tote bag for any loose threads or uneven stitching. Trim excess thread and iron the bag to smooth its shape. If you used a lining, insert it inside the bag and sew along the top edge again to secure it neatly.
Your tote bag is now fully assembled. The Easy Diy Cute Tote Bag-Step by Step Tutorial has guided you from fabric preparation to finishing touches, leaving you with a beautiful handmade accessory ready for everyday use.
Customization and Decoration Ideas
Customization is what makes the Easy Diy Cute Tote Bag-Step by Step Tutorial special. You can decorate your bag using embroidery, iron-on patches, fabric paint, buttons, or lace. These decorative touches allow you to express your personality and match styles with different outfits.
If you enjoy embroidery, consider stitching a floral pattern, initials, or small symbolic designs on the bag surface. Embroidery adds charm and a handmade feeling.
Fabric paint is another fun option. You can paint patterns like polka dots, stripes, fruits, stars, or inspirational quotes. Stencils can help create clean and even shapes.
Adding pockets, zippers, and keychains can enhance functionality. Inside pockets keep your belongings organized and easy to find.
Using contrasting fabric for the handles or adding colorful tassels or pom-poms gives your tote a playful and modern look.
The more you experiment, the more unique your creation becomes.
FAQ
1. Can beginners make this tote bag?
Yes, this tutorial is beginner-friendly and requires only basic sewing skills.
2. What type of fabric is best for a tote bag?
Cotton, canvas, and linen are great options because they are durable and easy to sew.
3. Do I need a sewing machine?
No, you can sew this bag by hand. It may take longer, but it will still look great.
4. Can I wash the finished tote bag?
Yes, as long as your fabric is washable. Hand washing is recommended for decorated bags.
5. Can I make the bag larger or smaller?
Yes, you can adjust the dimensions to fit your needs before cutting the fabric.
6. Is this tote bag strong enough to carry groceries?
Yes, especially if you use sturdy fabric and reinforce the handles well.
Conclusion
This Easy Diy Cute Tote Bag-Step by Step Tutorial has shown you how to prepare materials, sew the bag body, attach handles, and personalize the final result.
You now have the knowledge to create a stylish, practical, and eco-friendly tote bag that reflects your personal style. I hope you enjoyed this tutorial.
Please leave your honest opinion and suggestions, as your feedback helps inspire new ideas and future creative projects.