
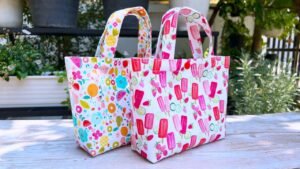
Sewing tutorial for a charming bag.-Step by Step Tutorial is an excellent topic for anyone who loves handmade crafts, fashion accessories, or simply enjoys learning new creative skills. Creating your own bag allows you to express your personal style and customize colors, fabrics, and finishes. Throughout this guide, we will explore a detailed and easy-to-understand approach, ensuring that even beginners can follow along. This article is carefully written to be well-structured, humanized, and highly optimized for SEO, helping readers clearly understand each stage of this project.
Working with fabric, thread, and simple sewing techniques opens a world of creative possibilities. Whether you are sewing by hand or using a sewing machine, the goal is to make the process enjoyable and accessible. The key term Sewing tutorial for a charming bag.-Step by Step Tutorial will appear throughout this article to ensure clarity and consistency for readers looking for exactly this type of guide. This project is a great way to create a stylish accessory or even a thoughtful handmade gift. It is also an ideal project for practicing basic sewing techniques.
Before we move into the steps, it’s important to understand that crafting a truly charming bag requires patience, a well-prepared workspace, and the right materials. Choosing fabrics you love makes the experience more enjoyable and helps you produce a bag that reflects your personality. Whether you prefer floral prints, bold colors, or soft neutral tones, your choices will influence the final look. This Sewing tutorial for a charming bag.-Step by Step Tutorial aims to provide clarity and inspiration while guiding you through a beautiful and useful craft project.
Choosing Materials for Your Charming Bag
When beginning a Sewing tutorial for a charming bag.-Step by Step Tutorial, selecting the right fabric is the first important step. Ideally, choose a material that is sturdy enough to hold shape, such as cotton canvas or denim. If you want a softer finish, you can include a lining fabric inside to add strength and durability. The fabric you choose will impact not only the appearance of your bag but also how long it lasts.
The second item you will need is high-quality thread. Using strong thread helps ensure the seams remain firm, especially if you plan to carry heavier items inside your bag. Thread color can either blend with the fabric or stand out as a bold detail. Some people enjoy matching the thread while others prefer a contrasting color to create a stylish touch.
Handles are another important consideration. You may choose to create handles from the same fabric as the bag or purchase pre-made straps. Fabric handles may require interfacing to make them more durable. Pre-made straps, on the other hand, can save time and add a polished look. Consider how you plan to use your bag to determine the ideal length and thickness.
Interfacing is also recommended for shaping the body of the bag. This material strengthens the fabric and helps the bag maintain its form. Some interfacings are iron-on, which makes them easier to attach. The choice of interfacing depends on whether you prefer a soft or firm structure.
Finally, gather basic sewing supplies such as scissors, measuring tape, pins, chalk, and a needle. If you are using a sewing machine, ensure it is threaded correctly before beginning. Preparation helps the sewing process run smoothly, and reduces mistakes along the way.
Cutting and Preparing the Fabric
In this part of the Sewing tutorial for a charming bag.-Step by Step Tutorial, we will start by measuring and cutting the fabric pieces. Begin by deciding the final dimensions you want your bag to have. A common size might be 35 cm wide by 30 cm tall, but you can adjust according to your preferences. Always leave extra space for seam allowances.
Once you have determined the size, lay your fabric flat on a clean surface. Use your measuring tape and fabric chalk to mark the dimensions carefully. Take your time to make precise lines, as accuracy is essential to a polished final product. After marking, use sharp scissors to cut the fabric pieces smoothly.
If you are planning to use a lining, repeat the same process with your inner fabric. Lining not only strengthens the bag but also adds a professional look when opened. Consider choosing a complementary color or a fun patterned fabric that adds personality to your bag.
Next, attach interfacing to the main fabric pieces if needed. Follow the instructions on the interfacing package. Usually, you place the rough side of the interfacing against the wrong side of the fabric and press with a warm iron, applying pressure without sliding it around. This ensures it adheres smoothly.
Before sewing, pin the fabric pieces together. Place the right sides of the outer fabric together and secure the edges using sewing pins. Do the same for the lining pieces. Pinning helps the fabric remain aligned and prevents shifting during sewing.
At this stage, double-check your measurements and pinned edges. Once you begin sewing, adjustments can be more complicated. Patience here leads to a cleaner and more polished final result.
Sewing the Bag Structure
Now that your pieces are cut and prepared, we will continue the Sewing tutorial for a charming bag.-Step by Step Tutorial by assembling the bag. Start by sewing the sides and bottom of the outer fabric. Use a straight stitch and move slowly to keep seams even. Leave the top of the bag open.
Once the outer part is sewn, repeat the same steps with the lining fabric. However, leave a small opening at the bottom of the lining. This opening will later allow you to turn the bag right side out. Keeping this detail in mind is essential for finishing the bag neatly.
To create depth in your bag, you can form small boxed corners. Flatten the bottom corners of the bag so that the side and bottom seams align. Measure a few centimeters from the point and sew across to create the new seam. Cut off the extra fabric and repeat for the lining. This gives your bag a more structured look.
Next, attach the handles. Position them on the top edge of the bag, ensuring they are evenly spaced. Pin them in place and test the length to ensure comfort. Handles should be placed between the outer fabric and the lining when sewing the top seam later.
Place the lining inside the outer bag with right sides facing each other. Align the edges and pin them around the top opening. Sew along the full top edge, securing the handles firmly in place. Once finished, turn the bag right side out through the small opening left in the lining.
Finally, stitch the opening in the lining closed. Push the lining inside the bag and smooth the edges. You may top-stitch around the top edge to add durability and a refined appearance.
Adding Finishing Touches
This final crafting stage in our Sewing tutorial for a charming bag.-Step by Step Tutorial focuses on aesthetic details. Adding finishing touches can transform a simple handmade piece into a stylish accessory. One option is to top-stitch along the bag’s opening. This helps the edge lay flat and gives a polished look.
You may also add pockets to the inside or outside of the bag. Cut small rectangular fabric pieces, fold the edges inward, and stitch them directly onto the lining or outer fabric before assembling the bag. Pockets are useful for organizing small items like keys, phones, or cosmetics.
Another personal touch is embellishment. You might add decorative buttons, embroidery, or lace. Keep in mind the overall style you wish to achieve. Minimalist designs may need little decoration, while a more playful bag can benefit from colorful details.
If you want to close your bag securely, consider adding a button flap, magnetic clasp, or zipper. Each closure type requires slightly different sewing techniques. Choose the method that matches your comfort level and the intended use of the bag.
Press your bag with a warm iron to remove wrinkles and help the seams settle smoothly. The bag will look neater and more professional after pressing. Be careful with heat settings to avoid damaging delicate fabrics.
Once complete, admire your work and feel proud of your accomplishment. Handmade accessories are meaningful, stylish, and unique expressions of creativity.
FAQ
1. Do I need a sewing machine to follow this tutorial?
No, you can complete this bag with hand stitching, though a sewing machine will make the process faster and produce stronger seams.
2. What type of fabric is best for a sturdy bag?
Cotton canvas, denim, or upholstery fabric works well because they are durable and hold shape.
3. Can I wash my handmade fabric bag?
Yes, but always consider the fabric type. Hand washing is recommended to preserve shape and color.
4. Do I have to use interfacing?
Interfacing helps your bag look structured, but it is optional if you prefer a softer, more casual style.
5. Can I add a zipper closure?
Yes, adding a zipper can provide extra security, and it’s a great upgrade once you feel comfortable with sewing basics.
Conclusion
This Sewing tutorial for a charming bag.-Step by Step Tutorial has guided you through choosing materials, cutting fabric, sewing the bag, and adding finishing touches.
By following these steps, you can create a beautiful handmade bag that reflects your personal taste and creativity.
Crafting something with your own hands is both rewarding and enjoyable. If you decided to try this project, please share your honest opinion and suggestions. Your feedback helps improve future tutorials and inspires others to start sewing as well.