
How to make a crocheted vest with a front tie.-Step by Step Tutorial is a wonderful project for anyone who enjoys creating stylish handmade clothing. This type of vest is light, versatile, and perfect for layering with different outfits, adding a personalized touch to your wardrobe. Whether you are new to crochet or already comfortable with basic stitches, this guide will gently walk you through each part of the process. The main goal is to make the experience smooth, enjoyable, and inspiring. Using the keyword How to make a crocheted vest with a front tie.-Step by Step Tutorial throughout the text helps ensure clarity and strengthens understanding for anyone searching specifically for this project.
Crocheting clothing pieces is not only rewarding but also offers endless creative possibilities. A vest with a front tie can be used in casual, beachy, or even elegant looks depending on the yarn type and colors you choose. You will learn how to select the right yarn, choose the correct hook size, measure your body, and assemble the vest with neat finishing. Following a How to make a crocheted vest with a front tie.-Step by Step Tutorial allows you to create a piece that fits your personal style and comfort level while practicing key crochet techniques.
Before diving into the steps, it’s important to gather everything you need. The materials are simple and easy to find: yarn, a crochet hook, scissors, and a tapestry needle. Choosing yarn that feels comfortable against your skin makes a big difference, especially because vests are worn directly over tops or dresses. In this How to make a crocheted vest with a front tie.-Step by Step Tutorial, we will go through each stage slowly and clearly, ensuring that even beginners can follow along with confidence and create something beautiful.
Materials You Will Need
To begin this How to make a crocheted vest with a front tie.-Step by Step Tutorial, start with choosing the right yarn. A lightweight yarn is ideal if you want a breezy, soft vest suitable for warm weather. Cotton yarn is often preferred because it gives a smooth texture and is comfortable for everyday wear. If you want a cozier vest for cooler days, choosing a soft acrylic or wool-blend yarn is a great alternative.
Next, select your crochet hook. The hook size should match the yarn weight indicated on the yarn label. Using the right hook size helps ensure your stitches look even and that your vest has a balanced texture. If your stitches tend to be tight, consider using a hook one size bigger to allow a more flexible fit and feel.
You will also need a pair of sharp scissors. Precise cutting helps avoid frayed ends and ensures your finishing looks polished. A tapestry needle is essential for weaving in yarn ends and connecting parts, helping the project look cohesive and professional.
Measuring your body is also important for fit. Take measurements around your bust and from your shoulder to the desired vest length. These measurements will guide how many chains to start with and how long to work each section. Customizing measurements is one of the benefits of following a How to make a crocheted vest with a front tie.-Step by Step Tutorial, resulting in a vest tailored perfectly to your own size.
Lastly, prepare a comfortable place to work where you can keep your materials organized. Having a peaceful workspace helps maintain motivation and enjoyment throughout the project.
Crocheting the Back Panel
The back panel is the foundation of this How to make a crocheted vest with a front tie.-Step by Step Tutorial. Begin by creating a foundation chain that matches your bust measurement. To do this, crochet a chain long enough to equal the width you need. Make sure the chain is not twisted before starting your first row.
Once your chain is ready, choose a simple stitch pattern. The single crochet stitch creates a dense, warm finish, while the double crochet stitch results in a looser, more flexible fabric. A popular option for vests is to alternate stitches for texture, such as combining half-double crochet with chain spaces.
Work your stitch pattern row by row, checking the height as you go. Keep your tension consistent to prevent the fabric from tightening or widening unevenly. Practicing slow and mindful stitching helps maintain a smooth and attractive shape throughout the project.
As you continue, occasionally hold the panel against your body to ensure the length is right. This is a helpful way to confirm that you are on track and making the vest fit your preferences. A personalized garment is one of the best outcomes of this How to make a crocheted vest with a front tie.-Step by Step Tutorial.
When the back panel reaches your desired length, fasten off and weave in loose ends using the tapestry needle. This step helps prevent unraveling and gives a clean look to the finished work. Set the back panel aside as you move to the next part.
Keep in mind that the back panel determines the overall stability of your vest. Taking your time to finish it neatly is key to achieving a professional-looking result.
Creating the Front Panels
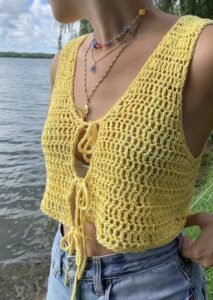
In this How to make a crocheted vest with a front tie.-Step by Step Tutorial, the front panels are what give the vest its charming appearance with the adjustable front tie. Each front panel will be created separately, mirroring each other to form the left and right sides.
Start by chaining half the width of your back panel for each front panel. This will create a balanced fit once the vest is assembled. Using the same stitch pattern as the back panel helps maintain the overall texture and style.
Work the front panel rows the same way as the back, stopping when the length matches the back panel. Consistency in stitch height and pattern makes assembly easier and results in a polished final piece. Pay attention to your edges as well, keeping them as straight as possible.
To shape the neckline, you may want to decrease stitches slightly near the top of the front panels. This can help the vest drape more naturally along your chest, creating a comfortable fit. The shaping does not need to be complicated; simply reduce one or two stitches at the beginning of a few rows.
Once both front panels are complete, fasten off and weave in the yarn ends. Lay them next to the back panel to ensure symmetry. The front pieces should align neatly with the back, forming clean edges that are easy to seam later.
These front panels are where the beauty of How to make a crocheted vest with a front tie.-Step by Step Tutorial truly shows, offering style, personalization, and softness.
Assembly and Creating the Front Tie
Now that all panels are completed, the next phase of this How to make a crocheted vest with a front tie.-Step by Step Tutorial is assembling the vest. Begin by placing the panels together with the right sides facing inward. Use your tapestry needle and leftover yarn to seam the shoulders first. Sew carefully to keep the seams flat and smooth.
Next, seam the sides of the vest, leaving openings for the arm holes. The size of these openings depends on your comfort and preference. A good rule is to leave enough room for easy movement without excess looseness. Try the vest on as you seam to check fit.
Once the vest structure is assembled, it’s time to create the front tie. To make the tie, crochet a long chain that can wrap comfortably around the front. After chaining, work one or two rows of single crochet to make the tie thicker and more durable.
Attach the tie securely to both front panels at the chest level. This is the defining feature of the How to make a crocheted vest with a front tie.-Step by Step Tutorial, giving the vest its adjustable closure and charming look. Make sure both sides are even so the vest ties symmetrically.
Finally, block your vest if needed. Blocking helps smooth the fabric and define the shape. Lay the vest flat, dampen it lightly, and let it dry in the desired form. This gives the vest a professionally finished look.
Your vest is now complete and ready to wear, gift, or style in different ways.
FAQ
1. Can beginners make this vest?
Yes, this tutorial is suitable for beginners who know basic stitches like chain and double crochet.
2. What yarn is best for a light and airy vest?
Cotton or cotton-blend yarn works beautifully for a breathable and comfortable finish.
3. How long does it take to finish the vest?
It depends on your crochet speed, but generally one to three days of relaxed stitching.
4. Can I add sleeves to this vest?
Yes, once you master the vest structure, you can extend the design into a cardigan by crocheting sleeves.
5. How do I adjust the vest size?
Simply change the starting chain length and number of rows to match your body measurements.
Conclusion
This How to make a crocheted vest with a front tie.-Step by Step Tutorial has guided you through choosing materials, crocheting panels, assembling the vest, and adding the front tie.
The finished piece is stylish, customizable, and enjoyable to create. If you make your own vest, share your honest opinion and suggestions.
Your feedback helps inspire others and makes this creative community even more meaningful.