
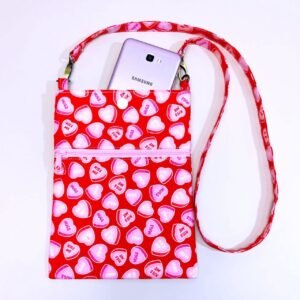
Cute phone bag with pocket-Step by Step Tutorial is a wonderful project for those who love handmade accessories and want to create something both functional and stylish. This type of bag is small, light, and perfect for carrying essential items, especially your phone, without needing a large purse. The main advantage of following a Cute phone bag with pocket-Step by Step Tutorial is that you can customize colors, size, and decorative details according to your own taste. This tutorial is suitable for beginners and intermediate crafters, offering a practical and enjoyable experience while teaching valuable crafting skills.
Creating a bag by hand brings a personal touch to your daily routine. Whether you like crocheting, sewing, or combining techniques, this project offers flexibility. A phone bag can be used while traveling, shopping, walking, or simply going about your day. The added pocket is especially helpful for holding small items like cards, earphones, or keys. Throughout this Cute phone bag with pocket-Step by Step Tutorial, we will guide you through materials selection, measurements, construction steps, and finishing details to ensure your final product is both durable and charming.
Before starting, it’s important to prepare your materials and workspace. You will need fabric or yarn (depending on your preferred method), a needle or hook, scissors, and simple measuring tools. Choosing comfortable and durable material ensures your bag remains strong and attractive, even with frequent use. As you follow this Cute phone bag with pocket-Step by Step Tutorial, take your time with each step, enjoy the creative process, and feel free to personalize your piece with patterns, textures, colors, and embellishments.
Materials and Preparation
To begin this Cute phone bag with pocket-Step by Step Tutorial, start by selecting the main material for your bag. If sewing, choose cotton fabric or canvas for durability. If crocheting, choose a medium-weight yarn that holds shape well. Light or overly stretchy yarn may cause the bag to lose its structure, so picking the right material ensures a more professional finish.
Next, choose your closure style. You may use a button, snap, or drawstring depending on the look you prefer. A simple button works well for a classic style, while a snap offers convenience and a clean appearance. Consider the color and size of the closure to match the overall design of your Cute phone bag with pocket-Step by Step Tutorial project.
Gather the tools needed: scissors, measuring tape, fabric marker or stitch counter, and a needle suited to your chosen technique. Keeping your tools organized helps maintain a steady workflow and reduces mistakes during construction.
Measure your phone to determine the appropriate bag size. Make sure to add extra space around the edges to accommodate seams or stitch thickness. A comfortable fit allows your phone to slide in and out easily while still being secure.
Choose lining material if sewing. Lining prevents stretching, protects the phone, and adds a neat interior finish. You can also skip lining if using sturdy yarn or fabric, but lining usually improves durability and quality.
Prepare your workspace by laying out all materials neatly. A clean and comfortable crafting environment helps maintain focus and increases enjoyment throughout this Cute phone bag with pocket-Step by Step Tutorial.
Creating the Bag Body
To build the main body of the Cute phone bag with pocket-Step by Step Tutorial, begin by cutting or crocheting a rectangular piece that will fold to form the bag shape. The rectangle should be tall enough to fully cover the phone plus extra space for seams or edges.
If sewing, fold the fabric in half and stitch the sides, leaving the top open. Make sure to reinforce the seams to prevent fraying. Press the seams flat using an iron to give a clean finish. This step helps your bag maintain its shape over time.
If crocheting, work in rows to form a rectangle. A simple stitch pattern such as single crochet or half double crochet provides good structure. Keep the tension consistent to avoid uneven edges. Once the rectangle reaches the desired length, fold it and seam the sides using slip stitch or yarn needle.
Consider adding reinforcement to the bottom of the bag. A stronger bottom helps prevent stretching and protects your phone. You can add a small layer of felt or an extra row of tighter stitches to create strength and stability.
Test the fit by placing your phone inside the bag. Ensure that the bag is neither too tight nor too loose. Adjust if necessary by adding or removing rows or fabric width.
Completing the bag body forms the foundation for your Cute phone bag with pocket-Step by Step Tutorial. Once this step is done, you’re ready to move on to the pocket, which adds both charm and functionality.
Making and Attaching the Pocket
The pocket is the special feature that makes this Cute phone bag with pocket-Step by Step Tutorial both convenient and stylish. Start by measuring a small rectangle, large enough to hold items such as cards or keys. The pocket should be smaller than the bag body but large enough to be practical.
If sewing, cut the pocket fabric and fold under the edges to create neat seams. Ironing the folded edges helps keep them in place. Sew the pocket onto the bag body, leaving the top open. Double-stitch the edges to reinforce strength.
If crocheting, create a small rectangle using the same or a complementary stitch pattern. The pocket can be a contrasting color or texture for a decorative touch. Attach the pocket by stitching or crocheting it onto the front panel of the bag.
Make sure the pocket is centered and aligned. A crooked pocket can affect both appearance and usability. Take time to position it carefully before attaching.
Test the pocket by placing a small item inside. Ensure the pocket holds securely and does not sag. If needed, you can reinforce the bottom stitch or seam line for extra support.
The pocket adds personality and practicality to the Cute phone bag with pocket-Step by Step Tutorial, making the bag more useful for everyday life.
Adding the Strap and Finishing Touches
Now it’s time to create the strap. The strap can be long or short depending on how you want to carry the bag. For a crossbody style, make the strap longer. For a wristlet or hand carry, make it shorter. Use strong stitches or fabric to prevent stretching.
If sewing, cut a long strip of fabric, fold it several times, and stitch along the edge. This creates a strong, comfortable strap. Attach it securely to the sides of the bag.
If crocheting, create a chain of desired length and work several rows of single crochet to thicken it. Attach the strap using sturdy stitching to ensure durability.
Choose your closure and attach it. A button can be sewn onto the front, with a loop at the top of the bag to secure it. A magnetic snap can also be installed for a modern look. Make sure the closure aligns properly and holds the bag closed.
Add optional decorative elements such as small charms, appliqués, embroidery, or tassels. These details personalize your piece and make it unique.
Once finished, test the bag by carrying it with your phone inside. Make sure it feels comfortable and secure. Your Cute phone bag with pocket-Step by Step Tutorial project is now complete.
FAQ
1. Can beginners make this phone bag?
Yes, the tutorial is simple enough for beginners, especially if using basic stitches or straight seams.
2. What materials are recommended?
Cotton fabric or medium-weight yarn works well for durability and comfort.
3. Can I wash the bag?
Yes, but hand washing is recommended to maintain shape and structure.
4. How can I adjust the size?
Measure your phone and add extra space for seams or stitches, adjusting width and height as needed.
5. Can I add more pockets?
Yes, you can add pockets inside or outside depending on your personal needs.
Conclusion
This Cute phone bag with pocket-Step by Step Tutorial has shown how to select materials, build the bag body, attach the pocket, add the strap, and finish the details.
You now have a beautiful, functional, and personalized accessory that can be used daily or gifted to someone special.
If you decide to make this project, feel free to leave your honest opinion and suggestions. Your feedback helps inspire more creative ideas and strengthens the crafting community.