
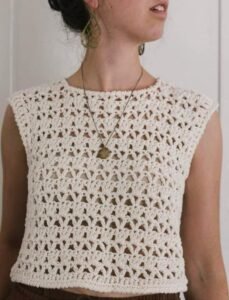
Simple crochet tank top-Step by Step Tutorial is a wonderful project for beginners and experienced crafters alike. If you enjoy making wearable crochet pieces that are stylish, lightweight, and comfortable, then this tutorial is perfect for you. The simple crochet tank top-step by step tutorial will guide you through the entire process, from selecting the right yarn to joining the final stitches. This piece is ideal for warm weather, layering over other tops, or pairing with casual outfits for a relaxed and charming look.
Creating a handmade tank top allows you to express your personal style in a way that store-bought clothing cannot. You can choose your favorite color palette, yarn texture, and even adjust the fit to match your body perfectly. The simple crochet tank top-step by step tutorial is not only a practical project but also a satisfying creative experience. Whether you are making it for yourself or as a thoughtful handmade gift, the result is always special and full of personality.
Before beginning, it is important to understand that patience plays a key role in crocheting. Even though this project is simple, each stitch contributes to the final beauty of the piece. Take your time, follow the steps carefully, and you will enjoy both the process and the final outcome. In this article, you will find detailed instructions, helpful tips, and suggestions to ensure your simple crochet tank top-step by step tutorial is clear, enjoyable, and rewarding.
Materials You Will Need
To begin your tank top, you will need to choose the right yarn. A lightweight cotton or cotton-blend yarn is ideal because it creates a breathable and soft fabric. Cotton yarn also holds its shape well and is comfortable against the skin, especially in warmer weather.
Selecting the correct crochet hook is equally important. Check the yarn label for recommended hook size, but remember that you can adjust the hook to achieve your desired tension. A slightly larger hook can create a more open and airy look, while a smaller hook results in a tighter, more structured fabric.
You will need scissors and a yarn needle for weaving in ends. These are small tools, but they play an essential role in ensuring a polished finish. A measuring tape is also useful for checking length and width as you work, helping you ensure the tank top fits correctly.
Having stitch markers can make your work much easier, especially when working in the round or shaping the neckline and straps. They help keep track of important points and prevent confusion as you move through sections of the pattern.
Before starting the simple crochet tank top-step by step tutorial, consider whether you want your tank top to be cropped, regular length, or longer. Deciding this early allows you to plan accordingly and avoid having to redo sections later.
Make sure you are familiar with basic crochet stitches such as chain, single crochet, double crochet, and slip stitch. These common stitches form the foundation of the tank top and are easy to practice if you need a refresher.
Beginning the Base of the Tank Top
Start with a foundation chain that matches the measurement of your bust or desired width. The length of your chain will determine how fitted or loose your top will be. The simple crochet tank top-step by step tutorial encourages measuring yourself before beginning to ensure good fit.
Once you have your foundation chain, join it in the round with a slip stitch, making sure the chain is not twisted. This will create a seamless loop that forms the body of your tank top. Crocheting in the round helps avoid side seams and gives a neat, continuous finish.
Begin working in simple stitch rounds, such as half double crochet or double crochet. These stitches create a smooth, flexible texture that drapes nicely on the body. Work steadily, maintaining even tension so your fabric looks clean and consistent.
Try on your work occasionally as you crochet to ensure the fit stays comfortable. Handmade clothing allows for adjustments during the process, which is one of the benefits of following a simple crochet tank top-step by step tutorial.
Continue crocheting until the piece reaches your desired height below the arms. This point is where you will begin shaping the armholes and neckline. The shaping gives structure to the tank top and allows it to fit naturally over the shoulders.
Be patient during this part of the process, as shaping requires attention to detail. Use stitch markers to help guide decreases and ensure the tank top remains balanced and symmetrical.
Shaping the Top and Creating the Straps
Once the body reaches the armhole area, you will stop crocheting in the round and begin working in rows. This allows you to shape the front and back pieces separately. The simple crochet tank top-step by step tutorial emphasizes keeping track of your stitch count to maintain symmetry.
To shape the neckline, you will gradually decrease stitches on either side. This creates a soft V or rounded shape depending on your desired style. Adjustments can be made based on personal preference, which is one of the joys of handmade clothing.
Continue decreasing until you reach the height where the straps will begin. The width of the straps can vary, but a comfortable width is usually between three to six stitches. Work each strap individually, crocheting them to desired length.
Straps should be sturdy enough to hold the top in place but not too thick to take away from the delicate look of the piece. The simple crochet tank top-step by step tutorial reminds you to measure the straps evenly to prevent one side from sitting lower than the other.
Once the straps have reached your preferred length, attach them securely to the back section using your yarn needle. Make sure to weave the ends neatly so that the stitches are tight and nearly invisible.
Try on the top again to check the fit. Adjust strap length if needed. This customization step ensures that your tank top is comfortable and flattering.
Finishing Touches and Variations
After assembling your tank top, it’s time to weave in all loose ends using a yarn needle. This gives your project a neat and professional finish. A clean edge along the neckline and armholes creates a polished look.
If you would like, you can add a border around the neckline and armholes. A simple single crochet border is elegant and helps reinforce areas that receive more wear. This detail enhances the durability of your simple crochet tank top-step by step tutorial project.
Consider adding decorative elements such as small buttons, lace edging, or embroidered flowers. These simple touches can turn a basic tank top into something unique and eye-catching.
You may also experiment with stitch patterns. For instance, alternating rows of double crochet and chain spaces can create a more open, airy design. This variation is perfect for summer or beachwear.
If you prefer a fitted waist, you can add a drawstring or slightly reduce stitches in the midsection to create shaping. Handmade clothing gives you the freedom to adapt designs to your style and comfort.
Finally, wash and block the tank top. Blocking helps the fabric relax and smooth out, enhancing the overall appearance and fit of the top.
FAQ
1. Is this project suitable for beginners?
Yes, this is a beginner-friendly project using basic stitches.
2. What yarn is best for a crochet tank top?
Cotton yarn is recommended for comfort and breathability.
3. Can I adjust the length of the tank top?
Absolutely, you can make it cropped, hip-length, or long.
4. How long does this project take?
Time varies, but most crafters finish in a few days depending on pace.
5. Can I make this tank top in multiple sizes?
Yes, simply adjust the foundation chain and total rows to fit your measurements.
Conclusion
This simple crochet tank top-step by step tutorial provided clear instructions for making a stylish, comfortable, and customizable tank top.
You learned how to choose materials, create the body, shape the neckline, and add finishing touches.
Now it’s time to enjoy wearing your handmade creation! If you found this guide helpful, please share your honest opinion and suggestions for future tutorials. Your feedback is always appreciated.