
Christmas Table Cutlery Holder-Step by Step Tutorial is the perfect way to add a festive, warm, and handcrafted touch to your holiday table decor. Whether you are hosting a big Christmas dinner or preparing a simple family meal, adding a personalized cutlery holder can elevate the atmosphere. This project is inexpensive, fun, and ideal for all skill levels, especially if you enjoy crafting with fabric, felt, or crochet. In this article, we will follow a complete guide to create your own Christmas Table Cutlery Holder and present it in a well-organized and elegant holiday setting.
Aside from being practical, this craft also works as a charming decorative accent. It helps keep the table neat and tidy while complementing the Christmas theme. When placed beside plates and glasses, these small festive holders bring a cozy touch that guests notice instantly. The best part is that you can customize the colors, patterns, and materials according to your Christmas theme, whether you prefer traditional red and green, metallic gold, snowy whites, or rustic details.
In this Christmas Table Cutlery Holder-Step by Step Tutorial, we will carefully guide you through everything you need to know, from choosing materials to assembling the final look. The instructions are simple, clear, and beginner-friendly. Without needing expensive supplies or advanced crafting skills, you can create a lovely holiday item that will impress your guests and make your table feel extra special. Now, let’s dive into the fun part and begin crafting your festive cutlery holder.
Choosing Materials and Preparing Your Workspace
Selecting the right materials is essential for a polished and attractive Christmas Table Cutlery Holder. You can use felt, cotton fabric, burlap, or any craft material you like. Felt is highly recommended because it is easy to cut and does not fray on the edges, making it perfect for beginners.
You should also pick colors that match your Christmas theme. Traditional Christmas colors include red, green, white, and gold. However, modern holiday decor trends also include silver, navy blue, beige, and rustic plaids. Choose colors that complement your table setting and home style.
Before beginning any crafting project, prepare your workspace. A clean, flat surface is essential for cutting, gluing, and stitching. Gather all your tools such as scissors, glue gun, needle, thread, ruler, and fabric markers. Keeping your materials organized will make the crafting process easier and more enjoyable.
Take time to pre-measure and outline the shape of your Christmas Table Cutlery Holder. You can make it rectangular, mitten-shaped, stocking-shaped, or star-shaped. A classic choice is a small stocking because it symbolizes Christmas cheer. Mark your measurements before cutting to avoid waste or inaccuracies.
If you are using fabric instead of felt, consider reinforcing it with fusible interfacing. This gives the holder structure and helps it maintain its shape. For felt projects, no reinforcement is usually required because felt is naturally sturdy. Once everything is prepared, you are ready to start constructing your holder.
Finally, remember that crafting is meant to be enjoyable. Play some Christmas music, light a scented candle, and embrace the cozy festive spirit while working on this charming project. The experience will be just as memorable as the final product itself.
Step-by-Step Instructions for Crafting the Holder
Begin by cutting your fabric or felt into the desired shape. Make sure to cut two identical pieces: one for the front and one for the back. These pieces will be sewn or glued together to form a pocket where the cutlery will be placed.
If you choose a stocking shape, draw a simple template on paper first. A small stocking shape, approximately the length of your hand, is usually the right size. Place the paper template over the material and trace it carefully before cutting.
After cutting your pieces, position them together and join the edges. You can use fabric glue or stitch around the border using a simple running stitch or blanket stitch. If stitching by hand, choose a thread color that either blends in or stands out decoratively.
Leave the top part open, as this is where the utensils will fit. Test the pocket by inserting a fork or spoon to ensure it sits comfortably. Adjust if necessary before decorating.
Decoration is the most creative and fun part. You can add ribbons, small bows, buttons, lace, glitter, or even embroidered initials. For a warm and charming look, try adding a small felt holly leaf with red bead berries.
Take your time to decorate in a way that reflects your personality and theme. Small details make the entire Christmas Table Cutlery Holder-Step by Step Tutorial unique and meaningful.
Creative Design Ideas and Styles
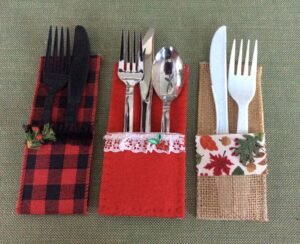
There are countless ways to style your Christmas Table Cutlery Holder depending on your home decor and holiday preferences. For a classic look, red and white with Santa-inspired motifs always brings a nostalgic Christmas feel.
If you love rustic holiday aesthetics, consider using burlap and lace. Combine natural tones with small wooden buttons or twine bows for a cozy farmhouse look. These holders pair beautifully with wooden tables and simple greenery centerpieces.
For modern and elegant Christmas settings, use neutral fabrics like ivory, champagne, or metallic tones. Metallic thread embroidery can add a luxurious touch to the holder without making it look too busy.
Cute and playful designs are perfect for families with children. You can create character-themed holders such as reindeer, snowmen, elves, or gingerbread men. Kids will enjoy having themed cutlery holders at the dinner table.
You can also create personalized holders for each family member by adding their initials or name tags. This adds an emotional and thoughtful touch to the holiday dining experience.
No matter which style you choose, the main goal is to create something heartfelt that contributes to the warm atmosphere of Christmas gatherings.
Tips for Presenting and Setting the Christmas Table
Now that your Christmas Table Cutlery Holder is complete, it’s time to think about how to display it beautifully on your holiday table. The holder should complement the plates, napkins, and centerpieces.
Place the holder on top of the plate, slightly angled, to draw attention to its decorative details. Alternatively, you can position it beside the plate, aligned with the napkin for a cleaner look.
Choose table linens that match the color of the holders. Table runners, napkins, and placemats can help unify the visual theme. Try to match textures and tones to create a balanced and cozy setting.
Add greenery such as pine branches, holly, or eucalyptus along the center of the table. Natural elements bring freshness and a festive aroma, making your table feel more alive and seasonal.
Soft lighting also plays an important role. Candles, fairy lights, or warm-toned LED lights create a magical Christmas glow. Lighting enhances the handcrafted charm of your cutlery holders and sets a peaceful, joyful mood.
Your table setting should feel inviting, warm, and joyful. Every little detail contributes to a memorable Christmas dining experience.
FAQ
1. What materials are best for a Christmas Table Cutlery Holder?
Felt is widely recommended because it is easy to cut and does not fray. However, fabric, burlap, and crochet yarn are also excellent choices depending on your style preference.
2. Do I need sewing skills for this project?
No, you can make the holder using hot glue or fabric glue if you prefer. Sewing is optional, though it can give the holder a more finished look.
3. Can I personalize the holder?
Yes, you can add initials, names, small charms, or decorative elements to make each holder unique and meaningful.
4. How long does it take to complete one holder?
Typically, each holder takes around 10 to 25 minutes depending on your experience and the level of decoration you choose.
5. Can I reuse the holder next year?
Yes, especially if made from durable materials like felt or reinforced fabric. Store them in a dry place and they will last for years.
Conclusion
Creating a Christmas Table Cutlery Holder is a delightful and meaningful project that brings beauty and warmth to your holiday celebrations.
This tutorial showed each step in a simple and accessible way, from choosing the materials to decorating and presenting your holder on the table.
The result is a charming handcrafted item that elevates your Christmas dining experience and impresses everyone at the table. I hope you enjoyed this guide. Feel free to leave your honest opinion and share suggestions for future tutorials. Your feedback helps inspire new creative ideas!