
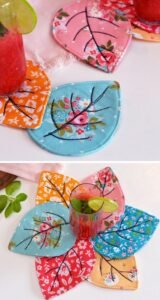
Padded leaf-shaped coaster-Step by Step Tutorial is a delightful and practical craft project that brings elegance and comfort into your home decor. If you enjoy handmade items with a natural and cozy touch, this tutorial is perfect for you. The padded leaf-shaped coaster-Step by Step Tutorial focuses on creating beautiful fabric coasters shaped like leaves, with a soft filling inside that provides extra thickness and protection. These coasters can be placed under mugs, cups, small vases, or even decorative jars, adding beauty to any surface. Throughout this guide, we will use the keyword padded leaf-shaped coaster-Step by Step Tutorial to maintain clarity and optimize search visibility.
This project is simple enough for beginners and enjoyable even for experienced crafters. Because the design is based on leaf shapes, you have the freedom to explore endless variations such as maple leaves, eucalyptus leaves, tropical leaves, and more. The padded leaf-shaped coaster-Step by Step Tutorial also encourages creativity in fabric selection, allowing you to use printed fabrics, plain materials, felt, or even recycled textiles. You can create an entire set of coasters in different colors to reflect different seasons or moods, giving your home a handmade feel that is both personal and stylish.
One of the greatest benefits of this padded leaf-shaped coaster-Step by Step Tutorial is that it also encourages sustainability. Many people use leftover fabric scraps from other projects, ensuring nothing goes to waste. The coaster pattern is small and simple, so even the tiniest textile pieces can be used. You can also reuse fabric from clothing that is no longer wearable, giving new life to something that once held meaning. With this approach, the coaster becomes not just a decorative item, but a reminder of creativity, resourcefulness, and thoughtful craftsmanship.
Preparing Your Materials
To begin the padded leaf-shaped coaster-Step by Step Tutorial, start by gathering your materials. You will need fabric pieces, preferably cotton or any material with a bit of structure. Cotton fabrics are ideal because they are easy to work with, washable, and durable, making them perfect for coasters that will be used regularly.
You will also need a layer of padding or batting to place between the two pieces of fabric. This layer is responsible for making the coaster padded and soft to touch. Many people use cotton batting, felt, or foam sheets. Choose a thickness that gives the coaster support without making it bulky.
In addition, prepare basic sewing tools such as fabric scissors, sewing thread, pins, and a sewing needle. If you have a sewing machine, the project will be faster, but hand sewing is also completely suitable for this tutorial. The padded leaf-shaped coaster-Step by Step Tutorial works well with either method.
Before cutting your fabric, choose a leaf shape that appeals to you. You can draw your own leaf pattern or trace one from a real leaf. Patterns can be as simple or detailed as you’d like. For beginners, a basic oval leaf with a pointed tip is ideal.
Once your pattern is ready, trace it onto the wrong side of the fabric pieces. You will need two identical fabric cutouts per coaster, along with one piece of padding. Make sure your padding piece matches the leaf shape but is slightly smaller so the coaster edges remain neat after sewing.
Organize everything before sewing. Having pieces cut and prepared helps make the entire crafting process smooth, enjoyable, and relaxing.
Sewing the Leaf Shape
Now that your materials are ready, it’s time to begin sewing the padded leaf-shaped coaster-Step by Step Tutorial. Place the two fabric leaf pieces right sides together, then position the padding layer underneath them. The goal is to sew the leaf shape while leaving a small opening for turning the piece inside out later.
Use pins to hold the layers securely so they do not shift while sewing. Start sewing along the traced outline of the leaf, following the shape carefully. Sew slowly around curved edges to maintain the leaf’s natural form.
Leave a small opening of about two fingers’ width on one side. This opening will be used to turn the leaf right side out later. Once the stitching is done, trim any excess fabric around the edges, leaving a small seam allowance. Clip tiny notches near curves and leaf points so the coaster will lay flat once turned.
Turn the leaf inside out through the opening. Be gentle and patient, especially around pointed areas. You can use the tip of a crochet hook or a pencil to help push the edges outward and shape the leaf properly.
Smooth the coaster and iron it lightly to flatten the seams. The coaster should already look close to its final shape. The padded layer inside creates a soft feel and adds functionality, as the coaster will protect surfaces from heat, moisture, and scratches.
Once the leaf is flattened, sew the opening closed either by hand or with a machine. A small, neat stitch will make the closure unnoticeable.
Adding Details and Texture
To make your coaster look more realistic and beautiful, add leaf veins. In this padded leaf-shaped coaster-Step by Step Tutorial, decorative stitching is used to create texture and define the leaf shape. This step greatly enhances the finished look.
Use a sewing machine or hand stitching to sew vein lines starting from the center of the leaf and extending outward. You can sew straight lines, curved lines, or branching lines, depending on the style of leaf you are creating. Be creative and allow the stitching to complement the fabric pattern.
Choose thread colors that match or contrast with the fabric for a decorative effect. A matching thread blends into the coaster for a subtle finish, while a contrast thread highlights the stitching beautifully.
If desired, you can also sew a border stitch around the entire edge of the coaster. This gives it a finished look and helps reinforce the edges for long-term use.
Another creative idea is to add embroidery details. Small stitches, delicate leaf veins, or initials can personalize the coasters further. Handmade touches like this make the coaster not just functional, but meaningful.
Once the details are added, iron the coaster lightly again to settle the stitches and smooth any wrinkles. Your coaster should now look polished and elegant.
Using and Displaying Your Coasters
The padded leaf-shaped coaster-Step by Step Tutorial results in coasters that are both functional and decorative. These coasters can be used on tables, nightstands, office desks, and kitchen countertops. They help protect surfaces from heat, moisture, and scratches while adding a natural and warm touch to your décor.
These coasters also make thoughtful gifts. Handmade gifts show care and attention, making them perfect for birthdays, holidays, housewarming celebrations, or simple friendship gestures. You can create custom sets in different colors or leaf styles for different recipients.
Consider making seasonal sets, such as bright green leaves for spring, deep reds and oranges for autumn, and cool-toned leaves for winter. Display them in a basket or small tray for easy access and charming decoration.
These coasters are washable and reusable, making them practical for daily use. Simply wash gently by hand or place them inside a mesh laundry bag for machine washing. Allow them to air dry to maintain fabric quality.
Over time, you may find yourself creating more sets as your confidence grows. Crafting is not only useful but also relaxing, giving you a moment to slow down and enjoy your creativity.
FAQ
1. Can beginners make this coaster?
Yes, the padded leaf-shaped coaster-Step by Step Tutorial is very beginner-friendly and requires only basic sewing skills.
2. What fabric works best?
Cotton fabric is ideal because it is durable, easy to sew, and washable.
3. Can I hand sew the entire project?
Yes, hand sewing works perfectly. A sewing machine is optional.
4. Do I need padding?
Padding is recommended because it gives the coaster softness and protection.
5. How do I wash the coaster?
Wash gently with mild soap and let it air dry.
6. Can I make different leaf shapes?
Absolutely, you can create any leaf style you like for variety and decoration.
Conclusion
In this padded leaf-shaped coaster-Step by Step Tutorial, we explored how to prepare materials, sew the basic leaf shape, add decorative stitching, and use your finished coasters in your home.
This craft is simple, charming, and full of creative potential. Whether you’re a beginner or experienced maker, this project encourages personalization and sustainability.
If you try making your own coasters, please leave your sincere opinion and suggestions—your feedback inspires new ideas and helps improve future tutorials!