
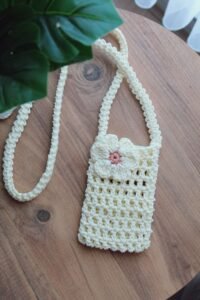
Crocheted cell phone pouch with flowers.-Step by Step Tutorial is a charming and practical handmade accessory that combines creativity with everyday functionality. This type of pouch is ideal for protecting your phone from scratches while adding a delicate, personalized touch to your style. Throughout this article, we will explore how to create your own crocheted cell phone pouch with flowers.-Step by Step Tutorial, while focusing on simple instructions that are easy to follow, even for beginners. By learning the basics of crochet and adding small decorative flowers, you can create something unique, meaningful, and fashionable.
One of the great advantages of following this crocheted cell phone pouch with flowers.-Step by Step Tutorial is that it allows you to customize your pouch according to your favorite colors, yarn textures, and flower designs. Whether you prefer soft neutrals for everyday elegance or bold, bright tones for a statement piece, the possibilities are endless. Handmade accessories like this pouch bring personality into your wardrobe and make excellent gifts for friends and family. Crocheting also has a calming, relaxing effect, helping you enjoy the process as much as the final product.
Besides being visually appealing, a crocheted cell phone pouch with flowers.-Step by Step Tutorial is also practical. Many people find that carrying a phone inside a pouch keeps it safe from dust, impact, and scratches. Additionally, you can add extra features such as a strap to hang the pouch around your neck, a button closure for security, or even a small pocket for cards. Whether the goal is fashion or function, or a combination of both, this pouch strikes the perfect balance. Now, let’s explore the materials, steps, and finishing methods you will need to create this lovely project.
H2: Materials Needed to Begin Your Project
To begin this crocheted cell phone pouch with flowers.-Step by Step Tutorial, you will need to gather all your materials. The most recommended yarn for this project is a medium-weight cotton yarn, as it provides durability, strength, and a soft texture. Cotton yarn is also easy to clean and resistant to wear, making it an excellent choice for everyday accessories.
You will also need a crochet hook that matches the size recommended on your yarn label. Typically, a hook size between 3.0 mm and 4.5 mm works well for cellphone pouches. Using the correct hook ensures that your stitches are consistent and that the pouch maintains its shape without stretching too much.
In addition to yarn and a hook, consider having a yarn needle for sewing pieces together and weaving in loose ends. Scissors will be used to cut your yarn once sections are complete. To embellish your pouch, gather small amounts of yarn in contrasting colors to crochet the flowers. These can be pastel shades for a delicate style or vibrant colors for a fun and playful look.
If you wish to add a strap, prepare extra yarn to create a chain, or use a ready-made cord or ribbon. To secure the pouch, you may add a button or a small decorative bead that matches the floral design. This gives the pouch both practicality and charm.
Before starting, make sure your phone’s dimensions are noted. Knowing its width and height helps you adjust your stitches to ensure a perfect fit. This step helps personalize your crocheted cell phone pouch with flowers.-Step by Step Tutorial so that it fits securely.
H2: Crocheting the Base of the Pouch
To start creating the base for the crocheted cell phone pouch with flowers.-Step by Step Tutorial, begin by making a chain that matches the width of your phone. Remember to leave a little extra room to avoid a tight fit. The chain should be long enough to wrap comfortably around the phone without stretching.
Once the foundation chain is complete, you will work in single crochet or half-double crochet stitches, depending on your preferred texture. Single crochet creates a tighter, more protective fabric, while half-double crochet adds flexibility. Continue crocheting in rows until the length of your piece matches the height of your phone plus additional space for folding.
Another popular method is to crochet in the round. To do this, after making your initial chain, stitch along one side of the chain, then rotate and stitch along the other side. This forms a seamless tube that eliminates the need for later seaming. This method creates a smooth finish and stronger construction.
As you work, check the size occasionally by placing your phone beside the piece. Adjust stitch count if necessary. The beauty of a crocheted cell phone pouch with flowers.-Step by Step Tutorial is that it is flexible and easy to modify as you go.
Once the pouch reaches the desired length, close the bottom if needed by sewing or crocheting the opening shut. If you crocheted in the round, your pouch will already be closed and ready for decorating.
H2: Creating and Attaching the Flowers
Now it’s time to bring charm and personality into your crocheted cell phone pouch with flowers.-Step by Step Tutorial by making the decorative flowers. Flowers can be crocheted in many shapes and sizes, but a simple five-petal design works beautifully for beginners.
To make a small flower, crochet a magic ring or chain ring, then work clusters of stitches separated by small chain spaces. When tightened, the flower will form naturally. You may create several flowers in different sizes and colors to arrange creatively on the pouch.
Once your flowers are complete, position them on the pouch to visualize your design. You may prefer a single elegant flower or a bouquet effect with several flowers along one side. The placement depends entirely on your personal preference and the style you want to achieve.
Use a yarn needle to sew each flower securely onto the pouch. Take care to secure the stitches firmly so the decorations stay in place even with frequent use.
You can also add small leaves, embroidered vines, or beads to enhance the floral design. These details give your crocheted cell phone pouch with flowers.-Step by Step Tutorial a unique, handmade charm.
H2: Adding the Strap and Final Details
To complete your crocheted cell phone pouch with flowers.-Step by Step Tutorial, you may want to add a strap. A strap is especially useful if you want to wear the pouch over your shoulder or around your neck. To make a simple strap, crochet a long chain and reinforce it with a row of slip stitches.
Attach the strap securely to the sides of the pouch. Ensure the stitching is strong enough to support the weight of the phone. If you prefer a wrist strap, simply make a shorter version of the same chain.
Next, add a closure to your pouch. A button works very well and complements the handmade charm. Sew it near the top and create a small loop with your yarn to fasten it. You could also use a bead or wooden toggle for a rustic touch.
Give your pouch a final look-over to ensure all threads are woven in and edges are neat. Lightly shape the pouch with your hands and flatten it so it looks beautiful and ready for use.
Your crocheted cell phone pouch with flowers.-Step by Step Tutorial is now complete and ready to enjoy. This charming accessory reflects your creativity, patience, and personal style.
FAQ
1. Is this project suitable for beginners?
Yes, this tutorial is beginner-friendly and uses basic crochet stitches.
2. What yarn is best for durability?
Cotton yarn is ideal because it is strong, washable, and holds shape well.
3. Can I make the pouch larger or smaller?
Yes, simply adjust the number of chains and rows to match your device.
4. Do I need to add flowers?
No, the decoration is optional. You can keep the design simple if you prefer.
5. How do I clean the pouch?
Hand wash with mild soap and allow it to air dry to maintain shape.
6. Can I use a different closure instead of a button?
Yes, ribbons, snaps, or toggles also work well.
Conclusion
In this crocheted cell phone pouch with flowers.-Step by Step Tutorial, we explored how to choose materials, crochet the base, create flowers, and finish your pouch with straps and closures.
This project is both practical and beautiful, allowing you to express creativity while making something useful.
I hope this tutorial inspires you to craft your own pouch and perhaps experiment with different colors and styles. Please leave your sincere opinion and suggestions—your feedback helps support new ideas and future tutorials!