
Christmas ornament: Fabric angel-Step by Step Tutorial is a beautiful and heartwarming craft project that allows you to create a delicate handmade decoration for the holiday season. This charming ornament adds a special touch to Christmas trees, gift wrapping, and festive home décor. Handmade ornaments bring sentimental value and can become family treasures passed down through generations. Creating a Christmas ornament: Fabric angel-Step by Step Tutorial is a wonderful way to express creativity and celebrate the warmth and meaning of the holiday season.
Making a fabric angel ornament does not require advanced sewing skills, which makes it ideal for beginners and enjoyable for experienced crafters as well. The materials needed are simple and often readily available, such as fabric scraps, ribbons, and thread. This makes the project both affordable and eco-friendly, especially for those who enjoy reusing or upcycling materials. Crafting your own Christmas ornament: Fabric angel-Step by Step Tutorial also allows you to personalize each piece with different colors, fabrics, and embellishments that reflect your holiday theme or home décor style.
Beyond the finished decoration, the process of creating a Christmas ornament: Fabric angel-Step by Step Tutorial can be a meaningful and relaxing activity. Many people enjoy crafting during the holiday season because it helps reduce stress and brings a sense of calm and joy. Whether you make these ornaments alone, with children, or during a holiday craft gathering, it is a lovely way to share time, creativity, and festive cheer. Before we begin the step-by-step instructions, let’s prepare the materials and understand some basic crafting tips that make this project smooth and enjoyable.
Materials Needed to Make the Fabric Angel
To begin the Christmas ornament: Fabric angel-Step by Step Tutorial, you will need a few basic supplies. The main item is fabric, and cotton or linen tends to work best because it is easy to fold and sew. You can select fabric patterns that match your holiday theme, whether traditional Christmas colors like red, green, and gold or softer tones like white, cream, and silver. Choosing different fabrics can help create a unique angel each time.
You will also need ribbon to form the wings and possibly a bow. Satin or organza ribbon is ideal because it adds a delicate and elegant touch. The color of the ribbon can be coordinated with your chosen fabric for a cohesive appearance. If you have leftover ribbons from gift wrapping or previous crafts, they are perfect for this project.
Stuffing material is required to shape the angel’s body and head. Polyester fiberfill works well, but small fabric scraps can also be used. Using leftover scraps makes this craft both economical and environmentally friendly. The stuffing should be soft but firm enough to hold shape once wrapped inside the angel’s body.
Thread and needle are essential tools for assembling the ornament. While sewing machines can be used, sewing by hand provides more control for small decorative projects like this. Additionally, sewing by hand contributes to the charming homemade look of the angel ornament. A hot glue gun can also be useful for securing embellishments.
Finally, any extra decorations such as tiny pearls, lace, buttons, or glitter can enhance the angel’s details. These give each angel personality and a unique festive sparkle. You may also choose to add a loop of thread or ribbon to allow the ornament to hang on the tree.
Step-by-Step Instructions to Create the Angel
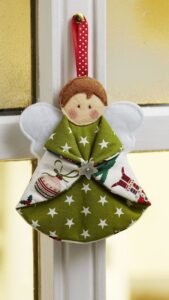
Start by cutting a square of fabric, approximately 15 cm by 15 cm. This piece will form the angel’s dress. Fold the square diagonally to form a triangle. Place a small amount of stuffing at the center of the folded edge, then gather the fabric to form the angel’s head. Tie this gathered portion with thread to secure it tightly. The head should look round and smooth.
Next, shape the angel’s dress by adjusting the fabric folds. You may press or gently manipulate the fabric until the dress falls in soft folds. If you want the angel to have a fuller dress, you can add more stuffing to the center base. Tie a thin ribbon around the neck to create a neat and secure neckline for the angel.
To create the wings, cut a piece of ribbon and fold it into a small bow shape. The wings should be proportional to the dress, not too large or too small. Secure the center of the ribbon using thread or a small drop of hot glue. Attach the wings to the back of the angel just below the neck. Ensure they are fixed firmly so they do not move or fall off.
Add facial features if desired. You can paint small eyes using fabric-safe paint or simply leave the face blank for a traditional and peaceful look. Many crafters prefer the minimalist style, as it gives the angel a timeless and gentle expression. If you choose to add features, keep them simple and subtle.
Once the angel’s main form is complete, you may add decorative embellishments. A tiny halo can be made from gold or silver thread shaped into a small circle and glued above the head. Lace or pearl accents can be added to the dress to make it look more festive and detailed. These details allow your angel to have a personal artistic touch.
Lastly, attach a loop of thread or ribbon to the back of the angel’s head or wings. This loop will allow the ornament to hang on a Christmas tree or be used for gift decoration. The angel is now complete and ready to display, gift, or cherish for many Christmas seasons to come.
Creative Variations for Your Fabric Angel
Different fabric patterns can completely change the appearance of your angel. For a classic approach, use white fabric and gold ribbon. For a cozy winter look, try plaid fabrics or warm tones. Each style brings a different atmosphere to your holiday décor. Using unique materials allows you to create a collection of angels that complement each other beautifully.
Experiment with the size of the angel. Tiny angels make lovely gift toppers or additions to garlands. Larger angels work well as tree toppers or as table decorations. Adjusting the fabric size proportionally will help you create various sizes without changing the crafting method.
Consider using lace or embroidered fabric for the dress to give extra elegance. Lace wings can also be made using lace ribbon for a delicate and angelic appearance. These design choices give the ornament a vintage and refined touch.
You may also personalize the angels for family members or friends. For example, choose favorite colors or add small charms that represent the recipient’s personality. Personalized ornaments make meaningful gifts and treasured keepsakes.
Children can participate in making simpler versions of the angel. Provide them with soft fabrics, pre-made wings, and safe glue to assemble their own decorations. Crafting together during the holiday season can become a joyful family tradition filled with memories.
Finally, consider creating small sets of angels to use as holiday home décor. Hang them across a fireplace mantle, arrange them in a decorative bowl, or place them along a holiday-themed shelf display. Their charm brightens any space.
FAQ
1. What type of fabric works best for the angel?
Lightweight cotton or linen is ideal because it is easy to fold and sew, and it drapes nicely.
2. Can I make the angel without sewing?
Yes, hot glue can be used instead of sewing for a quicker assembly.
3. How can I make the angel more durable?
Using strong thread and ensuring tight knots will help the ornament last for years.
4. Can children participate in this project?
Yes, with supervision. They can help with folding the fabric and decorating the angel.
5. How do I attach the hanging loop securely?
Sewing the loop into the back of the head or wings is the most durable method.
Conclusion
In this Christmas ornament: Fabric angel-Step by Step Tutorial, we explored how to create a charming and personal handmade ornament that brings warmth to holiday décor.
By using simple materials and easy crafting techniques, you can make a beautiful angel that reflects your creativity and festive spirit.
This project encourages personalization and creativity while being enjoyable for crafters of all levels. If you found this tutorial helpful, please leave a sincere comment and share your suggestions or experiences—your feedback helps inspire more creative holiday ideas!