
Crocheted house for decoration-Step by Step Tutorial is a charming and creative project that adds warmth and personality to any environment. Whether you’re decorating a child’s room, creating a cozy living room accent, or giving a handmade gift to someone special, a crocheted house for decoration is a delightful choice. The concept is simple: with yarn, a crochet hook, and a bit of imagination, you can craft a miniature house that radiates comfort, creativity, and handmade beauty. This Crocheted house for decoration-Step by Step Tutorial will guide you through the entire process using accessible techniques suitable for beginners and experienced crocheters alike.
One of the joys of creating a crocheted house is how customizable it is. You can choose any color palette to match your décor style—soft pastels for a gentle cottage feel, bold tones for a playful or modern touch, or earthy neutrals for a cozy and rustic style. Small details such as windows, doors, flowers, or chimneys can be added to make each house unique. The Crocheted house for decoration-Step by Step Tutorial encourages creativity, allowing you to build a tiny world with your hands. This flexibility makes the project incredibly enjoyable and deeply personal.
Handmade decorative items like this connect us to a slower, more thoughtful way of designing our spaces. They carry warmth, time, and intention—qualities that store-bought decorations often lack. Crafting also promotes relaxation, focus, and emotional well-being. As you follow this Crocheted house for decoration-Step by Step Tutorial, remember to enjoy the process instead of rushing to the end. Every stitch is part of the journey of making something meaningful, textured, and full of personality.
Materials Needed for the Crocheted House
Before beginning the Crocheted house for decoration-Step by Step Tutorial, gather all necessary supplies. You will need yarn in at least two or three colors. A primary color will form the walls, another shade will represent the roof, and additional colors can be used for small decorative details such as windows or flowers. Cotton or acrylic yarn works wonderfully because these fibers hold shape well and offer clear stitch definition.
Next, choose a crochet hook suited to your yarn thickness. A hook between 2.5 mm and 4.0 mm is usually appropriate for small decorative projects. Selecting the right size ensures that your stitches stay tight enough to maintain form and prevent gaps, especially if you plan to lightly stuff the house to give it volume.
You will also need a yarn needle for weaving in loose ends and sewing different parts together. Scissors are essential for trimming threads neatly. If you plan to stuff the house for structure, have a small amount of fiberfill or leftover yarn pieces on hand. Stuffing gives the house a cozy, three-dimensional shape.
Some crafters like to add embellishments such as buttons, beads, or embroidered details. These extras can personalize your crocheted house and make it even more special. However, if the decoration will be used in a child’s room, always ensure embellishments are securely attached and pose no safety risks.
Working in a comfortable space with good lighting also improves the crocheting experience. Have a basket or tray nearby to keep materials organized. This helps maintain rhythm and ease as you follow each step. Now that materials are prepared, we are ready to explore the structure of the house itself.
Crocheting the Base and Walls
To begin forming the house, start by crocheting a rectangular or square panel for the base. This serves as the foundation of the crocheted house for decoration. The number of stitches and rows will determine the final size of your house, so adjust according to your desired dimensions. A tight stitch works best as it provides structural support.
Once the base is complete, begin crocheting the walls. You can either work each wall as a separate panel and sew them together or create a long strip and fold it into shape. Both methods work well; the choice depends on your preferred crafting style. The key is maintaining consistent tension so that the house looks smooth and even on all sides.
Work in straight rows using single crochet stitches, which give a dense and solid appearance. Continue until you reach the height you want. The walls should stand upright without slouching, especially if you plan to assemble the house without heavy stuffing. If you want your structure firmer, you may lightly line the inside with felt.
Once the walls are finished, attach them to the base using a yarn needle and whip stitch or slip stitch method. Ensure corners are tight and aligned to help the house stand correctly. You can now see the basic shape forming—a small block ready to be decorated and completed.
At this stage, take a moment to check symmetry. Minor adjustments now can enhance the final look significantly. Handcrafted décor thrives on small details, making this step essential to the Crocheted house for decoration-Step by Step Tutorial.
Finally, prepare to add fine elements such as windows and doors. These elements will bring your crocheted house to life and give it charming personality.
Making and Attaching the Roof
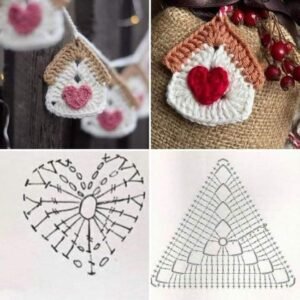
To construct the roof, switch to your chosen roof color. The roof can be flat or peaked depending on your desired aesthetic. A peaked roof is especially charming and cottage-like, so we will follow that approach. Begin by crocheting two triangular or trapezoid-shaped panels. These panels should match the width of the house walls.
Use the same stitch style as the walls to create uniformity. Work each row while decreasing stitches slowly to form the peak. The angle should be gradual, creating a soft slope. Once both roof panels are shaped, crochet a long strip to form the roof ridge. This piece will connect the two slanting roof sides together.
Sew or crochet the roof ridge securely, ensuring that both panels meet neatly at the top. Now attach the roof to the house structure. This part may require firm stitching. Take your time to ensure the roof sits evenly and does not tilt. A well-positioned roof brings balance and professional finish to the crocheted house.
Optional stuffing may be added beneath the roof if you prefer a fuller, more dimensional shape. Keep stuffing minimal to avoid warping the house walls. Once attached, your house will now look complete in form, but the decorative details are what make it truly charming.
Take a moment to observe the transformation—what began as yarn strands has become a little architectural treasure, guided step by step through the Crocheted house for decoration-Step by Step Tutorial.
Adding Decorative Details
Begin embellishing the house by crocheting small squares or rectangles for windows. Using contrasting colors enhances visibility and makes the house lively. Attach the windows with neat, small stitches. You may embroider criss-cross lines to suggest window panes.
For the door, choose a warm shade such as brown, mustard, or a darker color of the wall yarn. Position it at the center of the base front panel. The door should be slightly wider and taller than the windows so that it stands out as a focal feature.
Flowers, vines, or bushes can be created using tiny crochet flower motifs or simple embroidered stitches. These bring charm and garden-like beauty to your decorative house. If you prefer a more minimal style, you can leave the exterior simple and clean.
If you would like to add a chimney, crochet a small rectangular tube and attach it to the roof. Tilt it slightly to create a cozy and whimsical appearance. If the house is intended for seasonal décor, adapt details to match themes such as Christmas, springtime, or Easter.
Finally, weave in all loose ends and trim any excess thread. Your crocheted house is now complete. It is ready to be displayed proudly or given as a thoughtful handmade gift.
FAQ
1. Is this project suitable for beginners?
Yes, this project uses basic stitches and simple shaping, making it great for beginners.
2. What type of yarn works best?
Cotton and acrylic yarns provide good structure and stitch clarity for decorative items.
3. Can I make the house larger?
Yes, increase the number of stitches and rows to scale the house size.
4. Do I need stuffing?
Stuffing is optional and can add volume, but the house can also be left flat and firm.
5. How do I keep the house upright?
Use tight stitches, optional felt lining, or minimal stuffing to maintain shape.
Conclusion
This Crocheted house for decoration-Step by Step Tutorial guided you through creating a charming, handmade miniature house perfect for decorating any room.
From preparing the base and walls to adding the roof and adorable details, every step allows room for creativity and personalization.
Crafting your own decorative house brings joy, relaxation, and a sense of accomplishment. I hope you enjoyed learning and feel inspired to create your own version. Please leave your sincere opinion and suggestions—I would love to hear what you think and what you would like to learn next!