
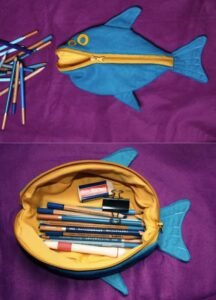
Creating your own stationery bags with a fish print for storing pencils is a fun and practical way to organize your supplies while expressing your personal style. Handmade stationery bags not only serve as useful storage solutions but also allow you to design something unique and full of character. In this Step by Step Tutorial, you’ll learn how to create your very own fish-print pencil bag using simple materials and easy sewing techniques. Whether you’re a beginner or an experienced crafter, this tutorial is perfect for anyone who loves creative DIY projects.
A fish print stationery bag can be used for more than just pencils. It’s great for pens, markers, small notebooks, or even makeup brushes. The aquatic design adds a refreshing and playful touch to your workspace or school bag. This tutorial will guide you through all the steps—from selecting materials to adding the final details—so you can proudly show off your handmade creation. The Stationery bags with a fish print for storing pencils – Step by Step Tutorial makes it easy for anyone to follow along and craft a beautiful result.
Not only is this project fun, but it’s also sustainable. By making your own stationery bags, you can use leftover fabric scraps or recycle old materials, reducing waste while creating something practical. The fish print design brings a charming and relaxing vibe inspired by nature. Whether you plan to keep it for yourself or gift it to someone special, this Step by Step Tutorial ensures you’ll have a stylish and eco-friendly pencil bag to treasure.
Materials and Preparation
Before starting the Stationery bags with a fish print for storing pencils – Step by Step Tutorial, you’ll need to gather a few basic materials. For this project, you’ll require a piece of cotton fabric with a fish pattern, a matching lining fabric, a zipper, scissors, thread, pins, and a sewing machine or needle if sewing by hand. Cotton fabric is ideal because it’s durable, easy to sew, and holds prints beautifully.
Choose a fabric that reflects your personality. A fish print can range from realistic underwater designs to cute cartoon-style patterns. The colors can be soft blues and greens to represent the ocean or bright and playful shades for a fun look. The Stationery bags with a fish print for storing pencils – Step by Step Tutorial encourages you to select a print that makes you smile every time you open your bag.
Next, measure your desired bag size. A good standard size is about 9 inches wide and 4 inches tall, but you can adjust the measurements depending on how many items you want to store. Cut two pieces of your fish print fabric and two pieces of the lining fabric using these dimensions. Make sure all pieces are even so your bag will look professional and well-shaped.
Prepare your workspace by laying out all materials neatly. Keep your zipper close by and make sure your sewing machine is threaded with a color that matches your fabric. If you’re hand-sewing, use small, tight stitches to keep the seams strong. Proper preparation ensures the sewing process goes smoothly and helps you enjoy the creative journey.
If you wish to personalize your stationery bag, you can also prepare additional decorations such as lace trims, small buttons, or embroidered details. These elements can make your bag one-of-a-kind and even more visually appealing. The fish print will serve as the main theme, but these extra touches add a unique flair.
Before sewing, iron your fabric pieces to remove any wrinkles. This helps with accuracy when sewing the seams and gives your project a more polished appearance. Now that your materials are ready, you can move on to the next step of this Step by Step Tutorial.
Sewing the Bag
Let’s start assembling your stationery bag with a fish print for storing pencils. Begin by placing one piece of the fish print fabric right side up. Position the zipper face down along the top edge of the fabric. Then, place one lining piece on top, right side facing down, sandwiching the zipper between the two layers. Pin everything in place to prevent shifting as you sew.
Using your sewing machine or a needle and thread, stitch along the pinned edge, sewing close to the zipper teeth. Take your time to keep your stitches straight and even. Once done, fold both fabrics away from the zipper and press them flat with an iron. Repeat this process for the other side of the zipper with the remaining pieces of fabric and lining.
Now, open the zipper halfway before sewing around the edges of your bag. This is an important step that will allow you to turn the bag right side out later. Align the outer fabrics together and the lining fabrics together, making sure the zipper teeth point toward the lining side. Pin around the edges, leaving a small opening at the bottom of the lining for turning.
Sew around the entire bag, following the pinned outline. Be careful when sewing across the zipper area, as this part can be slightly thicker. Once stitched, trim any excess fabric from the corners to reduce bulk and create a crisp finish when turned inside out.
Carefully turn the bag right side out through the opening in the lining. Push out the corners gently with a pencil or chopstick to shape them nicely. Sew the small opening in the lining closed with a few hidden stitches. Once this is done, tuck the lining inside the bag and smooth out the edges.
Finally, zip and unzip your bag to make sure everything works perfectly. At this stage, you’ll see your beautiful fish print stationery bag come to life. The vibrant design combined with your neat stitching results in a practical, eye-catching pencil holder.
Adding Decorative Details
Once the main structure of your stationery bag with a fish print for storing pencils is complete, it’s time to add some personal flair. Decorative details can elevate your project and make it truly unique. You can add a small fabric label, a charm attached to the zipper, or even a patch with your initials. These touches make the bag feel custom-made and stylish.
Consider using a contrasting thread color when topstitching around the zipper or edges. This not only reinforces the seams but also adds an attractive finishing detail. You could use ocean-inspired shades like turquoise or coral to complement the fish print design. This gives the bag an extra pop of color without being overwhelming.
Another fun option is to sew a small piece of lace or ribbon along the top seam or sides of the bag. It creates a more elegant or playful look, depending on the type of trim you choose. Handmade accessories like this allow you to express your creativity freely.
If you’re confident with embroidery, you can add simple ocean motifs like bubbles, shells, or waves to match the fish print theme. Embroidery adds texture and character to your bag, making it stand out as a true piece of art. The Stationery bags with a fish print for storing pencils – Step by Step Tutorial encourages these kinds of creative explorations.
For a practical touch, consider sewing an inner pocket to organize smaller items like erasers or USB drives. This adds functionality while maintaining the sleek exterior design. Using a contrasting fabric for the pocket lining can also create an appealing visual surprise each time you open your bag.
When all the decorative elements are finished, give your bag a final press with a warm iron. This smooths out any wrinkles and ensures that your stationery bag looks as good as something you’d find in a boutique store.
Care and Maintenance
Now that your stationery bag with a fish print for storing pencils is finished, it’s important to know how to take care of it properly. Regular maintenance will keep it looking clean and vibrant for a long time. Cotton fabric is easy to care for, but you should follow a few guidelines to maintain the print’s quality.
If your bag gets dirty, spot-clean it first with a damp cloth and mild detergent. Avoid using bleach, as it can damage the colors and weaken the fibers. For a deeper clean, hand-wash the bag gently in cold water. This helps preserve the fish print and prevents fading.
Once washed, reshape your bag and let it air dry completely before using it again. Avoid wringing it out, as that could distort its shape. You can press it lightly with an iron if needed, but make sure to place a thin cloth between the iron and the fabric to protect the design.
Proper storage also helps extend the life of your bag. Keep it in a cool, dry place away from direct sunlight. Storing it with silica gel packets or moth repellents can help prevent moisture and odors. This is especially useful if you plan to store multiple handmade bags together.
If your bag has a zipper, apply a little wax or candle on the zipper teeth occasionally to keep it running smoothly. This prevents snags and makes it easier to open and close. For any loose threads, simply trim them neatly without pulling.
Following these easy maintenance steps will ensure that your stationery bag with a fish print stays in great condition, ready to hold your pencils, pens, and creative ideas whenever you need them.
FAQ
1. What type of fabric is best for a stationery bag?
Cotton or canvas fabrics are ideal because they’re durable, easy to sew, and come in many attractive prints.
2. Can I make a stationery bag without a sewing machine?
Yes! You can sew it by hand using small, tight stitches. It might take a bit longer, but the result will still be beautiful and sturdy.
3. How do I make my fish print last longer?
Wash the bag gently in cold water and avoid strong detergents or bleach. Let it air dry and iron carefully.
4. Can I use other prints besides fish designs?
Of course! The tutorial works for any pattern. You can choose floral, geometric, or abstract prints depending on your style.
5. What size should my stationery bag be?
A standard size is around 9 inches by 4 inches, but you can adjust the measurements based on your storage needs.
Conclusion
Through this Stationery bags with a fish print for storing pencils – Step by Step Tutorial, you’ve learned how to create a stylish and practical pencil case from start to finish. From choosing materials and sewing techniques to adding decorations and caring for your creation, every step contributes to making a one-of-a-kind handmade accessory.
This project is perfect for anyone looking to organize their supplies while expressing creativity through fabric and design. With just a bit of patience and imagination, you can produce a durable and charming stationery bag that’s as functional as it is beautiful.
If you enjoyed this tutorial, please leave your honest opinion and share your suggestions for future projects. Your feedback helps inspire new creative ideas and makes future tutorials even better.