
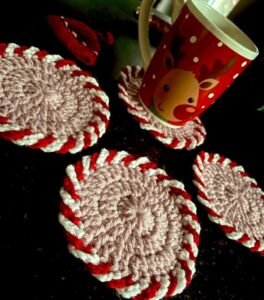
If you love creating small yet beautiful crochet projects, this Round crocheted coaster – Step by Step Tutorial is the perfect guide for you. Coasters are not only practical but also an excellent way to showcase your crochet skills and add a handmade charm to your home. In this tutorial, we’ll explore how to make a round crocheted coaster from start to finish, using simple stitches and easy-to-follow techniques. Whether you are a beginner or an experienced crocheter, this project is enjoyable, quick, and rewarding.
Making a round crocheted coaster is a great way to use up leftover yarn while improving your crochet skills. You can customize the size, color, and texture according to your preferences. These coasters make lovely additions to your table settings, perfect for protecting surfaces from heat and moisture while adding a touch of artistry to your décor. Plus, handmade coasters make thoughtful and personal gifts for friends and family, especially when paired with matching sets.
One of the best things about this Step by Step Tutorial is that it walks you through each stage with clarity and patience. You’ll learn how to start your round coaster from the center, how to increase evenly to create a perfect circle, and how to finish it neatly. With practice, you’ll be able to make sets of coasters quickly and even experiment with different patterns and stitches. Now, let’s begin this creative journey and discover how to make beautiful round crocheted coasters easily and efficiently.
Materials Needed for the Round Crocheted Coaster
Before you begin this Round crocheted coaster – Step by Step Tutorial, gather all your materials to make the process smooth and enjoyable. You’ll need a ball of cotton yarn, which is ideal for coasters because it’s absorbent and durable. Cotton also holds its shape well after washing, making it perfect for long-term use. Choose a color that complements your kitchen or dining area—neutral tones for elegance or bright hues for a fun, lively look.
Next, select the right crochet hook. For most cotton yarns, a 3.5mm to 4mm hook works perfectly. The size of the hook will affect the coaster’s texture: smaller hooks create tighter stitches, while larger ones produce a softer, looser feel. Check your yarn label for recommendations to get the best result.
You’ll also need a pair of scissors and a tapestry needle to weave in your ends neatly. If you want to make a set, consider preparing multiple yarn colors beforehand so you can create coordinating coasters in different shades. This not only adds variety but also allows you to practice color changes and creative combinations.
Having a comfortable workspace makes a big difference. Find a well-lit area where you can relax and focus on your stitching. Keep all your tools within reach to maintain a smooth workflow. You can even use a stitch marker if you like to track the start of each round accurately, especially helpful for beginners.
Before starting the project, it’s a good idea to make a small gauge swatch to check the stitch size and tension. This ensures that your coaster will lay flat and have the right diameter. Remember that crochet tension can vary depending on how tightly or loosely you hold your yarn.
Once you’ve gathered everything, you’re ready to begin your Round crocheted coaster project. Having the right materials and setup helps ensure that your finished coaster will be both functional and beautiful.
How to Crochet the Round Coaster
To start your Round crocheted coaster, make a magic ring or chain 4 and join with a slip stitch to form a small circle. The magic ring method is preferred because it allows you to pull the center tight, leaving no hole in the middle of your coaster. Once you’ve formed your base circle, chain 2 (this counts as your first half double crochet) or chain 3 (if you prefer to use double crochet stitches).
In the first round, make 11 more stitches into the ring, giving you a total of 12 stitches. Pull the ring closed tightly and join to the top of your starting chain with a slip stitch. This completes your first round. The circle should already begin to take shape.
For the second round, chain 2 again and make 1 half double crochet in the same stitch. Then make 2 stitches in each stitch around. You’ll end up with 24 stitches in total. This step ensures the coaster expands evenly and stays flat. Remember to count your stitches carefully to keep the circle symmetrical.
In the third round, the pattern continues with regular increases. Chain 2, make 1 stitch in the first stitch, then 2 in the next. Continue alternating between 1 stitch and 2 stitches around. By the end, you’ll have 36 stitches. This even distribution prevents curling and helps your round crocheted coaster maintain its perfect circular shape.
You can continue adding more rounds to achieve your desired size. For instance, in the fourth round, make 1 stitch in the first two stitches, then 2 in the third. This pattern of increasing gradually ensures that the circle grows smoothly. Always join each round with a slip stitch and start the next round with a chain of 2.
After reaching the size you want—usually about 4 to 5 inches in diameter—finish the coaster with a round of single crochet stitches around the edge. This creates a clean, sturdy border. Fasten off your yarn, cut the excess, and weave in the ends with your tapestry needle. Congratulations! You’ve completed your first Round crocheted coaster using this simple Step by Step Tutorial.
Design Variations and Creative Touches
One of the joys of following the Round crocheted coaster – Step by Step Tutorial is the opportunity to personalize your project. Once you’ve mastered the basic circle, you can experiment with different stitches and color combinations to create unique designs.
A popular variation is the striped coaster. To achieve this, simply change yarn colors every few rounds. This adds visual interest and makes your set more dynamic. For a nautical or beach-inspired theme, alternate blue and white yarns. For a festive touch, use red, green, and gold for holidays.
You can also experiment with textured stitches. Instead of using half double crochet throughout, try incorporating puff stitches, shells, or clusters in the later rounds. These textures make your coaster stand out while maintaining functionality. Just remember to keep the surface relatively flat so it can hold cups properly.
Another creative option is to add a decorative border. A scalloped edge, picot trim, or even a contrasting color border adds a refined finish to your round crocheted coaster. These small details elevate the design and give it a professional appearance.
For those who love a more minimalist look, use natural-colored cotton yarn and keep the stitches simple. The clean design works beautifully for modern home décor styles. You can even crochet a matching set of coasters and tie them together with a ribbon for an elegant handmade gift.
Don’t forget the option of using eco-friendly yarns, such as organic cotton or recycled fibers. These materials are sustainable and add an extra level of meaning to your handmade creations. Whichever design you choose, your coaster will reflect your creativity and care.
Tips for Care and Maintenance
Now that you’ve completed your Round crocheted coaster – Step by Step Tutorial, you’ll want to keep your creations looking beautiful and functional for as long as possible. Handmade items need a bit of care, but with the right steps, they can last for years.
Cotton yarn is easy to clean, which is one reason it’s perfect for coasters. If your coaster gets stained, spot-clean it immediately with mild soap and cool water. For a deeper clean, gently hand wash the coasters or put them in a laundry bag and machine wash them on a gentle cycle. Avoid bleach or harsh detergents to preserve the color and fiber quality.
After washing, lay the coasters flat to dry. This prevents stretching or warping. If they lose their shape slightly, reshape them while damp and let them air dry completely. You can also lightly press them with an iron on low heat to restore their neat appearance.
Avoid exposing your coasters to direct sunlight for extended periods, as this can cause colors to fade. When not in use, store them in a dry drawer or box to prevent dust accumulation. If you made a set, stack them neatly to keep their shape.
If your coasters start to curl at the edges after repeated use, lightly dampen them and block them by pinning them flat on a towel until dry. This quick fix restores their perfect round shape.
With proper care, your round crocheted coasters will remain vibrant and ready to protect your furniture from drinks and heat for many cozy moments to come.
FAQ
1. What type of yarn is best for crocheting coasters?
Cotton yarn is the best choice because it’s absorbent, durable, and easy to wash. It also holds its shape well after use.
2. Can I make the coasters using acrylic yarn?
You can, but acrylic is less absorbent and may not perform as well with hot or wet cups. Cotton remains the top choice for functionality.
3. How long does it take to make one coaster?
Depending on your skill level, it usually takes between 30 minutes and 1 hour to complete one coaster.
4. How can I prevent my coaster from curling up?
Ensure even increases in each round and maintain consistent tension while crocheting. Blocking the coaster afterward can also help.
5. Can I make larger or smaller versions?
Yes, simply add or reduce the number of rounds to adjust the size of your coaster. The same method applies for all sizes.
6. Are these coasters machine washable?
Yes, they are. Use a gentle cycle and cold water to prevent damage, and always air dry them afterward.
Conclusion
This Round crocheted coaster – Step by Step Tutorial has guided you through every stage of creating a beautiful and practical crochet project. From gathering materials and understanding basic stitches to exploring creative variations and caring for your finished coasters, you’ve learned everything you need to know to craft your own set with confidence.
Crocheting coasters is not only a relaxing hobby but also a wonderful way to add handmade beauty to your home. With just a small amount of yarn and time, you can create something useful and stylish.
Now that you’ve completed your coaster, take pride in your work and share your creations with others. Don’t forget to leave your honest opinion and suggestions about this tutorial—your feedback helps inspire even more creative projects and ideas for crochet lovers everywhere.