
Fabric scissor holder-Step by Step Tutorial is the perfect project for anyone who loves organization, sewing, and crafting practical accessories. This useful tool keeps your scissors protected, easy to find, and safely stored, whether you use them for sewing, embroidery, paper crafting, or everyday tasks. Creating a fabric scissor holder is simple, fun, and allows you to explore different designs, colors, and patterns while learning useful sewing techniques. As you follow this Fabric scissor holder-Step by Step Tutorial, you will discover how easy it is to transform small pieces of fabric into a stylish and functional accessory.
The beauty of a scissor holder is that it prevents blades from dulling, keeps sharp tips covered, and helps you maintain a clean and organized craft space. Many people struggle with scissors getting lost in drawers or accidentally damaging other supplies, which is why this Fabric scissor holder-Step by Step Tutorial can be such a game changer. This project is also beginner-friendly, so even if you are new to sewing, you will be able to follow along, improve your skills, and end up with a professional-looking result.
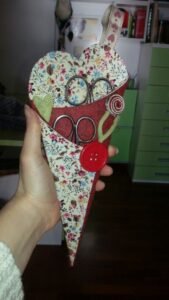
Another advantage of following this Fabric scissor holder-Step by Step Tutorial is the freedom to personalize your holder. You can use patterned cotton for a fun look, add quilting for extra durability, or choose neutral tones for a minimalist style. Handmade scissor holders also make thoughtful gifts for friends who love crafting. Whether you choose bright colors or subtle prints, your finished piece will be both beautiful and functional. Before diving into the instructions, gather your materials and prepare to enjoy an easy, relaxing, and rewarding sewing experience.
Choosing Materials and Preparing Your Pieces
To begin this Fabric scissor holder-Step by Step Tutorial, the first step is gathering the right materials. You will need two pieces of cotton fabric, medium-weight interfacing for structure, scissors, a sewing machine or needle and thread, pins, and optionally a decorative button or ribbon. Cotton fabric is the most recommended for this project because it is easy to sew, flexible, and available in endless colors and patterns. Choosing coordinating fabrics helps create a visually appealing design.
Start by selecting fabrics that you love. You can pick floral prints, geometric patterns, solid colors, or even fabric scraps left from previous projects. In this Fabric scissor holder-Step by Step Tutorial, the fabric choice plays a big role in the final look, so take your time to pick something that represents your style. Once selected, iron the fabric pieces to remove all wrinkles, which ensures more accurate cutting and straighter seams.
Next, cut two triangular pieces of fabric that will form the front and back of your scissor holder. The size of the triangle depends on the size of your scissors, but a common size is around 10 inches tall and 6 inches wide at the base. The interfacing should be cut to match the fabric pieces. Adding interfacing gives your holder structure, durability, and helps it maintain its shape even after repeated use. This is a key detail in the Fabric scissor holder-Step by Step Tutorial.
After cutting your pieces, fuse the interfacing to the back of one fabric piece by ironing it carefully. This step creates a stiffer base, making the scissor holder strong enough to withstand daily use. Once fused, place the two fabric triangles right sides together and pin them in place to prepare for sewing. These simple steps set the foundation for the next part of the Fabric scissor holder-Step by Step Tutorial.
Before sewing, take a moment to double-check that your scissors fit comfortably inside the layered triangle. It’s important to make sure the holder is neither too big nor too tight. Adjust the dimensions if needed. Customizing the holder to fit your scissors perfectly enhances the practicality of this project, one of the many benefits of a handmade accessory. This preparation phase ensures that the rest of the Fabric scissor holder-Step by Step Tutorial continues smoothly.
Finally, gather any decorative elements you may want to add later, such as lace trim, buttons, embroidery, or ribbon. Adding small details can transform your scissor holder from simple to stunning. Keeping all your materials organized and ready will help you enjoy the next steps of this Fabric scissor holder-Step by Step Tutorial without interruptions.
Sewing the Base Structure
Now that your pieces are ready, it’s time to begin sewing the base structure of your scissor holder. Start by stitching around the edges of the pinned fabric pieces, leaving a small opening at the base for turning the holder inside out. This is a common step in the Fabric scissor holder-Step by Step Tutorial, as it ensures a clean finish without exposed seams. Sew carefully, following the triangular shape for a precise result.
Once the stitching is done, trim the corners slightly to reduce bulk when turning the piece right side out. Be sure not to cut the stitches. Turn the fabric inside out through the opening. Use a blunt tool like a chopstick to push the corners out neatly. Iron the piece once again to flatten it and give your scissor holder a crisp, professional appearance. Pressing the seams is an essential part of this Fabric scissor holder-Step by Step Tutorial.
Next, close the opening at the base by folding the fabric edges inward and stitching the seam. This step gives your scissor holder a polished look and ensures the fabric does not fray over time. A neatly closed seam adds durability and strength, demonstrating the importance of attention to detail in this Fabric scissor holder-Step by Step Tutorial.
Now, fold the bottom portion of the triangle upward, leaving space for your scissors to slide in comfortably. Pin the folded flap in place. The folded section forms the pocket of the scissor holder. Make sure the fold is even and aligns well with the triangle’s sides. Proper folding ensures that the scissors sit securely inside, which is a crucial part of the functionality in this Fabric scissor holder-Step by Step Tutorial.
Secure the fold by stitching along the sides. Be sure to sew through all layers to keep the pocket firmly attached. Reinforce the ends of the seams with a few backstitches to prevent looseness from repeated use. This gives your holder long-lasting durability. As you complete this step, you’ll see the scissor holder take shape, showing how effective this Fabric scissor holder-Step by Step Tutorial truly is.
Once the pocket is fully sewn, test it by inserting your scissors inside. They should slide in easily and fit snugly. If everything fits well, you’re ready to move on to the embellishing stage. The basic sewing portion of this Fabric scissor holder-Step by Step Tutorial is now complete.
Adding Decorative Details
Decorating your scissor holder is one of the most enjoyable stages of this Fabric scissor holder-Step by Step Tutorial. You can add embellishments that reflect your personality and crafting style. Many people choose to decorate with lace, ribbon, embroidery, appliqué, or buttons. These little touches make your holder unique and charming.
If you want to add lace trimming, sew it carefully along the pocket edge. Choose a lace that matches or contrasts your fabric in a pleasing way. This delicate detail softens the overall look and adds elegance to the piece. It’s a perfect addition for people who enjoy a vintage or romantic style. Adding such details enhances the beauty of this Fabric scissor holder-Step by Step Tutorial.
Another option is to sew a decorative button on the front. While it may not serve a functional purpose, it adds character. Choose a button with an interesting shape or color. Buttons shaped like flowers, hearts, or sewing accessories can match the theme beautifully. This small touch helps personalize your holder and elevate its design.
Embroidery is another great way to add a personal touch. You can stitch initials, small flowers, or simple patterns. Embroidery adds texture and charm, and it turns your scissor holder into a more meaningful handmade item. Even beginners can try simple embroidery techniques to make their accessory more special. This enhances the creative side of the Fabric scissor holder-Step by Step Tutorial.
If you like appliqué, cut small fabric shapes and sew them onto the front of the holder. You could add a heart, a star, or even a tiny scissor silhouette. Appliqué allows you to layer fabrics and create eye-catching decorative effects. It’s an easy and fun way to make your holder stand out.
For those who prefer a minimalist look, consider adding just one elegant detail, such as a thin ribbon sewn near the top. Sometimes, simplicity is the best design strategy. Even with minimal decoration, your scissor holder will look clean, modern, and stylish, perfectly reflecting the balanced approach of this Fabric scissor holder-Step by Step Tutorial.
Care Tips and Long-Term Use
Taking care of your fabric scissor holder will help it last longer and keep its appearance beautiful. Since cotton fabric is easy to maintain, your holder can be washed gently with mild detergent. Handwashing is recommended to prevent distortion of the structure. This maintenance advice supports the durability taught in the Fabric scissor holder-Step by Step Tutorial.
Make sure your scissors are clean and dry before placing them inside the holder. Moisture can damage both the blades and the fabric. Keeping your holder dry will help it stay in excellent condition and prevent mold or stains. Good care habits ensure your project remains practical and long-lasting.
If you notice any loose threads or seams over time, repair them promptly. A few simple stitches can reinforce the structure and keep your holder looking new. This is part of maintaining handmade items and demonstrates the continued usefulness of this Fabric scissor holder-Step by Step Tutorial.
Store your scissor holder in a safe place, away from moisture or excessive heat. Whether you keep it in a drawer, sewing box, or bag, make sure it stays protected from rough objects that might fray the fabric. Proper storage contributes to the longevity of your handmade creation.
If your holder becomes wrinkled, you can iron it gently. Avoid ironing directly over decorations like lace or buttons. Use a pressing cloth to protect delicate areas. This small habit will help maintain the holder’s aesthetic appeal and structure.
Enjoy using your stylish scissor holder daily. It not only protects your scissors but also adds charm to your crafting space. A handmade organizer like this reflects care, creativity, and attention to detail—qualities celebrated throughout this Fabric scissor holder-Step by Step Tutorial.
FAQ
1. What type of fabric is best for a scissor holder?
Cotton is the most recommended fabric because it is easy to sew, durable, and widely available in many patterns and colors.
2. Do I need interfacing for this project?
Yes, interfacing provides structure and strength, helping the holder maintain its shape and securely protect the scissors.
3. Can beginners follow this tutorial easily?
Absolutely! This Fabric scissor holder-Step by Step Tutorial is beginner-friendly and includes straightforward steps suitable for new crafters.
4. Can I make this holder without a sewing machine?
Yes, you can sew it by hand using simple stitches. It may take longer, but the result will still be beautiful and functional.
5. What size should the scissor holder be?
It depends on your scissors, but a common size is around 10 inches tall and 6 inches wide at the base. Always adjust based on your tools.
Conclusion
By following this Fabric scissor holder-Step by Step Tutorial, you have learned how to choose the right materials, prepare your pieces, sew the structure, add decorative elements, and care for your finished scissor holder. This project is practical, creative, and perfect for anyone who loves crafting useful accessories.
Now that you have completed your handmade scissor holder, enjoy using it and take pride in your work.
Feel free to experiment with different fabrics, decorations, and sizes to create more versions. Please leave your honest opinion and suggestions—I’d love to know how your project turned out and what you would like to learn next!