
Starting your journey into handmade crafts with a Crocheted owl keychain-Step by Step Tutorial is a wonderful way to combine creativity, relaxation, and practical crafting skills. This adorable project brings together the charm of crochet with the personality of a cute owl design—perfect for gifts, accessories, or small decorations. From beginners taking their first steps to experienced crocheters seeking a fast and fun pattern, this guide offers a complete approach to making a memorable keychain. Throughout this article, you will see the term Crocheted owl keychain-Step by Step Tutorial naturally used to improve clarity and boost SEO performance.
Before diving into the stitches and techniques, it is helpful to understand why the Crocheted owl keychain-Step by Step Tutorial has become such a popular search topic. Small crochet projects are loved for being quick, adorable, and uniquely customizable. Many crafters enjoy creating keychains because they require very little material, making them affordable and sustainable. Owl-themed items are particularly trendy, thanks to their symbolic meanings of wisdom and protection. By following this complete guide, you will be able to create an owl keychain that is both affordable and meaningful.
In addition to providing detailed instructions, this article focuses on beginner-friendly explanations and Google AdSense–safe content. Whether you want to make the item for personal use, gifts, or even small sales, this Crocheted owl keychain-Step by Step Tutorial will help you achieve a neat and polished finish. With the right yarn, hook, and a little patience, anyone can craft a charming crocheted owl that stands out for its colors, textures, and handmade appeal.
Materials Needed for the Crocheted Owl Keychain
When starting this Crocheted owl keychain-Step by Step Tutorial, selecting good materials is the first important step. Even though the project is small, your choice of yarn and hook can influence the final result. Lightweight or medium-weight yarn works beautifully for this kind of project, giving the owl enough structure without becoming too stiff. Cotton yarn is often preferred because it is durable and holds its shape well.
Along with yarn, choosing the right crochet hook is essential. A smaller hook size helps create tight stitches, which is ideal for amigurumi-style pieces like your crocheted owl. Tight stitches prevent stuffing from showing and give your keychain a more polished finish. Make sure to test your tension before starting the main piece to ensure consistency.
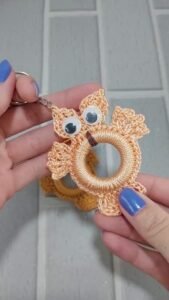
Safety eyes or embroidered eyes bring life to your owl. Some crafters prefer plastic safety eyes for a cleaner look, while others enjoy the charm of handmade embroidered features. Both options work beautifully, so feel free to choose what aligns with your style. Just remember that safety eyes should always be securely fastened.
Stuffing is also needed to give shape to your owl. Fiberfill stuffing is soft, lightweight, and easy to work with. You only need a small amount for this project, making it a cost-effective choice. A yarn needle will help with sewing pieces together and weaving in ends.
Finally, to complete your Crocheted owl keychain-Step by Step Tutorial, you will need a small keychain ring. Metal key rings are usually the most durable option and attach easily to the top of the crochet piece. With all materials ready, you can start crafting your charming owl.
Step by Step Instructions for Crafting the Owl
To begin, create a magic ring and start working in continuous rounds. This is the foundation of many small crochet projects and will help shape the bottom of your owl. Work several single crochet stitches into the ring, then tighten it securely. This gives your owl a clean base and prevents a visible hole at the bottom.
Increase stitches evenly in the next rows to start forming a rounded body. This shaping process is simple but important, as it determines the keychain’s structure. Make sure your stitch count is accurate after each round. A stitch marker can help beginners keep track of rounds and avoid mistakes.
Continue crocheting in single crochet without increasing to build the height of the owl. This creates the main body where the eyes and beak will be attached later. Keep your tension even to ensure a smooth and professional appearance. You can personalize your owl by switching yarn colors during this section if desired.
Once the body reaches the desired height, begin decreasing stitches gradually to close the top. Add a small amount of stuffing before fully closing the piece. The stuffing should be firm enough to hold the shape but not too tight, as this may distort the stitches. After closing, weave in the yarn end neatly.
Next, create small wings using simple crochet shapes such as half circles or ovals. These are made separately and attached to the sides of the body using a yarn needle. Wings add personality and movement to your owl, making it more visually appealing.
Finally, attach the keychain ring to the top securely. Insert the ring into a small stitch loop or use a separate chain to create a hanging loop. Once everything is secured, your crocheted owl is almost complete and ready for final touches.
Adding Details to Bring Your Owl to Life
The eyes are the most expressive part of your crocheted owl, and this section of the Crocheted owl keychain-Step by Step Tutorial focuses on bringing personality to your creation. If using safety eyes, insert them before closing the body completely. If embroidering, use black or dark yarn to make small circles or dots. Placement is key, as subtle shifts can change the owl’s expression from curious to sleepy.
After working on the eyes, create a small triangle for the beak using a contrasting color. This tiny detail adds charm and balance to the owl’s face. Attaching the beak with a few well–placed stitches ensures it stays secure and looks symmetrical. A bright color like yellow or orange is often used.
The wings should also be positioned evenly on both sides of the body. You can slightly curve them inward or outward depending on the character you want your owl to have. Some crafters like adding a second color to the wings to create depth. This customization option makes each piece unique.
Adding decorative stitching can further enhance the design. Small embroidered feathers or patterns on the body help create texture and visual interest. These details make your keychain stand out and demonstrate your craftsmanship.
If you want your owl to look even more adorable, consider adding small ear tufts using yarn strands attached to the top corners. These are common in owl designs and add extra charm. Trim the tufts to even lengths after attaching.
With all details complete, take a moment to check the piece for loose threads or uneven parts. Making final adjustments ensures your finished owl looks professional and secure for daily use.
Final Touches and Personalization Tips
Now that your crocheted owl is assembled, it’s time to perfect the final touches. Start by checking the shaping of the stuffing to ensure the owl looks even and symmetrical. Gently roll the piece in your hands to adjust the form if necessary. This helps give the keychain a neat finish.
Personalizing your owl is one of the most enjoyable steps in the process. You can experiment with different yarn colors, adding stripes, patterns, or seasonal combinations. Some people create themed owls—such as holiday versions or pastel tones—for special occasions. This flexibility is one reason the Crocheted owl keychain-Step by Step Tutorial is so popular.
Adding small accessories can make your owl even more special. A tiny bow, a flower, or even miniature embroidered glasses gives the owl a unique personality. These details transform a simple project into a memorable handmade gift.
If you plan to sell or gift these keychains, consider making a set with different colors or facial expressions. Variety appeals to buyers and makes your creations more engaging. This also helps you practice different techniques while improving your crochet skills.
Another helpful tip is to block small crochet pieces lightly if needed. While amigurumi typically does not require blocking, small components like wings or facial features can benefit from gentle shaping. This ensures they sit properly on the owl’s body.
Once everything looks perfect, attach the final key ring securely. Your project is complete, and you now have a charming crocheted owl ready to accompany keys, handbags, or backpacks.
FAQ About the Crocheted Owl Keychain
What is the best yarn for a crocheted owl keychain?
Cotton yarn is recommended because it holds its shape well and creates a smooth finish. Acrylic yarn can also work for a softer texture.
Is this project beginner-friendly?
Yes, this Crocheted owl keychain-Step by Step Tutorial is ideal for beginners. It uses basic stitches and simple assembly techniques.
Can I make the keychain larger or smaller?
Absolutely. Adjusting yarn thickness and hook size will change the overall size. Using thinner yarn provides a smaller result; thicker yarn makes the owl bigger.
Do I need safety eyes?
No. You can embroider eyes using black yarn if you prefer a fully handmade style or if the keychain is meant for a child.
How long does it take to complete the owl?
Most crafters finish the project in 1–2 hours, depending on skill level and added details.
Can I sell the finished keychains?
Yes, handmade keychains are popular items for small craft shops or gift sales. Be sure your work is neat and securely assembled.
Conclusion
This complete Crocheted owl keychain-Step by Step Tutorial has guided you through each stage of creating an adorable and functional accessory.
You learned how to choose materials, shape the body, add expressive features, and personalize your creation in unique ways.
Whether you are crafting for fun, gifting, or selling, this project is a delightful way to express your creativity. I hope you enjoyed this tutorial—please leave your sincere opinion and suggestions to help me improve future guides!