
How to crochet the Borzoi Keychain-Step by Step Tutorial is an enjoyable and creative project for crochet lovers who appreciate charming handmade accessories. This tutorial is perfect for anyone who enjoys crafting small, meaningful items that can be gifted, collected, or used every day. By following a clear and beginner-friendly process, you can make a lovely miniature Borzoi dog that transforms into an adorable keychain. In this article, you will discover detailed guidance on how to create this piece, along with tips, techniques, and essential materials. Because this is a How to crochet the Borzoi Keychain-Step by Step Tutorial, the instructions are designed to be both accessible and fun.
The popularity of small crochet animals has increased rapidly, especially among crafters who like practical and decorative projects. A keychain is the perfect item to showcase your crochet skills daily without taking too much time or materials. By mastering this How to crochet the Borzoi Keychain-Step by Step Tutorial, you will learn not only how to shape the silhouette of a Borzoi dog but also how to apply color changes, stuffing techniques, and finishing stitches. This guide is written in a humanized tone and structured for readability so that beginners and experienced crocheters alike can follow along with confidence.
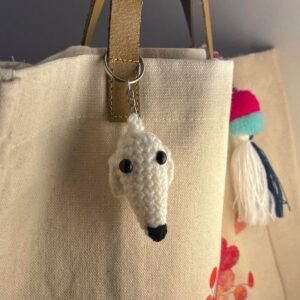
Creating a Borzoi keychain can be a meaningful experience because the Borzoi dog is known for its elegant and graceful look. Reproducing its slender snout and long body is easier than it might seem when following a well-explained How to crochet the Borzoi Keychain-Step by Step Tutorial. In the next sections, you will find essential information on materials, shaping techniques, assembly, and final touches. Each stage is divided clearly to help you stay organized as you crochet your miniature dog keychain.
To begin this How to crochet the Borzoi Keychain-Step by Step Tutorial, selecting the appropriate materials is key to achieving the best results. Lightweight yarn is usually the best choice because it helps create delicate stitches and gives the keychain a cleaner finished appearance. Cotton yarn is highly recommended, but acrylic yarn can also work well if you prefer a softer look. The yarn colors you choose will determine the personality of your Borzoi keychain, whether classic white and beige or a fun, colorful variation.
Your crochet hook should match the yarn weight. A smaller hook size, such as 2.0 mm or 2.5 mm, is ideal for small projects like amigurumi because it creates tighter stitches. This prevents stuffing from showing through and gives the keychain a firm structure. Since this is a detailed How to crochet the Borzoi Keychain-Step by Step Tutorial, precision is important, and using the right hook size will make your stitches look neat and compact.
You will also need fiber stuffing to shape the Borzoi’s body. Use small portions and fill gradually to avoid lumps. For the eyes, safety eyes are a great choice, but you may also embroider them if you prefer a softer or child-friendly result. Embroidery floss for the nose and mouth will add charm and expression to your crochet dog.
Other important materials include scissors, stitch markers, and a tapestry needle. Stitch markers will help keep track of your rounds, especially when working in continuous spirals. The tapestry needle will be used to sew small pieces together and hide yarn ends. Finally, a metal keychain ring will transform your finished crochet dog into a functional accessory.
Once you have all your materials organized, you are ready to start shaping the different parts of the Borzoi. Preparation is essential in any How to crochet the Borzoi Keychain-Step by Step Tutorial, and having everything within reach will make the process smoother and more enjoyable.
The first step in this How to crochet the Borzoi Keychain-Step by Step Tutorial is to create the body, which is typically crocheted in the round using basic stitches. Start with a magic ring and build up several rounds of single crochet. The shape should gradually increase to create a slightly elongated oval, reflecting the slim build of the Borzoi dog. Crochet evenly and use your stitch markers to avoid losing count as you progress.
As you continue shaping the body, you may incorporate gentle decreases to form a taper. This gives the Borzoi its characteristic long shape. It is helpful to stop occasionally and gently stuff the piece so it maintains stability. A well-stuffed but not overfilled body makes the keychain durable and pleasant to the touch. This stage shows how simple techniques can effectively contribute to the realism of this How to crochet the Borzoi Keychain-Step by Step Tutorial.
Next, you will shape the head separately. The Borzoi is known for its long snout, so this portion will be slightly extended before curving into a rounded head. Start with a narrower set of stitches, then build up to create fullness at the top of the head. Carefully place the safety eyes before closing the head completely. If embroidering eyes, leave a yarn tail long enough for finishing details.
When the head is complete, lightly stuff it to match the shape of the body. The head should be firm enough to hold its form but soft enough to look natural. The narrow snout will be the most expressive part of the Borzoi, so take your time shaping it evenly.
Once both pieces are ready, use your tapestry needle to attach the head to the body securely. A few small stitches can connect these two parts without visible gaps. Proper assembly enhances the overall look of your finished piece and showcases the effectiveness of this How to crochet the Borzoi Keychain-Step by Step Tutorial.
This part of the How to crochet the Borzoi Keychain-Step by Step Tutorial focuses on the small details that bring your miniature dog to life. Begin by crocheting the legs. They are usually made with only a few rounds and kept short and narrow. After finishing four identical legs, position them evenly under the Borzoi body. Stitch them carefully so they lay flat and give the dog a balanced look.
Next, crochet the tail. Borzoi dogs typically have long, graceful tails, so this piece should be slightly curved. This curvature creates movement and brings charm to the keychain. The tail can be attached to the end of the body using the tapestry needle, ensuring it sits securely without gaps.
Now it’s time to add facial features. Use embroidery floss to stitch the nose at the tip of the snout. A small, oval-shaped nose adds personality and helps define the dog’s expression. You may also add a small line for the mouth. These tiny features give your keychain a friendly and appealing appearance.
You can choose to add decorative color patches depending on your yarn choices. A few surface stitches on the body or head can mimic markings commonly seen on Borzoi dogs. Adding these details makes your creation unique and emphasizes the freedom offered by the How to crochet the Borzoi Keychain-Step by Step Tutorial.
After all features are added, review your piece to ensure symmetry and stability. Adjust any loose stitches, and gently shape the stuffing if needed. When everything looks correct, the next step is adding the hardware that completes the keychain.
In this final crafting stage of the How to crochet the Borzoi Keychain-Step by Step Tutorial, your goal is to turn your miniature dog into a functional accessory. Start by locating a central point on the top of the head where you will attach the metal ring. Using a small loop of yarn or a metal jump ring, create a secure attachment spot.
Slide the keychain ring through the loop and pull tight. Make sure the connection is strong enough to withstand everyday use, since keychains experience frequent movement. A double stitch or reinforced loop will ensure durability.
Once the ring is attached, trim all excess yarn ends. Use your tapestry needle to hide any remaining threads inside the stuffed body. A clean finish is essential in making your keychain look professional and polished.
At this stage, review the entire piece. Check the legs, tail, snout, and facial features for symmetry and stability. If any stitches appear loose, reinforce them gently with a few extra passes of the needle. A well-finished piece highlights the quality of this complete How to crochet the Borzoi Keychain-Step by Step Tutorial.
Now your crochet Borzoi keychain is ready to use, gift, or display. This small but expressive piece is a wonderful example of how creativity and technique come together in a rewarding crafting experience. Enjoy the satisfaction of having created something adorable, functional, and handmade.
1. Is this How to crochet the Borzoi Keychain-Step by Step Tutorial suitable for beginners?
Yes. While the project involves small pieces, the stitches are simple. Beginners can easily follow the instructions with patience.
2. How long does it take to make the Borzoi keychain?
Most people complete it in 1 to 2 hours, depending on experience and crochet speed.
3. Can I use thicker yarn for this project?
You can, but thicker yarn will result in a larger keychain. For best results, lightweight yarn is recommended.
4. Do I need safety eyes for this project?
Safety eyes are optional. You may also embroider eyes if you prefer a simpler, softer look.
5. How do I keep the stuffing from showing?
Use a smaller hook size to keep your stitches tight and even. This prevents gaps.
6. Can I customize the Borzoi’s colors?
Absolutely. You can create realistic or playful color variations depending on your style.
7. Is the keychain durable enough for everyday use?
Yes, as long as you reinforce the attachment point and use sturdy yarn.
8. Can children help with this project?
Children can help with stuffing or color choices, but crocheting the pieces requires adult skill.
9. Can I sell finished Borzoi keychains?
Yes, handmade keychains are popular craft fair items. Just avoid selling copyrighted patterns.
10. What stitches do I need to know for this tutorial?
Basic stitches like single crochet, increases, and decreases are enough to complete the project.
This complete How to crochet the Borzoi Keychain-Step by Step Tutorial has guided you through the entire process of creating an adorable and functional crochet keychain.
From gathering materials to shaping, assembling, detailing, and adding the keychain hardware, you have learned every important step needed to craft your own miniature Borzoi dog. This project is perfect for gifting, selling, or personal use, and it showcases the charm of small handmade crochet items.
I hope this guide has inspired you to continue exploring creative crochet ideas. Please leave your honest opinion and share suggestions so future tutorials can become even more helpful and enjoyable for you!