
Crochet Turkey Treat Cups-Step by Step Tutorial is a charming and fun project that brings together creativity, seasonal joy, and practical crafting. Whether you’re preparing for Thanksgiving, fall celebrations, or simply enjoy making themed crochet projects, these adorable treat cups are a delightful way to share sweets with friends and family. In this article, you will learn how to make your own cups from start to finish, following a clear, humanized, and highly detailed guide. Because this is a Crochet Turkey Treat Cups-Step by Step Tutorial, every part of the process—from gathering materials to adding decorative details—will be explained with clarity and simplicity.
Creating themed crochet items for holidays has become increasingly popular, as they allow crafters to express their festive spirit in a personal and handmade way. The Crochet Turkey Treat Cups-Step by Step Tutorial presented here helps you transform simple yarn into decorative containers that serve as both gifts and party favors. These little cups are perfect for holding candies, chocolates, tiny toys, or even handwritten notes. Their turkey-inspired design makes them especially charming and ideal for both kids and adults. With careful crafting and thoughtful color choices, your treat cups will stand out as unique handmade treasures.
The goal of this guide is to make the Crochet Turkey Treat Cups-Step by Step Tutorial accessible to beginners while still offering detail and precision for experienced crocheters. You will discover how to crochet the base cup, assemble the turkey’s colorful feathers, add the head and facial features, and complete the treat cups with professional finishing touches. This comprehensive tutorial is structured to help you follow along easily, maintain creativity, and produce beautiful results every time.
To begin your Crochet Turkey Treat Cups-Step by Step Tutorial, you first need to collect the right materials. The success of your project depends on selecting colors that bring the turkey theme to life. Typically, you will need yarn in shades of brown, orange, yellow, red, and white. Brown will form the main structure of the cup, while the other colors will be used for the feathers, beak, and facial details. Using medium-weight yarn works best because it provides enough structure for the cup to stand upright.
You will also need a crochet hook that matches your yarn weight. For treat cups, a 4.0 mm (G) hook is commonly used, but you may choose a smaller or larger size depending on how tight you want the stitches to be. A tight stitch will make your treat cups more rigid, which is ideal for holding small items. Because this is a Crochet Turkey Treat Cups-Step by Step Tutorial, consistency in stitch tension is important for a uniform appearance.
A small amount of stuffing may be required for the turkey’s head, though some crafters prefer to crochet it flat. Safety eyes or small black beads can be used to create expressive eyes, but you may also embroider them if you prefer a simpler or more child-safe design. A tapestry needle will be essential for assembling the feathers and attaching all the decorative parts securely.
Another item you will need is a pair of scissors for trimming yarn ends neatly. Optional materials include fabric stiffener or diluted glue, which can be used to make the cup slightly firmer. This can be especially helpful if you plan to fill the cups with heavier snacks. Having all your supplies ready before beginning will make the Crochet Turkey Treat Cups-Step by Step Tutorial smoother and more enjoyable.
Once your materials are set, you’re ready to begin the crafting process. Preparing your workspace with good lighting and organized tools ensures a pleasant experience. This tutorial is designed to guide you step by step, making sure you feel confident as you move from one stage to the next.
<h2>Creating the Base Cup Structure</h2>
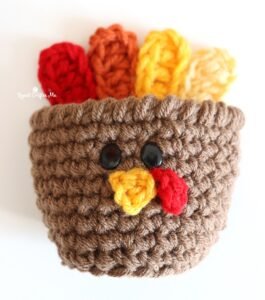
The foundation of this Crochet Turkey Treat Cups-Step by Step Tutorial is the base cup, which must be sturdy and shaped correctly to hold treats. Start by crocheting a flat circle using single crochet stitches. Use increases evenly spaced in each round to form a smooth and symmetrical base. This circular bottom will determine the overall size of your cup, so adjust the number of rounds if you want a larger or smaller treat holder.
Once the base is complete, it’s time to build up the sides. To do this, crochet around the edge of the circle without increasing. This causes the piece to rise vertically, forming the walls of the cup. Keep your stitch tension firm so that the walls stand up properly. A consistent rhythm helps create smooth edges, which is important for the polished look of the Crochet Turkey Treat Cups-Step by Step Tutorial.
Continue crocheting upward until your cup reaches the desired height. Most turkey treat cups are short and wide, allowing space for the decorative feathers to show nicely from behind. You may choose to add a small rim by working one or two rounds of slip stitches or by using a contrasting color. This gives the cup a neat finish and adds visual interest.
Once the walls are complete, reinforce the shape by pressing the cup gently into a rounded form. Some crafters prefer to dampen the cup slightly and let it dry to maintain structure. This is optional but helpful if you want the cup to stay perfectly upright. Because the goal of the Crochet Turkey Treat Cups-Step by Step Tutorial is to create functional treat holders, structure and stability are key.
Before moving to the next steps, weave in any loose yarn ends to prevent unraveling. This also prepares the cup for decoration. The next part of the tutorial will focus on crocheting feathers and giving your turkey a fun, colorful personality.
<h2>Crocheting and Attaching the Turkey Feathers</h2>
The feathers are one of the most iconic parts of the Crochet Turkey Treat Cups-Step by Step Tutorial, adding vibrant colors and playful detail. To make them, crochet small, leaf-shaped pieces using bright autumn shades like orange, red, and yellow. Each feather should be slightly curved, giving a natural flow to the turkey’s tail fan.
Start each feather with a small chain, then work single and half-double crochets along the chain to form the shape. You can add texture by working two stitches into the same spot or by tapering the tip to achieve a natural feathered look. Repeat this process until you have five to eight feathers, depending on how full you want your turkey’s tail to appear.
Once your feathers are ready, lay them out behind the cup to determine the best arrangement. Spread the colors evenly for a balanced design. This part of the Crochet Turkey Treat Cups-Step by Step Tutorial allows for creativity—some people prefer alternating colors, while others like grouping similar shades together.
Attach each feather to the back of the cup using your tapestry needle. Stitch them securely along the top edge of the cup so they stand upright. Make sure each feather is stitched tightly enough so it doesn’t flop forward when treats are placed inside. A well-attached tail ensures your turkey treat cup looks polished.
After attaching all the feathers, reinforce the back seams if necessary. This gives the turkey a full and confident appearance. Taking time with this stage makes your final creation visually striking and sturdy.
<h2>Adding the Turkey Head and Final Details</h2>
The final crafting stage in this Crochet Turkey Treat Cups-Step by Step Tutorial is creating and attaching the turkey’s head. Start by crocheting a small round head, increasing gradually to form a sphere. You can choose to lightly stuff it or leave it unstuffed for a flatter appearance.
Once the head shape is complete, attach small safety eyes or embroider simple black dots. Add a tiny orange or yellow triangle for the beak. Don’t forget the red wattle, which is a distinctive feature of turkeys. This can be made using a small chain that you fold and stitch under the beak. These small details give your turkey personality and charm.
Attach the head to the front of the cup, positioning it so that the feathers create a backdrop behind it. Stitch it tightly so that it stays centered and upright. The expressive face makes the treat cup appealing for children and adults alike.
After attaching the head, check all parts of your project for loose ends or uneven stitches. Use your tapestry needle to adjust or reinforce where necessary. Clean finishing is essential to create a neat and professional look.
Take a moment to admire your work—your turkey treat cup is almost complete. At this point, you can choose to stiffen the cup slightly if you plan to fill it with heavier treats. Otherwise, it is ready to be used or gifted.
Finally, test the cup by placing a few treats inside. Make sure it stands upright and holds its shape well. Congratulations—you have completed the Crochet Turkey Treat Cups-Step by Step Tutorial beautifully!
<h2>FAQ – Frequently Asked Questions</h2>
1. Is the Crochet Turkey Treat Cups-Step by Step Tutorial suitable for beginners?
Yes, the project uses simple stitches and small pieces, making it perfect for beginners.
2. How long does it take to complete one treat cup?
Most crafters finish one cup in 1–2 hours.
3. What yarn works best for this tutorial?
Medium-weight yarn works best for structure, especially in autumn colors.
4. Can I use glue instead of sewing pieces together?
Sewing is recommended for durability, but glue can be used for non-functional decorative pieces.
5. Are the treat cups washable?
They can be gently hand washed, but avoid harsh scrubbing to preserve the shape.
6. How many feathers should I make?
Typically five to eight feathers create a full, balanced look.
7. Can children use these treat cups?
Yes, but avoid small pieces if gifting to very young children.
8. Can I customize the turkey face?
Absolutely—different eye shapes or beak sizes add personality.
9. Can I make larger treat cups?
Yes, simply increase the number of rounds in the base and height.
10. Do I need stuffing for the head?
Optional. Stuffing creates a more rounded head, but a flat head also works well.
<h2>Conclusion</h2>
This complete Crochet Turkey Treat Cups-Step by Step Tutorial has guided you through every part of making festive, colorful, and functional crochet treat cups.
From crafting the base to shaping the feathers, creating the expressive face, and assembling everything neatly, you now have all the knowledge you need to produce beautiful handmade decorations.
These cups make wonderful gifts, party favors, or seasonal décor pieces. I hope this detailed guide was helpful—please leave your honest opinion and share suggestions so future tutorials can be even more enjoyable and useful for you!