
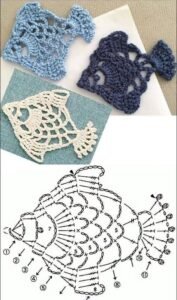
The Crocheted fish appliques-Step by Step Tutorial is a delightful guide for anyone looking to explore creative crochet projects that are fun, simple, and highly versatile. These charming appliques can be added to blankets, hats, bags, children’s clothing, and decorative home items. Whether you are a beginner or an experienced crocheter, this tutorial offers approachable instructions and clear guidance to help you create cute, colorful fish with ease. Because this technique uses small amounts of yarn and basic stitches, it’s also a great way to use up leftover materials while making something truly unique.
Working with crocheted fish appliques allows you to practice essential stitch combinations without feeling overwhelmed. Each small piece lets you experiment with colors, shapes, and textures while developing your skills in a relaxing and enjoyable way. These appliques are quick to produce, making them perfect for last-minute gifts or craft-themed surprises. The Crocheted fish appliques-Step by Step Tutorial ensures that even beginners can follow along and achieve beautiful results, thanks to its approachability and structured instructions. You’ll find that this project encourages creativity at every stage.
Creating appliques is also an excellent opportunity to personalize handmade items. The Crocheted fish appliques-Step by Step Tutorial teaches you how to build the fish structure, embellish details, choose ideal materials, and assemble everything neatly. Whether you prefer realistic designs or playful, cartoon-style fish, this guide offers the foundation you need. The goal of this article is to support your learning while offering an SEO-friendly, well-structured, and humanized explanation suitable for crochet lovers of all levels. By the end, you’ll feel confident creating your own set of vibrant fish appliques.
Choosing Materials for Crocheted Fish Appliques
Choosing the right materials is essential for a successful Crocheted fish appliques-Step by Step Tutorial, especially because appliques are small pieces that rely on detail. The most popular yarn for this type of project is cotton, as it offers great stitch definition and durability. Cotton yarns help the fish maintain their shape and appearance over time, making them ideal for attaching to clothing or decorative items.
Another important factor is hook size. For neat and defined stitches, a smaller crochet hook—typically between 3 mm and 4 mm—works best. Using a hook that is too large may result in loose stitches that distort the applique shape. A properly sized hook ensures compact and tidy results, which is ideal for small designs like fish.
Color selection is one of the most exciting parts of this tutorial. You can create realistic fish in natural tones or opt for bright, vibrant colors that add a playful touch. Many crafters like using multicolored yarns to give a fun, unexpected pattern to the body of the fish. Consider using contrasting shades for fins, tails, and eyes to create depth and visual appeal.
You will also need small accessories such as a tapestry needle for weaving in ends and stitching the appliques onto their final surface. Having a pair of sharp, comfortable scissors helps keep your project tidy. Since the fish are small, every detail matters, so precision tools make the process smoother.
Stitch markers can be helpful too, especially if you are new to shaping projects. They help you keep track of rows or identify your starting point. Although optional, they offer clarity while following the Crocheted fish appliques-Step by Step Tutorial.
Finally, selecting quality materials enhances the overall result. While appliques use minimal yarn, choosing soft yet durable fibers ensures the fish remain intact over time. This is particularly important if you plan to attach them to children’s items or frequently used accessories.
Step-by-Step Instructions to Start Your Fish Appliques
To begin the Crocheted fish appliques-Step by Step Tutorial, you will start by forming a magic ring. This technique allows you to work in the round and adjust the opening so that the center closes tightly, creating a smooth and seamless fish body. The magic ring helps maintain structure and provides a polished look.
After creating the ring, work several single crochet stitches into it. These stitches form the base of the fish body. Pull the ring closed, and you’ll instantly see the round shape take form. The number of stitches depends on the desired size, but beginners can start with six to eight stitches.
The next step is to increase around the circle. Increasing means adding two stitches into one, which helps expand the shape evenly. Continue increasing until the fish reaches the width you want. This stage is very beginner-friendly and teaches essential shaping techniques.
Once the base circle is complete, begin shaping the tail. This is usually done by working rows instead of rounds. Alternating between single crochet and half-double crochet stitches creates dimension in the tail. The Crocheted fish appliques-Step by Step Tutorial makes this process easy to follow with simple, clear steps.
After shaping the tail, it’s time to create the fins. Fins can be added directly to the body or made separately and sewn on. Small variations in stitch combinations add unique texture to each fin. Feel free to experiment and create different styles.
Finish your fish by stitching on a small eye. You can use a contrasting yarn color to embroider the eye or attach a small safety eye if the applique will be used on non-baby items. Weave in all ends neatly to complete your applique.
Adding Details and Personalization to Your Fish
Adding details is where the Crocheted fish appliques-Step by Step Tutorial becomes even more fun and expressive. You can choose to embroider stripes along the fish’s body using slip stitches or surface crochet. These small details bring personality and make the fish stand out.
Another option is to add little bubbles or seaweed motifs alongside the fish if you are decorating a larger project like a blanket or wall hanging. These additional elements help create a cohesive underwater theme without requiring advanced skills. Creativity is limitless in this step.
Changing colors is another great way to personalize your fish. You may choose to create bold color transitions to make your applique more playful. Switching yarn colors at the end of rounds or rows ensures clean transitions and a neat finish.
Texture can be added by using bobble stitches or popcorn stitches. These stitches add dimension and make the fish more unique. For example, adding a bobble stitch near the tail can give the illusion of scales or bubbles.
If you want to create realistic features, consider adding subtle shading by blending two similar yarn tones. Holding two strands together, each of a slightly different shade, creates a beautiful marbled effect that resembles natural fish patterns.
Finally, consider adding a border to your fish using slip stitches. This finishing touch sharpens the edges and gives the applique a more defined structure, making it look polished and professional.
Tips to Succeed with This Crochet Tutorial
To ensure success with the Crocheted fish appliques-Step by Step Tutorial, begin by practicing tension control. Appliques require compact and consistent stitches for best results. If your tension is too loose, the fish may look uneven or floppy.
Another helpful tip is to read through all instructions before starting. This allows you to anticipate steps and understand the shaping process. Being familiar with the sequence makes the crochet experience smoother and more enjoyable.
Work in a well-lit area to see the stitches clearly, especially when using small hooks or dark yarns. Good lighting reduces eye strain and helps you maintain precision while working on small details.
Keeping your yarn organized is crucial for color changes and multi-part assembly. If using multiple colors, separate the yarn balls to prevent tangling. Organized materials make the creative process faster and more pleasant.
Take short breaks when working on small appliques. Because the pieces are tiny, your hands may tire faster. Stretching your fingers occasionally helps maintain comfort and prevents discomfort.
Lastly, don’t hesitate to experiment with different yarn combinations, textures, and stitch patterns. This project is beginner-friendly and meant to encourage creativity. The more you explore, the more unique and expressive your fish appliques will become.
FAQ
How big should crocheted fish appliques be?
They can range from 5 to 10 cm, depending on the pattern and hook size, but you can adjust the size easily by changing yarn weight.
Can beginners follow this tutorial?
Yes, the Crocheted fish appliques-Step by Step Tutorial is perfect for beginners and uses basic stitches.
What yarn is best for fish appliques?
Cotton yarn works best because it creates defined, durable stitches.
Can I wash these appliques?
Yes, but follow the care instructions on your yarn label to maintain shape and color.
How do I attach appliques to other items?
Use a tapestry needle and yarn to sew them securely onto fabric or crochet surfaces.
Can I make the appliques larger?
Absolutely—use a thicker yarn and a larger hook to scale up the size.
Conclusion
This Crocheted fish appliques-Step by Step Tutorial has shown you how to select materials, shape the fish, personalize details, and complete each applique with confidence.
These small crochet pieces are rewarding, versatile, and perfect for beginners who want to develop new skills while creating decorative elements.
I hope this article has inspired your creativity and helped you learn a fun new crochet technique. Please leave your sincere opinion and share suggestions for future tutorials—your feedback helps make each guide even better!