
The Crocheted snail, crocheted animal applique-Step by Step Tutorial is a perfect project for those who enjoy creating charming and delicate crochet motifs. These small appliques add personality to baby blankets, children’s clothing, decorative pillows, bags, and even greeting cards. Because of their size and simplicity, they are ideal for beginners while still offering creative freedom for experienced crocheters. With just a bit of yarn and basic stitches, you can create adorable snails that brighten any handmade item and bring a touch of whimsy to your projects.
A crocheted snail applique is not only cute but also incredibly versatile. This tutorial guides you through the entire process, from choosing materials to shaping the snail’s spiral shell and assembling the final details. Since the snail is made of two main components—the body and the shell—you can easily mix and match colors to create fun, eye-catching combinations. The Crocheted snail, crocheted animal applique-Step by Step Tutorial emphasizes creativity while offering clear and easy-to-follow steps, so even if you are new to crochet, you’ll feel confident completing your applique successfully.
Another advantage of working with crocheted animal appliques is that they help you practice essential crochet techniques such as increases, shaping, and decorative embroidery. This makes the Crocheted snail, crocheted animal applique-Step by Step Tutorial a valuable learning opportunity for anyone wanting to expand their crochet skills. By the end of this article, you’ll not only understand how to create a snail applique from start to finish but also how to personalize it with unique touches that make your work stand out. This project is small, relaxing, and rewarding—perfect for crafters who love detailed handmade items.
Materials You Need for a Crocheted Snail Applique
To begin the Crocheted snail, crocheted animal applique-Step by Step Tutorial, gathering the right materials is essential. The most recommended yarn type is cotton because it offers clear stitch definition and durability. Cotton appliques hold their shape well over time, especially when attached to garments or decorative items that will be handled frequently. You can use size 2 or 3 cotton yarns for a delicate yet sturdy finish.
Selecting the correct hook size is also crucial. Small appliques require hooks between 2.5 mm and 4 mm to maintain precise shaping. A smaller hook creates tighter stitches, which is perfect for the snail’s tiny details. If your stitches appear too loose or floppy, switching to a smaller hook will instantly improve your applique’s appearance.
Color choice is where creativity begins. You can make the crocheted snail look natural with earthy colors or create a playful version using bright or pastel tones. Many crocheters love using variegated yarn for the shell because it creates a beautiful spiral effect effortlessly. You may also choose contrasting colors for the body and shell to add visual interest.
A tapestry needle is essential for sewing the body and shell together and weaving in yarn tails. Using a sharp pair of scissors helps you trim ends neatly and maintain a polished look. Because appliques rely on clean finishing, having these tools ready will improve your final result.
Safety eyes or small yarn embroidery can be used to create the snail’s eyes. Safety eyes add a charming expression, but if the applique will be used for baby items, embroidered eyes are safer and recommended. Tiny details such as smiles or blush can be added with simple embroidery stitches.
Lastly, keeping stitch markers nearby can be helpful, especially when working on the spiral shell. They help track increases and ensure the shape remains symmetrical. While optional, stitch markers are especially useful for beginners following the Crocheted snail, crocheted animal applique-Step by Step Tutorial.
Step-by-Step Guide to Crocheting the Snail Body and Shell
The body of the snail begins with a simple chain, making it an approachable starting point for beginners. After creating your initial chain, you will work single crochet stitches along one side, then continue around the opposite side. This forms an oval shape, which becomes the foundation of the snail’s body. The size of your starting chain will determine the length of the body, making it customizable.
Next, shape the snail’s head by adding slight increases at one end of the oval. These increases help form a rounded head that contrasts with the slender body. The Crocheted snail, crocheted animal applique-Step by Step Tutorial keeps this step very simple so that beginners can follow without confusion. After shaping the head, continue crocheting evenly along the body to maintain smooth lines.
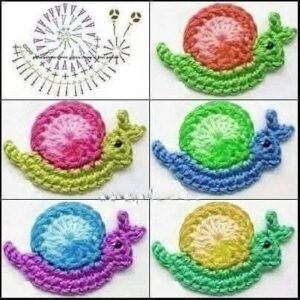
Once the body is complete, you can move on to the shell, which is the signature element of the crocheted animal applique. The shell begins with a magic ring, worked in the round. Single crochet increases are added each round so the shell expands gradually into a perfect spiral shape. This spiral helps define the snail’s unique appearance and adds texture to the applique.
Color changes can be added to the shell to create fun rings or patterns. Switching colors after one or two rounds results in a beautiful layered look. This technique is optional but adds a delightful detail that makes the snail more visually appealing. The shell should be slightly larger than the body so it remains the focal point.
After completing both parts, sew the shell onto the side of the body using a tapestry needle. Position the shell slightly behind the head for the most natural appearance. Take your time sewing around the edges to ensure a strong and clean attachment.
Finally, add facial features. Embroider tiny eyes, add a smile, or even add small antennae by stitching two tiny chains onto the top of the head. These details bring your snail to life and complete the Crocheted snail, crocheted animal applique-Step by Step Tutorial beautifully.
Personalizing and Decorating Your Crocheted Snail
One of the most enjoyable aspects of the Crocheted snail, crocheted animal applique-Step by Step Tutorial is the ability to personalize your snail. You can create snails in different colors, sizes, and styles, making each one unique. For example, pastel shades create a soft and gentle look, while bright colors make your applique stand out boldly.
Adding surface embroidery is another wonderful way to personalize your snail. You can embroider flowers on the shell, add spirals, or make tiny dots using contrasting yarn. Surface crochet is a fun and simple technique that adds texture without complicating the project. These small details transform your applique into a charming work of art.
You may also adjust the size of your applique by changing hook and yarn size. Using thicker yarn results in a larger snail, ideal for pillows or wall decor. Using fine thread and a small hook creates a miniature snail perfect for greeting cards, bookmarks, or tiny embellishments.
Experimenting with shell shapes can also be fun. While the spiral is traditional, you can also create a more textured shell using bobble stitches or popcorn stitches. These stitches add dimension and make your snail look whimsical and delightful.
Adding accessories such as tiny flowers, leaves, or vines enhances the overall theme. These elements can be crocheted separately and sewn beside the snail to create a nature-inspired design. Your creativity is the only limit.
If you plan to attach the snail to clothing, consider adding a small felt patch behind it. This adds stability and ensures the applique maintains its shape even after multiple washes.
Creative Uses for Your Crocheted Snail Applique
Once you’ve completed your crocheted animal applique, you may be surprised by how many creative ways you can use it. One popular option is attaching the snail to baby blankets or hats. These appliques add charm and personality to baby items without overwhelming the design.
Another idea is decorating children’s backpacks or pencil cases. Kids love fun and colorful accessories, and a cute snail applique makes their belongings more special. Simply sew the applique onto fabric surfaces, and it becomes a durable decorative element.
You can also use the crocheted snail to embellish home decor. Attach it to cushions, wall hangings, table runners, or handmade quilts. Snails fit beautifully in garden-themed decorations and bring a soft, natural touch.
Crafters who enjoy making greeting cards or scrapbooks can glue flat appliques onto cardstock. This creates a lovely handmade element that adds value and charm to your paper crafts. Because the snail is small, it fits perfectly on cards without adding too much bulk.
Another creative use is making a collection of appliques and framing them as artwork. Arrange snails of different colors and sizes in a decorative frame to create a playful nature scene. This is a beautiful gift idea for nursery decor.
Lastly, if you enjoy making handmade bags or pouches, sewing a crocheted snail applique on the front adds a delightful and personal touch. It instantly upgrades the design and showcases your crochet skills.
FAQ
Can beginners follow the Crocheted snail, crocheted animal applique-Step by Step Tutorial?
Yes, this tutorial is very beginner-friendly and uses basic stitches with simple shaping techniques.
What type of yarn is best for snail appliques?
Cotton yarn is recommended because it provides crisp stitch definition and durability.
How big does the snail applique usually turn out?
Most appliques measure between 7 and 12 cm, depending on hook size and yarn thickness.
Can I wash items with crocheted snail appliques attached?
Yes, but always follow the care instructions of the yarn to ensure the applique stays in good condition.
How do I attach the applique to clothing or fabric?
Use a tapestry needle and yarn to sew around the edges securely.
Can I modify the snail design?
Absolutely—you can change colors, stitch textures, and sizes to customize your snail completely.
Conclusion
This Crocheted snail, crocheted animal applique-Step by Step Tutorial has guided you through choosing materials, shaping the body and shell, adding personal details, and discovering creative uses for your finished applique.
With simple stitches and endless customization possibilities, this project is enjoyable for beginners and experienced crocheters alike.
I hope this tutorial inspires you to create your own collection of adorable snail appliques. Please leave your sincere opinion and share suggestions—your feedback helps me improve future articles and tutorials!