
The Crocheted cat hair clip-Step by Step Tutorial is a charming and creative way to bring handmade beauty into your daily accessories. This project combines simplicity, personality, and the joy of crafting with yarn, making it perfect for beginners and experienced crocheters alike. In this article, you will learn how to create an adorable cat-shaped hair clip that can complement hairstyles, serve as a thoughtful handmade gift, or be used as a cute decorative piece. From selecting materials to shaping the little cat face, the Crocheted cat hair clip-Step by Step Tutorial will guide you clearly and gently through each stage.
One of the great advantages of this project is how customizable it is. With a few basic stitches and a small amount of yarn, you can create a variety of cat expressions, colors, and sizes. The Crocheted cat hair clip-Step by Step Tutorial encourages creativity while also maintaining structure, allowing you to work confidently even if you are new to crochet. Because the project is small, you can complete it quickly, making it ideal for craft fairs, personal accessories, or even playful children’s items. This tutorial ensures every step is easy to follow, helping you enjoy both the process and the final product.
The techniques introduced in the Crocheted cat hair clip-Step by Step Tutorial also offer great practice for crocheters who want to improve their precision in shaping and assembling small pieces. You will work in rounds, add simple decorative details, and attach your finished cat to a clip base. These skills are essential for many small crochet projects and help build confidence for more complex creations. Whether you want to explore creative accessories or simply enjoy the calming rhythm of crochet, this tutorial provides a complete and humanized guide.
Choosing Materials for Your Crocheted Cat Hair Clip
To start your Crocheted cat hair clip-Step by Step Tutorial, selecting the right materials is essential for achieving a neat, polished, and durable finish. The most commonly used yarn for this project is cotton yarn, as it provides structure and excellent stitch definition. Its texture gives the cat face a clean look that complements the small size of the hair clip. You may also use acrylic yarn, which is soft and widely available, but cotton tends to create more stable results for accessories that will be handled often.
Choosing the correct hook size is equally important. A small hook, usually between 2.5 mm and 3.5 mm, ensures tight stitches that help the cat face maintain its shape. Loose stitches may cause the piece to look uneven, so the Crocheted cat hair clip-Step by Step Tutorial recommends checking your tension before you begin. Practicing with a few sample stitches can help you find the perfect grip and ensure more consistent results.
In addition to yarn and a hook, you will need a metal or plastic hair clip base. Barrettes, snap clips, or alligator clips all work beautifully depending on the style you prefer. The tutorial also suggests using a yarn needle to weave in loose ends and sew the crochet piece onto the clip base securely. This step is crucial because hair accessories need to withstand frequent use.
For the eyes, nose, and additional details, you may use embroidery thread or a thin yarn in contrasting colors. The Crocheted cat hair clip-Step by Step Tutorial encourages simple facial features to keep the design clean and sweet. Safety eyes can also be used, but embroidery is often safer and more flexible for small pieces.
You may also want to prepare small decorative items such as beads, tiny bows, or ribbon accents. These can be added after crocheting to customize your cat hair clip according to your style. Keep your materials organized before beginning so you can follow each step with ease.
Finally, make sure you have a clean, well-lit workspace. Even though this is a small project, clear visibility is essential for precise stitching. Having everything ready beforehand helps the Crocheted cat hair clip-Step by Step Tutorial flow smoothly from start to finish.
Crocheting the Cat Face
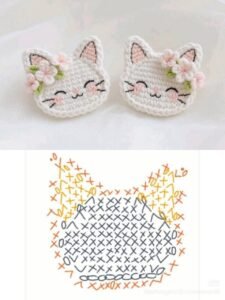
The cat face is the central element of the Crocheted cat hair clip-Step by Step Tutorial, and it begins with a basic circle worked in rounds. Start by creating a magic ring, which allows you to tighten the center cleanly. This technique is perfect for facial appliqués because it leaves no visible hole in the middle. After forming the magic ring, you will work the first round of single crochet stitches evenly around.
As you progress into the next rounds, increases are added to expand the circle and shape the head. The increases should be evenly spaced to maintain a perfect circle, and counting your stitches is essential during this step. The Crocheted cat hair clip-Step by Step Tutorial emphasizes this technique because even small mistakes can create uneven edges that will affect the final look.
Once the circle reaches the desired size, usually between 5 and 7 cm depending on your yarn, the next step is shaping the cat ears. Instead of cutting the yarn, continue crocheting small triangular ear shapes directly onto the top of the circle. This integrated method saves time and creates a seamless appearance. Each ear typically consists of a few rows of decreasing stitches to achieve a pointed shape.
Repeat the ear-shaping process for the second ear. It is important to keep both ears symmetrical for the face to look balanced. Adjusting tension and counting rows helps keep the ears identical. The Crocheted cat hair clip-Step by Step Tutorial reminds you to check the alignment of the ears before fastening off the yarn.
After completing the head and ears, weave in all loose ends neatly using a yarn needle. This step ensures the back of the piece remains smooth, making it easier to attach to the clip later. Keeping the back tidy also improves durability and comfort when worn in hair.
At this stage, the crocheted cat face is ready for detailing. The shape should look clear, even, and symmetrical, forming a perfect base for the facial embroidery that follows.
Adding Facial Features and Details
Adding the facial details is where your project truly comes to life. The Crocheted cat hair clip-Step by Step Tutorial begins this section with simple embroidery techniques that work beautifully on small crochet pieces. Use black or dark-colored thread to embroider the eyes. You can make them round, oval, or slightly angled to give the cat its own unique expression.
Next, embroider a tiny triangular nose in a contrasting color such as pink or brown. This small detail adds charm and personality to your cat face. After completing the nose, stitch a short vertical line downward for the mouth and add two small curved stitches for a gentle smile. These features should remain simple so they do not overwhelm the small design.
If you want to add whiskers, use a thin thread and create three small stitches on each side of the face. Keep them short and delicate to maintain balance. The Crocheted cat hair clip-Step by Step Tutorial encourages creativity, so feel free to create playful or sleepy expressions depending on the style you want.
For extra decoration, you can add small blush circles by lightly stitching two tiny patches of yarn in a soft pink shade. This gives your cat a sweet and friendly appearance. If you prefer a more elegant look, you can add a tiny bow near one ear using ribbon or a contrasting yarn color.
You may also embellish the ears with one or two stitches in a lighter shade to mimic natural ear details. This subtle addition adds depth and texture to the piece. Embroidery gives you the freedom to personalize your cat hair clip however you like.
Once all the features are complete, check the symmetry of the face. The Crocheted cat hair clip-Step by Step Tutorial recommends positioning the eyes, nose, and other elements carefully so the cat face looks appealing from every angle. Adjust any stitches if necessary before moving to the assembly stage.
Attaching the Cat to the Hair Clip
Now that your crocheted cat face is complete, the next step in the Crocheted cat hair clip-Step by Step Tutorial is attaching it securely to the hair clip. Start by placing the crochet piece onto the clip to check positioning. Make sure the cat face aligns perfectly and sits flat without bending.
Using a strong thread or the same yarn, sew the back of the cat face to the top of the clip. Work slowly, inserting your needle through the crochet stitches and around the clip base. This ensures the attachment is firm and durable. The tutorial recommends going around the entire edge to prevent the cat face from lifting during use.
If your clip is metallic and has small holes or ridges, take advantage of these features by passing the thread through them for extra stability. The Crocheted cat hair clip-Step by Step Tutorial emphasizes durability because hair accessories are often pulled, opened, and closed frequently.
After sewing, test the clip to make sure it opens and closes easily without pulling on the crochet. Adjust stitches if needed. The attachment should feel secure but natural, allowing the accessory to sit comfortably in the hair.
If you added small decorations such as bows or beads, make sure they do not interfere with the clip mechanism. Everything should stay firmly in place while still being lightweight and comfortable to wear. The tutorial encourages checking every detail to achieve a professional finish.
Once everything is secure, trim any excess thread. Your crocheted cat hair clip is now complete and ready to use, gift, or add to your handmade accessory collection.
Crocheted cat hair clip-Step by Step Tutorial
1. Is this project beginner-friendly?
Yes! This tutorial uses simple stitches and easy assembly, making it great for beginners.
2. What is the best yarn for crochet hair clips?
Cotton yarn is the best choice because it provides structure and holds its shape.
3. Can I use safety eyes on the cat face?
You can, but embroidery is often safer and more flexible for small accessories.
4. How long does it take to make one clip?
Most people finish one in 30 to 60 minutes.
5. Can I wash the crocheted hair clip?
Hand washing is recommended, especially if the accessory includes metal parts.
6. Can I make the cat face larger or smaller?
Yes, simply adjust the number of rounds when crocheting the circle.
Conclusion
This Crocheted cat hair clip-Step by Step Tutorial has guided you through each stage of creating an adorable and practical handmade accessory.
You learned how to choose materials, crochet the cat face, add cute details, and attach everything securely to a clip. With these steps, you can now customize your own designs, experiment with colors, and create charming accessories for yourself or loved ones.
If you enjoyed this tutorial, please leave your sincere opinion and share your suggestions for future projects—I’d love to hear your thoughts!