
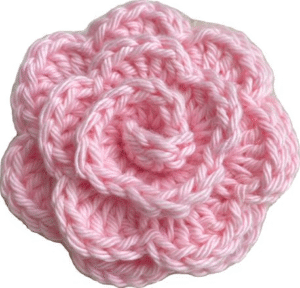
Beautiful crocheted pink flower-Step by Step Tutorial is a delightful project for anyone who loves creating handmade pieces with charm, color, and elegance. This crochet flower can be used for home décor, clothing embellishments, accessories, gifts, or simply as a relaxing crafting activity. In this guide, you will learn everything you need to know to complete a Beautiful crocheted pink flower-Step by Step Tutorial, from choosing materials to shaping petals with smooth curves. Whether you are a beginner or someone with more advanced crochet knowledge, this tutorial will help you craft a beautiful and delicate pink flower with confidence.
Crocheting flowers is a timeless tradition that brings joy and beauty into everyday life. When working on a Beautiful crocheted pink flower-Step by Step Tutorial, you will discover how small details and simple stitches can come together to create striking results. This project is especially satisfying because it works up quickly, requires minimal supplies, and offers endless possibilities for customization. You can make the flower in different shades of pink, adjust the number of layers, or even add leaves for a more natural look. Every decision you make allows you to personalize your creation.
Before we begin the tutorial, it is essential to understand the materials and stitches involved in achieving a lovely and polished result. This Beautiful crocheted pink flower-Step by Step Tutorial uses basic crochet techniques, making it accessible for beginners while still enjoyable for experienced crocheters. The combination of soft yarn, precise stitch placement, and careful shaping will bring your flower to life. With attention to detail and a willingness to practice, you will master the delicate texture and structure that make crocheted flowers so charming. Now, let’s explore the process step by step and start bringing your beautiful pink flower into bloom.
Materials Needed for the Pink Flower
To successfully begin your Beautiful crocheted pink flower-Step by Step Tutorial, gathering the right materials is the first important step. Choose a yarn that is smooth, soft, and easy to work with. Cotton yarn is an excellent option because it maintains shape well and provides a clean, crisp finish to your petals.
Select a crochet hook that matches the thickness of your chosen yarn. A smaller hook will give you tight, detailed petals, while a slightly larger hook will create a softer, more open look. Both options are beautiful; it depends on your preference.
Scissors and a yarn needle are must-have tools for trimming ends and sewing parts together. A stitch marker is optional but useful if you plan to work in rounds and want to keep track of your progress.
If you want additional embellishments, consider using small beads or pearls for the flower center. These accents can enhance the final design and make your flower stand out even more.
You may also want to prepare green yarn if you plan to add leaves later. Though optional, leaves can make your project look more natural and decorative.
Once all materials are ready, you can begin crafting your beautiful flower. Having everything close at hand will ensure a smooth and enjoyable experience.
Step-by-Step Instructions for the Flower Center
The center is an essential part of your Beautiful crocheted pink flower-Step by Step Tutorial, as it provides structure and sets the foundation for your petals. Begin with a magic ring, which helps create a tight, clean start.
Work single crochet stitches into the ring until you have a small round shape. Keep your stitches even and uniform to ensure the center looks neat.
Tighten the ring securely so there is no gap in the middle. A clean center enhances the overall appearance of your flower and gives the petals a stable base.
For more texture, you can add an extra round of stitches around the center. This builds dimension and helps the flower look more layered and realistic.
Fasten off your yarn once the center is complete, leaving a tail for attaching petals. Make sure the stitches are firm, but not too tight, to avoid distortion.
Set the finished center aside as you prepare to crochet the petals. This small component will soon become the heart of your beautiful flower.
Creating the Pink Flower Petals
Crocheting petals is the highlight of the Beautiful crocheted pink flower-Step by Step Tutorial, as they bring color and personality to the piece. Start by attaching your pink yarn to the flower center.
Work chain stitches and double crochet stitches to shape the base of each petal. These longer stitches help create soft curves that mimic natural petals.
Increase and decrease your stitches strategically to give each petal a smooth, rounded outline. The goal is to make the outer petals slightly larger than the inner ones for a layered effect.
Once each petal is complete, slip stitch back into the center to anchor it. This technique keeps the petals evenly spaced and prevents them from overlapping awkwardly.
Continue this process until you have crocheted all the petals you desire. Most flowers look lovely with six to eight petals, but you can add more for fullness.
Gently shape the petals with your fingers after finishing. This final touch helps them curve, open, and settle into a beautiful floral arrangement.
Adding Details and Final Assembly
The final steps in your Beautiful crocheted pink flower-Step by Step Tutorial involve assembling the flower and adding optional enhancements. Begin by making sure all yarn tails are neatly woven in with your yarn needle.
If you decide to add leaves, crochet them separately using green yarn. Simple leaf shapes with a curved tip will complement the flower beautifully.
Attach the leaves to the back of the flower using a few secure stitches. Adjust their placement until you are satisfied with the look.
You can also add a bead, pearl, or small button to the flower center. This accent elevates the design and adds a touch of elegance.
If you want to attach the flower to a hair clip, headband, or garment, sew it onto the chosen surface with matching thread or yarn. This ensures that it stays firmly in place.
After completing all details, gently fluff and adjust the petals one final time. Your flower should look fresh, vibrant, and full of charm.
Beautiful Crocheted Pink Flower
1. Is this project beginner-friendly?
Yes, the Beautiful crocheted pink flower-Step by Step Tutorial uses simple stitches suitable for beginners.
2. What yarn is best for crocheted flowers?
Cotton yarn is ideal because it holds shape well and gives clean definition to each petal.
3. How long does it take to make one flower?
Most crocheters finish one flower in 20 to 40 minutes, depending on skill level.
4. Can I make the flower in other colors?
Absolutely. You can use any color you like—blue, yellow, white, or even multicolored yarn.
5. How many petals should I make?
Six to eight petals are standard, but you can add more for a fuller flower.
6. Do I need to use a magic ring?
While recommended for a clean center, you can use a chain loop if you prefer.
7. Can I use this flower in accessories?
Yes, it’s great for headbands, brooches, hats, scarves, and bags.
8. What if my petals curl too much?
You can gently block them with steam or reshape them by hand.
9. Can I make this flower with leftover yarn?
Definitely! This project is perfect for using scrap yarn.
10. Are embellishments necessary?
No, they are optional. The flower looks beautiful with or without decorations.
Conclusion
This Beautiful crocheted pink flower-Step by Step Tutorial has guided you through creating a charming handmade flower from start to finish.
You learned how to prepare materials, crochet the center, shape the petals, and add final details that elevate your project.
With practice, creativity, and patience, you can make stunning flowers for countless uses. I hope you enjoyed this tutorial and feel inspired to create more beautiful pieces. Please leave your sincere opinion and suggestions—I would love to hear your feedback!