
Tutorial for a small fabric hair bow Coquette Hair Bows-Step by Step Tutorial is a charming and accessible guide for anyone who wants to create elegant, delicate, and stylish bows using simple materials at home. These bows have become an essential accessory, especially with the rise of the coquette aesthetic, which blends femininity, soft textures, and vintage-inspired charm. By following this tutorial, you can create beautiful bows for personal use, gifts, or even small-scale sales. Because the process is simple, fun, and inexpensive, many crafters love using these bows to customize hairstyles, clothes, bags, and even home décor.
This Tutorial for a small fabric hair bow Coquette Hair Bows-Step by Step Tutorial is designed with beginners in mind, but the instructions can also be adapted for more experienced sewists who want to refine their technique. The tutorial is presented with humanized explanations, ensuring that every step feels clear and enjoyable. Using accessible materials like cotton, satin, or organza, you can create bows in any color and size you desire. These small accessories carry enormous decorative potential, making them a favorite for special occasions such as birthdays, weddings, and holidays.
Before diving into the detailed steps, it is helpful to understand the versatility of small fabric bows. They can complement nearly any outfit, elevate simple hairstyles, and add personal flair to handmade items. The Tutorial for a small fabric hair bow Coquette Hair Bows-Step by Step Tutorial teaches you the foundational structure for creating bows, but once you master this method, you can easily experiment with different fabrics, patterns, and embellishments. Whether your style is soft and girly or bold and modern, fabric hair bows give you endless creative possibilities.
Materials Needed for a Coquette Hair Bow
To begin this Tutorial for a small fabric hair bow Coquette Hair Bows-Step by Step Tutorial, you only need a few simple materials. Choosing the right fabric is essential, as it determines the bow’s texture, volume, and final appearance. Cotton fabric is ideal for structured bows, while satin and organza provide a soft, romantic look perfect for the coquette style. Lightweight fabrics are easier to fold and sew, making them beginner-friendly.
A pair of sharp scissors is crucial for achieving clean edges. Fabric scissors are recommended, as they ensure precise cutting without fraying. A small ruler or measuring tape helps you keep the dimensions consistent, especially if you plan to make multiple bows for gifts or sale. Consistency is one of the key elements of a professional finish, and this tutorial emphasizes careful measuring to help you achieve that.
You will also need needle and thread or a sewing machine, depending on your preference. Hand sewing works perfectly for small bows and allows for greater control over delicate fabrics. A sewing machine, however, is helpful if you intend to produce bows in larger quantities. Both methods are fully compatible with this Tutorial for a small fabric hair bow Coquette Hair Bows-Step by Step Tutorial.
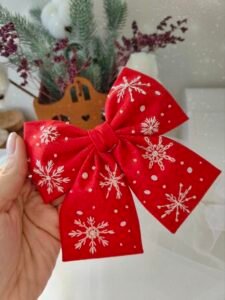
For the center of the bow, you may prepare a small strip of matching or contrasting fabric. This center band holds the bow together and reinforces its shape. You may also use ribbon, lace, or decorative trims to add extra charm. The coquette aesthetic especially embraces ribbons, soft colors, and delicate textures, making these elements perfect for your creation.
Hot glue or fabric glue can also be helpful for attaching the bow to clips, headbands, or elastics. Many crafters use alligator clips for hair accessories because they grip well and are easy to attach. If you prefer sewing the bow onto a fabric headband or garment, thread alone is sufficient. The Tutorial for a small fabric hair bow Coquette Hair Bows-Step by Step Tutorial supports all attachment methods to give you maximum flexibility.
Finally, optional embellishments such as pearls, beads, and tiny fabric flowers can add an elegant finishing touch. These additions enhance the bow’s femininity and make it stand out, especially for special occasions. Whether you choose a minimalist design or an ornate one, your bow will carry your personal creative signature.
Step-by-Step Instructions to Create the Bow Base
The first major step in this Tutorial for a small fabric hair bow Coquette Hair Bows-Step by Step Tutorial is creating the base shape of the bow. Begin by cutting a rectangular piece of fabric. The size of the rectangle determines the size of the bow, so adjust the dimensions according to your preference. A common size for small bows is 15 cm by 10 cm, but you can experiment with larger or smaller cuts.
Fold the fabric in half lengthwise, right sides together, and sew along the edges, leaving a small gap for turning. This creates a clean and polished look with hidden seams. Turn the fabric right-side out, gently pushing out the corners with a blunt tool like the back of a pencil. Press the rectangle lightly with an iron to flatten it and create a crisp surface.
Next, fold the rectangle accordion-style to form the characteristic bow shape. This folding technique gathers the fabric naturally and adds dimension. Pinch the center tightly and secure it with a few stitches. This step is essential in the Tutorial for a small fabric hair bow Coquette Hair Bows-Step by Step Tutorial, as it defines the bow’s structure and ensures that it holds its shape.
At this point, you may add additional folds for a fuller look. Adjusting the folds allows you to customize the volume of your bow, making it delicate or more dramatic depending on your preference. The simplicity of this technique makes it ideal for beginners while still offering room for creativity.
Once the bow structure is secured, prepare the small center strip of fabric. This piece wraps around the middle of the bow and hides your stitches, giving the accessory a neat and professional finish. You can glue or sew this strip in place depending on the look you want to achieve.
With the center strip attached, your bow base is complete. The next steps focus on attaching it to accessories or adding decorative details to enhance the coquette look.
Adding the Center Strap and Attaching the Bow
This stage of the Tutorial for a small fabric hair bow Coquette Hair Bows-Step by Step Tutorial focuses on reinforcing your bow and preparing it for use as a hair accessory. Begin by cutting a narrow strip of fabric approximately 2 to 3 cm wide. This piece serves as the central band that wraps around the bow, giving it structure and refinement.
Fold the strip inwards along both long edges and press it lightly with an iron. This makes the strip easier to sew and helps prevent fraying. Wrap it securely around the center of the bow and adjust the tightness until the folds sit neatly. A neatly attached center band improves the bow’s symmetry and gives it a polished appearance.
You can secure the center band with a few small stitches at the back. If you prefer, fabric glue can also be used, especially if you are making multiple bows quickly. The Tutorial for a small fabric hair bow Coquette Hair Bows-Step by Step Tutorial emphasizes flexibility in your technique, so choose whichever method feels most comfortable for you.
Once the center band is in place, attach the bow to your chosen accessory. Alligator clips, hairpins, elastic bands, and headbands all work extremely well. Sewing the bow directly onto these items provides long-lasting durability. If using glue, ensure it is strong enough to hold the fabric securely for daily use.
Adjust the bow’s shape after attaching it by gently spreading the loops and smoothing the fabric. Even small adjustments can make a big difference in the final presentation. The coquette aesthetic focuses on soft, delicate, and romantic styling, so taking a moment to refine your bow enhances its overall look.
At this point, your small fabric bow is ready for optional decorative touches, which can transform a simple accessory into something truly enchanting.
Creative Variations and Coquette-Style Embellishments
The final part of this Tutorial for a small fabric hair bow Coquette Hair Bows-Step by Step Tutorial encourages creativity and personalization. Adding embellishments allows you to adapt the bow to different occasions, styles, or age groups. Small details can turn a simple bow into a standout accessory.
Pearls are one of the most popular additions for coquette-style bows. You can sew or glue small pearls onto the loops of the bow to create a soft, elegant glow. For a more playful look, tiny rhinestones or glitter accents can be added in moderation. These simple touches elevate the bow’s charm.
Lace trims are also a beautiful way to enhance the bow. You can layer lace behind the bow base or add a lace strip onto the center band. This adds texture and gives the accessory a vintage look that fits perfectly with the coquette trend. The Tutorial for a small fabric hair bow Coquette Hair Bows-Step by Step Tutorial encourages experimenting with textures to discover what you love best.
If you prefer a bold or modern variation, consider using patterned fabrics such as polka dots, floral prints, or gingham. These designs provide visual interest and make the bow a standout piece. Matching the bow to seasonal fabrics is also a fun idea, especially for holidays or themed outfits.
For themed events, you may add small decorative charms or tiny embroidered details. These special touches make your bow unique and meaningful, especially if the accessory is meant as a gift. Handmade items carry sentimental value, and the time invested in crafting them adds to their beauty.
With all embellishments added, your bow is complete and ready to wear. The versatility of this tutorial allows you to produce countless variations and refine your skills with every bow you make.
FAQ
How long does it take to make a small fabric hair bow?
Most bows can be completed in 10 to 20 minutes, depending on your sewing experience and whether you add embellishments.
Can beginners follow this Tutorial for a small fabric hair bow Coquette Hair Bows-Step by Step Tutorial?
Yes, the tutorial was created for all skill levels, and the steps are simple, approachable, and easy to follow.
What is the best fabric for coquette-style bows?
Lightweight fabrics like satin, cotton, and organza work beautifully because they hold their shape and create soft, elegant folds.
How do I attach the bow to hair accessories?
You can sew or glue the bow onto alligator clips, headbands, elastics, or hairpins depending on your preference and your project needs.
Will the bow stay secure during use?
Yes, as long as the center band is tightly wrapped and the bow is firmly attached to the accessory base.
Can I wash fabric bows?
Hand washing is recommended for bows, especially those with embellishments, to preserve their structure and appearance.
Conclusion
This Tutorial for a small fabric hair bow Coquette Hair Bows-Step by Step Tutorial guided you through creating a beautiful, delicate, and customizable fabric bow from start to finish.
You learned about the materials, assembly steps, attachment options, and decorative variations that transform simple fabric into a stylish accessory.
I hope this tutorial inspires your creativity and encourages you to make many charming bows. Please leave your sincere opinion and suggestions so I can continue creating helpful content for you.