
Starting a creative project with a Learn how to crochet a seashell.-Step by Step Tutorial guide is the perfect way to explore the beauty of ocean-inspired crochet. This project is ideal for beginners and experienced crafters who want to experiment with texture, shaping techniques, and decorative stitches. By introducing the topic with the title keywords in the very first line, this article ensures strong SEO optimization and helps readers clearly understand what they will learn. Throughout the entire tutorial, the term Learn how to crochet a seashell.-Step by Step Tutorial will appear naturally to reinforce relevance and clarity.
Crocheting a seashell is a charming and relaxing project that can be used for many different purposes. You can incorporate a crocheted seashell into beach-themed home décor, add it to appliqué projects, include it in children’s toys, or use it as a decorative embellishment on bags, hats, or blankets. This Learn how to crochet a seashell.-Step by Step Tutorial is designed to guide you through each stage of the process with simple explanations that feel friendly and easy to follow. Even if you are completely new to crochet, the steps in this guide will help you gain skills and confidence.
This project is also a wonderful way to make use of leftover yarn. Small seashells require only a minimal amount of material, making them perfect for scrap yarn and practice pieces. Whether you prefer realistic soft tones or vibrant, fantasy-inspired seashells, this tutorial gives you the freedom to experiment with colors and textures. By following this Learn how to crochet a seashell.-Step by Step Tutorial, you’ll learn shaping techniques that can be applied to many other crochet projects as well.
Materials Needed for Your Crochet Seashell
To begin this Learn how to crochet a seashell.-Step by Step Tutorial, gathering the right materials will help make the process easier and more enjoyable. The first essential material is yarn. You can use cotton, acrylic, or blended yarns, but cotton is preferred for projects that need structure. Cotton yarn holds shape well and gives your seashell a clean, polished look.
Choosing the right hook size is also important. A smaller hook, such as 2.5 mm or 3 mm, works best because it creates tighter stitches. This helps give your seashell the defined ridges and curves that make it look realistic. When stitches are too loose, your piece may look floppy or uneven. Always check your yarn label for hook recommendations, and adjust as needed.
You will also need basic crochet tools such as scissors, a yarn needle, and stitch markers. Stitch markers can be especially helpful for beginners following this Learn how to crochet a seashell.-Step by Step Tutorial, as they help track rounds and stitch counts. They also make it easier to maintain symmetry as you shape your seashell.
A small amount of stuffing may be optional depending on the style of seashell you want to create. Some crocheters prefer a flat appliqué-style shell, while others enjoy making a more dimensional, slightly stuffed piece. Both options work beautifully, and the choice depends on your intended use.
Color selection is another enjoyable part of preparing for this project. Natural seashell colors include cream, beige, peach, and light pink, but you can choose any shade that matches your creative vision. Using variegated yarn can also create interesting patterns that resemble real seashells.
With your materials gathered, you are now ready to move on to the next steps in this Learn how to crochet a seashell.-Step by Step Tutorial, where you will start creating the foundation of your seashell design.
Starting the Base Shape
The base of your seashell is crucial because it provides structure for the rest of the design. This section of the Learn how to crochet a seashell.-Step by Step Tutorial focuses on establishing a strong foundation. Begin with a magic ring or an adjustable loop, which allows your first stitches to be tightly secured at the center. This helps give your seashell a natural, spiraled look.
Once your magic ring is ready, add your first round of single crochets. Keeping the stitches close together creates the tight center that mimics the natural swirl of a real seashell. Be sure to count your stitches carefully. Seashell patterns rely on precise increases to create the curved shape you want.
As you continue, you will gradually increase the number of stitches in each round. These increases help your work expand outward in a spiral. This is where stitch markers can be especially helpful, preventing you from losing your place. With careful attention, this section of the Learn how to crochet a seashell.-Step by Step Tutorial becomes one of the most enjoyable steps.
One key tip is to crochet tightly and consistently. Tight stitches help maintain the seashell’s shape as you add more rounds and begin shaping the ridges. Loose stitches may cause unwanted gaps or create an uneven curve. Take your time and adjust your tension if necessary.
After completing a few rounds, you should begin to notice the familiar swirl pattern of a seashell forming. The growth of the shape will depend on how many increases you include and the pattern you wish to follow. Patience during these early stages will result in a more polished final product.
With the base shape established, you are now ready to move on to the more detailed shaping that gives your seashell its realistic appearance. The next section of this Learn how to crochet a seashell.-Step by Step Tutorial will walk you through that process step by step.
Shaping the Ridges and Spiral
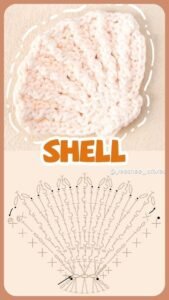
One of the most beautiful aspects of crocheted seashells is the spiral shape and textured ridges that mimic real shells. In this part of the Learn how to crochet a seashell.-Step by Step Tutorial, you will learn how to create these unique details. The combination of increases, decreases, and textured stitches helps bring the seashell to life.
To form the ridges, many patterns use a combination of back-loop-only stitches and strategic increases. Crocheting through the back loop creates a subtle ridge that resembles the lines seen in natural shells. As you work your rounds, continue to pay attention to stitch placement. Each ridge should align evenly as you move outward.
Another technique involves alternating single crochets and half double crochets. This adds variety in height and texture, making your seashell look more realistic. These small variations create a stunning visual effect that is easy to achieve with a bit of practice. The Learn how to crochet a seashell.-Step by Step Tutorial encourages you to explore these combinations with confidence.
The spiral effect becomes more noticeable as you continue shaping the shell. By placing increases in consistent positions, you allow the shell to grow outward in a curved, natural form. The key is to visualize how the shell should curl as you work. Adjustments can be made if you want a tighter or looser spiral.
If you prefer a more dimensional seashell, you can lightly stuff the piece as you go. This helps maintain fullness and gives the shell a three-dimensional shape. However, stuffing should be added sparingly to avoid distorting the spiral. This detail adds character to your seashell and enhances its decorative appeal.
Finish the shaping section by smoothing the sides and ensuring all ridges align properly. Take time to adjust your tension and check that the spiral shape flows naturally. This step is essential for producing a polished result, and it highlights the creativity behind the Learn how to crochet a seashell.-Step by Step Tutorial.
Finishing Touches and Creative Uses
The finishing touches bring your seashell project together beautifully. In this stage of the Learn how to crochet a seashell.-Step by Step Tutorial, you will learn how to secure your work, weave in ends, and explore creative ways to use your crocheted seashell. Carefully fasten off your yarn and weave in any loose ends with a yarn needle to maintain a neat appearance.
You may also choose to add decorative details such as embroidered lines, beads, or small pearls. These embellishments can give your seashell a more elegant, ocean-inspired look. Adding just a few extra details allows you to personalize your creation and make it truly unique.
Another popular option is adding a loop to turn your seashell into a keychain, bag charm, or Christmas ornament. This tiny detail transforms your piece into a functional accessory. Because seashells symbolize calmness and beauty, they make wonderful handmade gifts for friends and family.
If you prefer to use your seashell for home décor, consider attaching it to a decorative frame, wall art, or crochet garland. The soft curves and textured ridges create a lovely coastal feel that fits perfectly into beach-themed decorations. This is one of the reasons why the Learn how to crochet a seashell.-Step by Step Tutorial appeals to many different crafting styles.
Flat seashell appliqués can also be used on blankets, pillow covers, or children’s clothing. They add a playful and charming touch to fabric projects. Because these seashells are small and easy to make, you can create a whole collection in different sizes and colors.
With your seashell complete, you can proudly admire the time and effort you invested in the process. Each handmade seashell is unique and carries the personal touch of its creator, making this project both relaxing and rewarding.
Learn how to crochet a seashell
Do I need special yarn to crochet a seashell?
No. Cotton yarn is recommended, but any smooth yarn works well.
Can beginners follow this tutorial?
Yes, the Learn how to crochet a seashell.-Step by Step Tutorial is perfect for beginners because it uses simple stitches and easy shaping.
What size hook should I use?
A small hook such as 2.5–3 mm is best for tight, structured stitches.
How long does this project take?
Beginners may take 1–2 hours, while experienced crocheters can finish in under an hour.
Can I make the seashell bigger?
Yes. Continue increasing rounds until you reach your desired size.
Can I use stuffing inside the seashell?
Yes, but only a small amount. Too much stuffing can distort the spiral shape.
Conclusion
This Learn how to crochet a seashell.-Step by Step Tutorial has guided you through every stage of creating a beautiful seashell using simple crochet techniques.
From choosing the right materials to shaping spirals and adding creative details, you now have everything you need to craft your own handmade seashells.
I hope this tutorial has inspired you to explore new crochet projects. Please leave your sincere opinion and share your suggestions so I can continue improving and creating more helpful content for you.