
Starting a festive crafting project is always exciting, and this Crochet new Christmas coasters-Step by Step Tutorial is the perfect opportunity to bring handmade charm to your holiday décor. Whether you enjoy decorating your home with seasonal items or gifting homemade creations to friends and family, learning how to make these coasters is both enjoyable and rewarding. In this article, you will explore a complete guide that teaches every detail in a humanized and beginner-friendly way while keeping Crochet new Christmas coasters-Step by Step Tutorial as the main focus for improved SEO.
Handmade Christmas decorations never go out of style, especially when they blend creativity, practicality, and nostalgia. The Crochet new Christmas coasters-Step by Step Tutorial you will learn here allows you to create beautiful and functional coaster sets that enhance your table setting during holiday celebrations. With simple stitches and an accessible pattern, you can make multiple coasters quickly, customize them with different colors, and adapt them to your personal taste. This flexibility makes the project ideal for both beginners and more experienced crocheters.
As you continue reading, you will find carefully organized explanations, clear instructions, and helpful insights to support your crafting journey. This Crochet new Christmas coasters-Step by Step Tutorial has been structured to help you understand the materials, master the stitches, and follow the steps confidently. Whether you plan to use these coasters at your Christmas dinner table or package them as heartwarming gifts, this tutorial will guide you from start to finish with ease.
Understanding the Materials for Crochet Christmas Coasters
Choosing the right materials is an essential part of this Crochet new Christmas coasters-Step by Step Tutorial, as it ensures durable coasters that maintain their shape and appearance even after repeated use. The yarn you select plays a key role, and most crafters prefer 100% cotton due to its absorbency and heat resistance. Cotton yarn is also lightweight and easy to work with, making it ideal for beginners who want to achieve a neat result.
Your crochet hook size also matters when starting this project. A hook that matches your yarn weight will help you maintain even tension throughout the coaster, which is crucial for a professional-looking finish. Many patterns suitable for holiday coasters recommend a hook sized between 3.5 mm and 4.5 mm. This size helps you achieve the perfect balance between stitch definition and flexibility.
Other materials needed for this Crochet new Christmas coasters-Step by Step Tutorial include scissors for trimming yarn ends, a tapestry needle for weaving in loose threads, and optionally stitch markers to keep track of rounds. These tools make the process smoother, especially when working on circular designs.
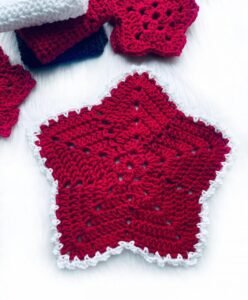
Christmas colors play a significant role in the final aesthetic of your coasters. Traditional shades like red, green, white, and gold always work well for holiday projects, but you can also experiment with modern palettes such as silver, burgundy, or pastel tones. What matters most is that the finished piece reflects the festive spirit you want to bring to your home.
Choosing high-quality materials ensures that your coasters can be reused for many Christmas seasons. Durability is especially important if you plan to gift these handmade items, as the recipients will appreciate the lasting value of your craft. With the right materials prepared, you can now move smoothly into the practical steps of this Crochet new Christmas coasters-Step by Step Tutorial.
By understanding these basics, you set a strong foundation for the rest of your crafting experience. Materials may seem like a simple first step, but they directly influence the entire outcome of your project.
Beginning the First Stitches of Your Christmas Coaster
To start the actual crocheting process in this Crochet new Christmas coasters-Step by Step Tutorial, you usually begin with a magic ring or an adjustable loop. This technique helps you create a tight center, which is essential for round coasters. If you are new to the magic ring, don’t worry—many beginners find it tricky at first, but with practice, it becomes an easy and useful method.
After forming the magic ring, you will typically crochet a series of single crochets or double crochets into it. This creates the first round and forms the base of your coaster. Maintaining even tension during these first steps is crucial because it prevents the coaster from curling or forming uneven edges.
Once the first round is complete, you will tighten the ring and join the stitches using a slip stitch. This step keeps everything secure and sets you up for the increasing rounds that follow. The increases usually happen gradually, helping the coaster grow outward while staying perfectly flat. This is an essential technique you will master with this Crochet new Christmas coasters-Step by Step Tutorial.
To add more texture and beauty, many crafters choose to alternate stitch types in later rounds. You may combine single crochet, half double crochet, and double crochet stitches to form decorative edges or patterns. The goal is to create a festive look while keeping your coaster functional and sturdy.
As you continue, don’t hesitate to adjust your tension or restart if the coaster begins to ripple. Rippled coasters usually happen when too many stitches are added in one round, but following the tutorial steps closely helps prevent this issue.
By now, you should feel more confident with the basic structure of your coaster. Each stitch contributes to the final holiday charm, making the process enjoyable and relaxing.
Adding Decorative Elements to Your Christmas Coaster
Decoration is the most creative part of this Crochet new Christmas coasters-Step by Step Tutorial, allowing you to customize your coasters exactly the way you want. Christmas-inspired appliqués such as stars, small holly leaves, or tiny snowflakes can be added to enhance the design. These elements bring personality and festive cheer to your finished piece.
If you prefer a more minimalist look, you can play with color changes instead of adding appliqués. Switching colors between rounds creates a striped effect that looks elegant and seasonal. For example, alternating red and white resembles a candy cane, while mixing green and gold gives a warm, classic Christmas touch.
Another technique you may explore is surface slip stitching. This method lets you draw lines or outlines on the coaster surface using a contrasting color. It’s a simple way to enhance the design without adding extra layers of crochet fabric.
Beading is also an option for those who want extra sparkle, but it’s important to use this technique moderately. Too many beads may make the coaster uneven or unstable for holding cups. A few decorative beads can create a subtle shining effect while keeping the coaster functional.
Blocking your coaster is another recommended step for achieving a polished finish. Blocking helps flatten the coaster and improve the shape of decorative stitches. Cotton yarn responds very well to blocking, so you’ll achieve excellent results.
After completing all decorative steps, your coaster begins to truly represent the festive spirit and creative expression that inspired this Crochet new Christmas coasters-Step by Step Tutorial.
Finishing and Caring for Your Christmas Coasters
The finishing part of this Crochet new Christmas coasters-Step by Step Tutorial is essential for ensuring durability and a clean look. After completing the final round, carefully cut the yarn and pull it through the last stitch to secure it. Using a tapestry needle, weave in all loose ends neatly, ensuring no threads remain visible on the surface.
Once all ends are secured, you may want to block the coasters again, especially if they have detailed edges or decorative elements. This ensures a uniform appearance and allows each coaster to maintain its shape over time. Blocking is simple and can be done using a flat surface and pins.
Cleaning your Christmas coasters correctly ensures they last for many seasons. Cotton coasters can usually be machine washed on a gentle cycle, but hand washing is recommended for those with appliqués or embellishments. Laying them flat to dry prevents stretching or distorting.
Storage is another important aspect of caring for your handmade pieces. Keep your coasters flat or stack them in a protective box to avoid bending the edges. This helps maintain their structure and appearance for future holiday use.
If gifting these coasters, consider tying them with a festive ribbon or placing them in a charming handmade pouch. Presentation adds a special touch that highlights the effort you put into crafting them.
With proper care and finishing, your coasters will look beautiful year after year, reflecting both your creativity and the guidance from this Crochet new Christmas coasters-Step by Step Tutorial.
Crochet New Christmas Coasters
1. Are Christmas crochet coasters suitable for beginners?
Yes, most Christmas coaster patterns are beginner-friendly, especially when they follow a clear Crochet new Christmas coasters-Step by Step Tutorial. Basic stitches are often used, making the project accessible even if you are new to crochet.
2. What type of yarn works best for Christmas coasters?
Cotton yarn is highly recommended because it absorbs moisture, resists heat, and holds its shape. It also provides a clean and polished finish.
3. How long does it take to make one coaster?
Depending on your skill level, a single coaster usually takes between 20 to 45 minutes. More detailed or decorative coasters may take a bit longer.
4. Can I use acrylic yarn instead of cotton?
Acrylic can be used for decorative purposes, but it is less heat-resistant and may not perform well as a functional coaster for hot drinks.
5. Do I need to block my crochet coasters?
Blocking is recommended for achieving a neat and flat finish. It helps even out stitches and improves the overall shape.
6. Can I sell the coasters I make from this tutorial?
Yes, handmade coasters are popular at craft fairs and online shops. Just make sure your work is neat and high quality.
Conclusion
This article has guided you through a complete Crochet new Christmas coasters-Step by Step Tutorial, from choosing your materials to adding finishing touches.
You learned how to start your coaster, how to create decorative elements, and how to care for your handmade pieces so they last year after year.
If you enjoyed this project, please leave a sincere opinion and share suggestions for future tutorials. Your feedback helps keep creative inspiration alive and growing.