
Starting this How to make a crocheted sock keychain-Step by Step Tutorial, you will learn how to create a fun, simple, and adorable crochet accessory that is perfect for gifting, decorating, or adding personality to your everyday items. This tiny crocheted sock is not only quick to make but also incredibly charming, making it an ideal project for beginners and experienced crocheters alike. Whether you want a colorful keychain, a cute backpack charm, or a small handmade present, this step-by-step guide will help you achieve beautiful results with ease.
The beauty of the How to make a crocheted sock keychain-Step by Step Tutorial is its versatility. You can customize your sock using any color combination, yarn weight, or design style you prefer. Many crafters enjoy making themed socks such as Christmas socks, striped socks, pastel socks, or even tiny socks representing sports teams. The project requires very little yarn, making it a fantastic way to use up scraps and create something meaningful from materials you already have at home. As you work through the tutorial, the keyword will appear naturally to support your SEO goals.
This guide was written to be easy to follow, clear, and optimized for search engines while remaining friendly and human. By the time you finish the How to make a crocheted sock keychain-Step by Step Tutorial, you will not only know the full process but also understand how to personalize, style, and care for your tiny crocheted creation. Now let’s explore the materials, steps, and creative possibilities of this delightful project.
Essential Materials for Your Crocheted Sock Keychain
To begin the How to make a crocheted sock keychain-Step by Step Tutorial, you will need just a few accessible materials. Choosing the right yarn is important to ensure that your sock keychain maintains its shape and looks neat once finished. Cotton yarn is the most popular choice because it creates clean stitches and holds up well for everyday use.
A small crochet hook is recommended for this project, usually between 2.0 mm and 3.0 mm. Using a smaller hook helps you achieve tighter stitches, which is essential for miniature crochet items like keychains. Tight stitches ensure the sock looks structured and professional.
You will also need a keychain ring or clasp. These can be found in many sizes and materials, allowing you to choose a style that matches your intended use. Some crocheters prefer simple metal rings, while others like swivel clasps for easier attachment.
A tapestry needle is another essential item for assembling the sock and weaving in yarn ends. Because the sock is small, a fine needle will help you sew through the stitches without stretching or distorting them.
You may also want a small amount of stuffing, although this depends on the design you choose. Some crocheted socks are made flat and left unstuffed, while others include a bit of fiberfill to create a fuller shape.
Finally, scissors are necessary to cut your yarn cleanly. Keeping your materials organized will make the How to make a crocheted sock keychain-Step by Step Tutorial smooth and enjoyable from start to finish.
Step-by-Step Instructions for Crocheting the Sock
Begin the How to make a crocheted sock keychain-Step by Step Tutorial by crocheting the toe area. Most sock keychains begin with a magic ring, which allows you to create a tight and seamless circular start. This technique is perfect for miniature crochet because it prevents gaps at the center of your work.
Once your magic ring is ready, you will create several increase rounds. Increasing gradually helps shape the toe of the sock and gives your project the rounded look associated with real socks. Keeping your stitch count consistent ensures that the sock develops evenly.
After completing the toe, you can begin forming the foot section by crocheting several rounds without increases. This area forms the length of the sock and is customizable depending on how long you want your miniature sock to be. Working in continuous rounds creates a smooth finish without visible seams.
Next, you’ll shape the heel. This step involves turning your work and crocheting back and forth instead of in the round. It may seem tricky at first, but it becomes simple with practice. The heel is essential for giving your tiny sock its realistic appearance.
Once the heel is formed, the sections are joined together again, and you continue crocheting in the round to create the sock’s cuff. You can experiment with ribbed designs, color changes, or decorative edging to personalize your sock keychain.
When the sock is complete, sew in all the loose ends and attach the keychain ring securely. Your miniature creation is now ready to use as part of your How to make a crocheted sock keychain-Step by Step Tutorial experience.
Creative Variations and Customization Ideas
One of the most exciting parts of the How to make a crocheted sock keychain-Step by Step Tutorial is customizing your mini sock. You can choose your favorite colors, patterns, and textures to make a keychain that reflects your style or the style of the person receiving it.
Striped socks are one of the most popular variations. Switching colors every few rows creates a fun and playful design. You can use classic stripe patterns or experiment with rainbow stripes, seasonal colors, or soft pastels.
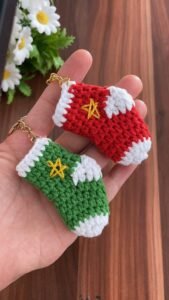
Holiday-themed mini socks are also very popular. For example, red and white stripes make a perfect Christmas sock, while bright yellows and blues can represent spring or summer. These themed socks make wonderful small gifts or accessories for seasonal bags.
If you enjoy adding texture to your crochet, consider using special stitches. Puff stitches, bobble stitches, or ribbed patterns create beautiful effects on the tiny sock, making your keychain look more intricate and unique.
Another fun idea is adding small embellishments. Sew on tiny buttons, bows, or beads to make your sock stand out. A little charm attached alongside the sock can add even more personality to your keychain.
Finally, you can personalize your sock keychain by adding initials, symbols, or embroidered accents. These details make your creation feel special and meaningful, especially when gifting it to someone important.
Tips for Perfecting Your Crocheted Sock Keychain
When following the How to make a crocheted sock keychain-Step by Step Tutorial, maintaining consistent tension is one of the keys to a polished finish. Because the sock is small, even slight changes in tension can affect the shape. Practice helps improve this skill over time.
Always count your stitches carefully, especially during increases and decreases. Missing a stitch or adding an extra one can distort the shape of the sock. Keeping track of your stitch count ensures a smooth and symmetrical result.
If you’re new to magic rings or heel-shaping techniques, practice them separately before starting your final sock. A little extra preparation makes the main project easier and faster to complete.
Choose yarn that is smooth and easy to work with. Fuzzy or textured yarns may hide your stitches, making the project more challenging, especially for beginners.
Use a secure method when attaching the keychain ring. You want to ensure the sock stays safely attached while being used daily. Reinforcing the joining stitches prevents the keychain from loosening over time.
Finally, take your time while weaving in ends. Neat finishing contributes significantly to the overall appearance of your crocheted sock. A clean, professional finish enhances the charm of your handmade keychain.
How to Make a Crocheted Sock Keychain
1. Is the How to make a crocheted sock keychain-Step by Step Tutorial suitable for beginners?
Yes. While some parts may require practice, the pattern is simple enough for beginners to follow with patience.
2. What is the best yarn for a crocheted sock keychain?
Cotton yarn is recommended because it holds its shape and offers clean stitch definition.
3. Do I have to use stuffing inside the sock?
No. Stuffing is optional and depends on the design you prefer. Many people prefer flat, unstuffed socks.
4. Can I make the sock larger?
Absolutely. Increase the number of rounds in the toe and foot sections to create larger versions.
5. How do I attach the keychain ring securely?
Sew the ring onto the cuff with several strong stitches, ensuring it is tightly anchored.
6. Can I sell keychains made with this tutorial?
Yes. Handmade keychains from this How to make a crocheted sock keychain-Step by Step Tutorial make excellent craft fair or online shop items.
Conclusion
This How to make a crocheted sock keychain-Step by Step Tutorial has shown you how to create a charming, miniature crocheted sock that works beautifully as a keychain, gift, or personal accessory.
You learned how to choose materials, follow step-by-step instructions, customize your design, and apply helpful tips for the best results. Now it’s your turn to create your own tiny socks and explore new variations.
If you enjoyed this tutorial, please leave your honest opinion and share your suggestions for future projects. Your feedback helps inspire new ideas and keeps the creativity flowing!