
The Crocheted dish towel holder-Step by Step Tutorial is a wonderful project for anyone who loves adding handmade charm to their kitchen while keeping everything organized in a practical way. Right from the first stitches, this project offers a sense of creativity and satisfaction, especially for beginners who want to try something useful and delightful. Using the keyword Crocheted dish towel holder-Step by Step Tutorial throughout this article will also guide readers clearly and help them follow each part of the process with ease.
Creating a crocheted dish towel holder is more than just a craft—it’s an opportunity to bring warmth to your home décor. Handmade items have a special essence because each piece reflects care, personality, and style. Whether you want to craft one for yourself or offer it as a thoughtful handmade gift, the Crocheted dish towel holder-Step by Step Tutorial will walk you through the full process in a simple and inspiring way. With basic crochet stitches and minimal materials, the project is accessible to all skill levels.
Before we dive into the first steps, it’s important to understand that consistency is key. Taking your time, practicing stitches, and choosing appropriate materials will ensure your towel holder is strong, durable, and visually appealing. Throughout the Crocheted dish towel holder-Step by Step Tutorial, you will see how small details combine to create a finished piece that is both functional and charming. Now, let’s begin this creative journey together.
Understanding the Project and Choosing the Right Materials
Starting the Crocheted dish towel holder-Step by Step Tutorial means gathering the right materials to ensure a smooth and enjoyable crafting experience. The beauty of this project is that it doesn’t require anything complex. Most of the items needed might already be in your crochet basket. Choosing the right yarn is one of the most important steps, as it not only determines durability but also the final look of your piece.
When selecting yarn, cotton is the preferred material because it is strong, washable, and ideal for kitchen use. Cotton yarn keeps its shape well and resists stretching over time, ensuring that your towel holder remains stable. Throughout the Crocheted dish towel holder-Step by Step Tutorial, using cotton will help maintain structure and provide a polished finish. You can choose solid colors to match your kitchen theme or mix tones for a more decorative effect.
The hook size should match your yarn weight. Most crocheters use a 4 mm to 5 mm hook for medium-weight cotton yarn, but feel free to adjust depending on your preferred tension. A looser tension can create a softer fabric, while a tighter tension increases durability. The Crocheted dish towel holder-Step by Step Tutorial encourages beginners to experiment with tension until they find a comfortable rhythm that produces consistent stitches.
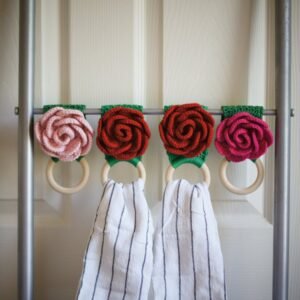
You will also need scissors and a yarn needle to weave in the ends. The yarn needle helps give your holder a clean, professional finish by securing all loose threads. Another optional but helpful element is a small wooden or metal ring. Many crocheted towel holders use a ring for extra support, making it easier to hang or attach towels. Including a ring is optional, but it adds structure and makes your piece more functional.
Finally, before beginning your project, take a moment to read through the basic steps and stitch descriptions. Understanding the structure of the Crocheted dish towel holder-Step by Step Tutorial ensures you will move confidently from one step to another. The preparation stage is simple but essential for a smooth crafting experience, especially if this is your first time making a functional kitchen accessory.
Step-by-Step Instructions to Create Your Towel Holder
To begin the Crocheted dish towel holder-Step by Step Tutorial, start by creating the foundation chain. This chain will determine the width of your holder, so adjust it based on your preferences. A good average width is between 8 to 12 stitches, but you can increase or decrease this depending on how wide you want your holder to be. Make sure the chain is even and not too tight, as flexibility will help shape the project.
The next step involves working single crochets in each chain across. This creates a solid and sturdy base for your towel holder. Single crochet stitches offer durability, which is exactly what you need for an item that will hold weight and be used frequently. Continue working single crochets in rows until the piece reaches your desired length. The Crocheted dish towel holder-Step by Step Tutorial recommends around 12 to 16 rows for a balanced shape.
Once you reach the desired length, it’s time to create the loop or attachment area. This is the part that will hold your towel securely. If you are using a ring, simply crochet around it to anchor it in place. This technique keeps the ring tightly attached and enhances the strength of your finished piece. The Crocheted dish towel holder-Step by Step Tutorial explains that wrapping single crochets around the ring creates a neat and professional finish.
For those who prefer not to use a ring, you can create a loop by chaining several stitches and joining them with a slip stitch. This loop should be wide enough for your towel to pass through easily. After forming the loop, you can continue working around it to reinforce the structure. This ensures the towel holder remains firm and stable without stretching too much over time.
Finishing the base of the towel holder involves adding a few decorative touches, such as a border or a row of half-double crochets. This step is optional but highly recommended to enhance the final look. Borders frame the piece beautifully and give your craft a polished appearance. The Crocheted dish towel holder-Step by Step Tutorial encourages personalization through colors, stitch variations, and small embellishments.
Finally, weave in all loose ends using your yarn needle. This is a critical step to prevent unraveling and to maintain a clean, tidy look. Once all threads are secured, your towel holder is ready to use. This part of the Crocheted dish towel holder-Step by Step Tutorial is the most satisfying, as you see how all the steps come together into a functional and lovely handmade item.
Adding Decorative Details and Personal Touches
One of the most enjoyable parts of the Crocheted dish towel holder-Step by Step Tutorial is customizing your finished piece. You can add personality and flair by incorporating different stitches, patterns, and colors. The towel holder can be as simple or as detailed as you wish, depending on your creativity and skill level.
Adding a flower applique is a popular choice among crocheters. It adds a cute, charming touch and makes your towel holder stand out. Using contrasting colors for the applique enhances its visibility and adds vibrancy. You can sew the flower directly onto the base or near the loop for a more balanced finish. The Crocheted dish towel holder-Step by Step Tutorial suggests lightweight embellishments to avoid weighing down the holder.
You may also add stripes or color blocks by switching yarns while working rows. This is a simple technique but gives your towel holder a modern and stylish appearance. When following the Crocheted dish towel holder-Step by Step Tutorial, make sure to switch yarns cleanly to avoid visible knots or uneven tension. Proper yarn changes maintain the neatness of your finished project.
Another creative idea is to incorporate textured stitches, such as puff stitches or bobble stitches. These stitches add depth and visual interest but are still easy to create once you understand their pattern. Textured stitches make your towel holder unique and can transform even the simplest design into a sophisticated piece. The Crocheted dish towel holder-Step by Step Tutorial recommends practicing textured stitches separately before adding them to your main project.
You can also personalize the towel holder by adding initials or small letters. Using surface crochet or embroidery techniques allows you to add names, initials, or tiny symbols that give your piece a meaningful touch. This is especially nice when offering the towel holder as a gift. The Crocheted dish towel holder-Step by Step Tutorial highlights that personal touches make handmade items more memorable.
Lastly, consider matching your towel holder with your kitchen décor or creating a set of holders in different colors. Some crafters enjoy making seasonal versions, such as holiday-themed or color-coordinated designs. This brings variety and keeps your kitchen looking fresh throughout the year. With the ideas provided in the Crocheted dish towel holder-Step by Step Tutorial, you can explore endless combinations to suit your style.
Tips for Durability, Use, and Maintenance
Once your towel holder is complete, following the recommendations in the Crocheted dish towel holder-Step by Step Tutorial will help maintain its durability. Handmade items require simple but consistent care to preserve their beauty and strength. Cotton yarn, although durable, benefits from proper cleaning and occasional reshaping.
Avoid pulling too hard on the towel holder, as excessive force can stretch the stitches. If your towel is heavy or damp, make sure the holder is secured properly to avoid damage. The Crocheted dish towel holder-Step by Step Tutorial reminds crafters that while the structure is strong, proper usage keeps it in good condition for a long time.
Cleaning your towel holder is easy. Since most are made of cotton, you can handwash them with mild soap and reshape them while damp. Allow them to air dry completely before hanging them again. This method protects the fibers and keeps the stitches tight. The Crocheted dish towel holder-Step by Step Tutorial recommends washing by hand instead of machine washing for best results.
Inspect your towel holder occasionally for loose ends or stretched stitches. If you notice any issues, they can be repaired quickly with a yarn needle. Fixing small problems prevents bigger damage and ensures your accessory remains functional. Following the instructions in this Crocheted dish towel holder-Step by Step Tutorial helps maintain the integrity of your craft.
If you plan to make several towel holders, consider experimenting with different yarn weights and stitches to discover which constructions last longer. Keeping notes on your preferences and results can help you refine your technique over time. The Crocheted dish towel holder-Step by Step Tutorial encourages experimentation as part of the learning process.
Lastly, store your handmade towel holders away from moisture or excessive sunlight when not in use. Temperature and humidity can affect yarn quality. Proper storage ensures your work remains vibrant and sturdy. With these care tips from the Crocheted dish towel holder-Step by Step Tutorial, your creation will stay beautiful for years.
About Crocheted Dish Towel Holders
1. What materials do I need to follow the Crocheted dish towel holder-Step by Step Tutorial?
You will need cotton yarn, a matching hook, scissors, a yarn needle, and optionally a wooden or metal ring. These materials make the project simple and accessible for all skill levels.
2. Is this project suitable for beginners?
Yes, the Crocheted dish towel holder-Step by Step Tutorial is perfect for beginners. The stitches are basic, and the steps are easy to follow, even for those new to crochet.
3. How long does it take to complete the towel holder?
Most people finish it within one to two hours, depending on their crochet speed. More detailed embellishments may add time but are optional.
4. Can I wash the towel holder?
Absolutely. Cotton yarn is washable. Handwashing with mild soap is recommended to maintain the piece’s strength and appearance.
5. Do I need a ring for this project?
No, using a ring is optional. You can also create a loop using chains, as explained in the Crocheted dish towel holder-Step by Step Tutorial.
6. Can I customize the design?
Yes, you can add colors, textures, appliques, and personalized details. Customization is encouraged in the Crocheted dish towel holder-Step by Step Tutorial.
Conclusion
The Crocheted dish towel holder-Step by Step Tutorial offers a delightful and practical project for crafters of all levels.
From choosing materials to adding final decorative touches, each step provides a chance to express creativity and improve crochet skills.
You now have everything you need to make a beautiful, functional towel holder for your kitchen. I hope this guide inspires you to create your own unique piece. Please leave your honest opinion and suggestions to help improve future tutorials!