
The Curly crocheted snowman-Step by Step Tutorial is a delightful and creative guide for anyone who wants to bring a touch of handmade charm to their holiday décor. Whether you are an experienced crocheter or a complete beginner, this project offers a joyful crafting experience filled with texture, personality, and creativity. Starting your crochet journey with a themed project like this one is a wonderful way to strengthen your skills while creating something adorable and festive. The Curly crocheted snowman-Step by Step Tutorial combines simple stitches with fun curly elements, making it both unique and achievable for all skill levels.
In this article, you will learn how to create a curly snowman that stands out with its charming spirals, soft features, and cozy winter vibes. The Curly crocheted snowman-Step by Step Tutorial breaks down the process into clear, accessible instructions so you can follow along without feeling overwhelmed. With thoughtful guidance and a steady pace, you will understand every step involved, from shaping the snowman’s round body to crafting the tiny accessories that bring the character to life. The goal is to make the experience enjoyable, easy to follow, and rewarding.
Before diving into the detailed instructions, it’s important to understand the value of handmade decoration. A Curly crocheted snowman-Step by Step Tutorial not only encourages creativity but also gives you the chance to produce long-lasting ornaments that can be used year after year. Handcrafted pieces hold sentimental value, especially when made for loved ones or as part of your family’s holiday tradition. As you work through this tutorial, you will also gain confidence in your crochet abilities and discover new techniques that can be applied to future projects. With that in mind, let’s begin exploring this adorable winter craft.
Understanding the Curly Snowman Design
Creating the snowman starts with understanding the structure behind the design. The Curly crocheted snowman-Step by Step Tutorial focuses on building the classic snowman shape using three main spheres: the head, the middle body, and the base. Each sphere requires careful increases and decreases to maintain a smooth, round look. Once you understand this foundation, the rest of the project will feel much easier and more enjoyable.
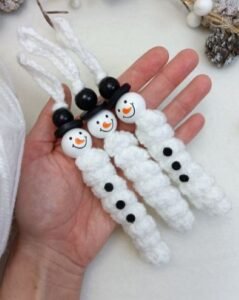
The curly elements are what make this snowman unique. The Curly crocheted snowman-Step by Step Tutorial teaches how to create spirals using basic stitch repetition, resulting in fun, bouncy curls that give the snowman a playful appearance. These spirals can be added as hair, scarf fringe, or decorative accents. Learning this curly technique will expand your crochet skill set and open the door to many future creative possibilities.
The design also involves simple embroidery techniques. The Curly crocheted snowman-Step by Step Tutorial explains how to stitch on facial features like eyes, mouth, and eyebrows. These details breathe life into the snowman and give it a personality that reflects your unique style. You can customize the features based on your preferred expression—cute, happy, shy, or even silly.
Accessories play a major role in the final appearance. According to the Curly crocheted snowman-Step by Step Tutorial, you can add hats, scarves, mittens, or buttons to personalize your snowman even further. These accessories are quick to crochet and allow you to experiment with colors, textures, and patterns. The more creative you get, the more special your final piece becomes.
This tutorial also guides you in choosing the right yarn. The Curly crocheted snowman-Step by Step Tutorial suggests soft, medium-weight yarn for flexibility and easy shaping. Lighter colors like white, cream, and light blue work beautifully, but you can explore any palette that inspires you. High-contrast yarns are ideal for accessories.
Finally, understanding the assembly process is essential. The Curly crocheted snowman-Step by Step Tutorial carefully explains how to attach each part securely while keeping the snowman’s structure stable. Proper assembly ensures durability and gives the final craft a polished, professional appearance.
Step-by-Step Body Construction
To begin the body construction, the Curly crocheted snowman-Step by Step Tutorial starts with the creation of the smallest sphere—the head. You will work from the top down, gradually increasing the number of stitches to create a perfectly rounded shape. This step requires patience but is simple enough for beginners to follow confidently.
After finishing the head, the next step described in the Curly crocheted snowman-Step by Step Tutorial is adding the middle section of the snowman. This sphere is slightly larger and requires additional rounds of increase and decrease. Maintaining a consistent tension is important for ensuring smooth curves and a uniform shape.
The third section is the largest sphere, forming the snowman’s base. The Curly crocheted snowman-Step by Step Tutorial explains how to crochet this portion with more increases to give the snowman a stable structure. The base needs enough weight in its stuffing to help the snowman stand upright on its own.
Once you have completed the three spheres, the Curly crocheted snowman-Step by Step Tutorial instructs you to fill each piece with fiber stuffing. The stuffing should be firm enough to help the spheres maintain their shape but soft enough to remain squeezable and comfortable to hold.
The tutorial then guides you through attaching the spheres together. According to the Curly crocheted snowman-Step by Step Tutorial, you will use invisible stitching techniques to join them without showing seams. This is an essential step for achieving a clean and polished final look.
Finally, the base structure is complete, and you can move on to adding details. The Curly crocheted snowman-Step by Step Tutorial emphasizes taking your time with shaping and adjusting the body so the snowman sits straight and looks well-balanced.
Adding Curly Details and Personality
One of the most enjoyable parts of the Curly crocheted snowman-Step by Step Tutorial is learning how to make the curls. By repeating simple stitches along a chain, you create spirals that bring movement and charm to your snowman. These curls can be attached around the head like hair or added to accessories.
The tutorial encourages creativity with colors. The Curly crocheted snowman-Step by Step Tutorial suggests using bright hues for curls to make them stand out, especially if the snowman is mostly white. You can mix multiple colors for a cheerful, playful look.
Making the facial features comes next. The Curly crocheted snowman-Step by Step Tutorial explains how to form small embroidered eyes and a curved smile. You can adjust their placement to give the snowman different expressions. This step truly brings the character to life.
Accessories add warmth and personality. The Curly crocheted snowman-Step by Step Tutorial includes instructions for crocheting a simple hat and scarf. You can add curls to the ends of the scarf or outline the hat with spirals for extra charm.
Buttons and tiny details complete the design. Following the Curly crocheted snowman-Step by Step Tutorial, you can attach tiny crocheted buttons, beads, or small decorations down the front of the snowman. These finishing touches make your craft feel unique and personalized.
Once all decorative elements are added, the tutorial recommends adjusting everything for symmetry. According to the Curly crocheted snowman-Step by Step Tutorial, small adjustments can significantly improve the snowman’s final appearance.
Finishing Touches and Display Ideas
To finalize your snowman, the Curly crocheted snowman-Step by Step Tutorial teaches you how to secure all embellishments properly. Ensuring that each piece is firmly attached will make the snowman durable enough to last through many winter seasons.
Next, the tutorial encourages blocking lightly if needed. The Curly crocheted snowman-Step by Step Tutorial explains that gentle shaping helps your snowman maintain its proportions and stand upright gracefully. This extra step enhances the overall quality of the craft.
The snowman is now ready to be displayed. The Curly crocheted snowman-Step by Step Tutorial suggests placing it on shelves, mantels, or holiday tables. Its cheerful design adds warmth and personality to any room.
This snowman also makes a heartwarming gift. According to the Curly crocheted snowman-Step by Step Tutorial, handmade items like this are perfect for family, friends, teachers, and coworkers who appreciate thoughtful, creative presents.
If you enjoy decorating for holidays, the tutorial offers inspiration. The Curly crocheted snowman-Step by Step Tutorial recommends creating multiple snowmen in various colors to form a festive winter collection. Their curls and accessories create a fun and cohesive theme.
Finally, this project opens the door to more creative crochet experiences. The Curly crocheted snowman-Step by Step Tutorial helps build valuable skills that can be applied to amigurumi, home décor, and handmade gifts throughout the year.
Curly Crocheted Snowman
What skill level is needed for this project?
This project is suitable for beginners and intermediates. The Curly crocheted snowman-Step by Step Tutorial provides clear instructions, making it easy to follow.
How long does it take to complete the snowman?
Most crafters complete it within a few hours, depending on experience and speed.
What yarn works best?
Medium-weight yarn is recommended, as it shapes well and provides a soft finish for the snowman.
Can I customize the accessories?
Yes, the Curly crocheted snowman-Step by Step Tutorial encourages full customization, including different hats, scarves, and colors.
Are the curls difficult to make?
Not at all. The curls are created using repeated stitches and form naturally as you work through the instructions.
Is this a good project for holiday gifts?
Absolutely. Handmade snowmen bring joy, warmth, and sentimental value during the festive season.
Conclusion
The Curly crocheted snowman-Step by Step Tutorial offers a delightful and creative experience for anyone who loves crocheting or wants to start learning.
Throughout this article, you explored how to build the snowman’s body, add curly details, personalize the accessories, and complete the project with confidence.
This charming snowman is a rewarding project that brings cheer to any home and makes a heartfelt handmade gift. I hope this tutorial inspires you to create your own curly snowman. If you enjoyed this guide, please leave a sincere opinion and share suggestions for future tutorials—I would love to hear your thoughts!