
Creating a Crocheted flower: learn how to make it-Step by Step Tutorial is one of the most delightful ways to begin or expand your journey in crochet. These small yet beautiful pieces can be used in countless creative projects such as accessories, home décor, gift wrapping, appliqués, and more. In this article, you will learn how to craft your own crocheted flower using simple techniques and clear, friendly instructions. Whether you are a beginner or someone looking to refine your skills, this guide offers the perfect combination of structure, creativity, and practical tips. By using the keyword Crocheted flower: learn how to make it-Step by Step Tutorial throughout the text, the content remains optimized for SEO and aligned with Google AdSense guidelines.
Working with crocheted flowers is incredibly rewarding because they are quick to make, versatile, and ideal for using leftover yarn from previous projects. This Crocheted flower: learn how to make it-Step by Step Tutorial will show you how easy it is to create stunning flowers with just a few basic stitches. Once you master the steps, you can play with different shapes, sizes, and colors. Handmade flowers add a personalized touch to everything you create and can transform simple items into beautiful, eye-catching pieces. With their charming appearance and endless possibilities, crocheted flowers have become a favorite among crafters around the world.
Throughout this article, you’ll also find helpful tips to make the process smoother and more enjoyable, along with detailed explanations and step-by-step guidance. This Crocheted flower: learn how to make it-Step by Step Tutorial is meant to inspire confidence and encourage creativity. No prior experience is required—just your willingness to learn and have fun. Grab your yarn and hook, find a comfortable place to sit, and get ready to discover the joy of creating beautiful crochet flowers with your own hands.
Materials Needed to Start Your Crocheted Flower
To begin this Crocheted flower: learn how to make it-Step by Step Tutorial, it is important to gather the right materials before starting your project. Having everything prepared will make the steps easier to follow and help you stay focused throughout the process. One of the main supplies you’ll need is yarn. You can choose cotton yarn, acrylic yarn, or even leftover pieces from previous works. Lighter weights like DK or sport yarn create delicate flowers, while thicker yarns make more textured and bold designs.
You will also need a crochet hook that matches the yarn weight you have chosen. Usually, hook sizes between 3 mm and 4.5 mm work well for flower projects, but feel free to experiment to achieve different textures. Choosing the right hook ensures that your stitches look neat and even, which is essential when creating small details like petals.
A pair of scissors is another essential tool for trimming yarn ends. It’s always helpful to have sharp scissors handy, as they make your cuts clean and precise. A yarn needle is also necessary for weaving in ends once your flower is complete. This ensures your work stays secure and maintains a polished, professional appearance.
If you want to add extra charm to your crochet flower, gather optional materials such as beads, buttons, or pearls for the center. These additions can transform a simple flower into a unique and elegant embellishment. They are especially beautiful when used in hair accessories, décor pieces, or gift packaging.
Consider preparing a small stitch marker if you prefer to keep track of your rounds more easily. This is not essential but can be very helpful, especially for beginners learning from this Crocheted flower: learn how to make it-Step by Step Tutorial. A marker helps you avoid losing count and ensures that each round is completed accurately.
Lastly, make sure you have a comfortable workspace with good lighting. Crochet is much easier and more enjoyable when you can clearly see your stitches and feel relaxed. This preparation step sets the tone for a smooth and successful crochet experience.
Step-by-Step Instructions to Create Your Crocheted Flower
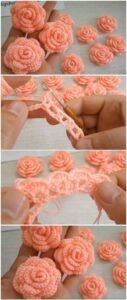
To begin the practical part of this Crocheted flower: learn how to make it-Step by Step Tutorial, start by making a magic ring. This technique forms the center of your flower and allows you to tighten the opening later, creating a neat and compact center. If you prefer, you can also start with a chain of four and slip stitch to form a circle, which works well for beginners.
Once your ring is ready, crochet several single crochets or double crochets inside it, depending on the style you want. The number of stitches will determine the fullness of the flower. For example, fewer stitches create a small delicate flower, while more stitches create a larger base for more petals.
After completing the center round, it’s time to form the petals. Many crocheted flowers follow a pattern where each petal is made by repeating a sequence of chains and stitches in the same stitch or space. A simple petal might consist of chain three, then work two double crochets, chain three again, and slip stitch into the next stitch. Repeat this sequence around the circle to create beautiful evenly spaced petals.
Continue this process until you complete the entire round. Your flower will start to take shape as you work through each petal. If you wish to add layers for a fuller effect, repeat similar steps on an outer round. Adding layers is one of the best ways to customize your design while following the structure of this Crocheted flower: learn how to make it-Step by Step Tutorial.
When all petals are complete, fasten off your yarn securely and weave in any loose ends using a yarn needle. This step ensures your flower stays intact and looks tidy. Always take time to hide the ends properly so they don’t show through the petals.
Finally, shape your flower with your fingers by adjusting the petals. This small finishing touch makes a big difference in the final look and gives your flower a polished appearance.
Creative Ways to Use Your Crocheted Flowers
One of the highlights of this Crocheted flower: learn how to make it-Step by Step Tutorial is exploring the endless ways these flowers can be used. Their versatility makes them perfect for adding charm and personality to a wide variety of handmade projects. You can easily attach them to hats, headbands, scarves, blankets, and bags to bring a touch of color and elegance.
Another popular idea is to use crocheted flowers as appliqués for home décor items. They look beautiful on cushions, table runners, napkin rings, and wall hangings. A simple arrangement of crocheted flowers can instantly brighten any room and create a cozy, handcrafted atmosphere.
If you enjoy gift-giving, crocheted flowers make excellent decorative additions to gift wrapping. Instead of using traditional bows, attach a small flower to the top of your present. It adds a thoughtful and handmade touch, and the recipient can reuse the flower in various creative ways.
These flowers are also wonderful for creating brooches and pins. By attaching a safety pin or brooch backing to the flower, you can create a stylish accessory that matches different outfits. This idea is especially appealing for handmade markets or as part of a personalized handmade gift set.
For those who like to customize baby items, crocheted flowers can be sewn onto baby shoes, headbands, or blankets. They add softness and charm while giving a unique handcrafted appearance.
Lastly, you can create floral garlands or bouquets using your crocheted flowers. These decorative pieces are perfect for parties, weddings, and seasonal decorations. The possibilities are truly endless and allow you to explore your creativity in many delightful ways.
Helpful Tips to Improve Your Flower-Making Process
To make this Crocheted flower: learn how to make it-Step by Step Tutorial even easier, here are some practical tips to enhance your experience. First, always choose yarn and hook combinations that feel comfortable in your hands. Different yarn textures create different effects, so test a few to see which one gives you the result you want.
Second, practice your tension. Consistent tension ensures that all petals are the same size and shape, resulting in a more polished flower. If your stitches feel too tight or too loose, adjust your grip on the yarn until you find a comfortable balance.
It is also helpful to count your stitches carefully. Missing or adding stitches accidentally can change the symmetry of your flower. Especially when working in rounds, taking a moment to double-check helps you avoid mistakes and saves time in the long run.
Blocking your flower is another technique you can use. Lightly shaping it with your fingers or using a soft steam block helps your petals lie flat and maintain their form. This extra step can significantly improve the final appearance of your flower.
Experiment with different color combinations. Using two or three colors in one flower can create striking effects. For example, you can make the center yellow, the petals pink, and the outer layer white. These small experiments make each flower unique.
Finally, don’t be afraid to try new patterns once you feel confident. There are countless ways to build petals, layers, and shapes. This Crocheted flower: learn how to make it-Step by Step Tutorial provides the foundation, but your creativity will take your designs even further.
Crocheted Flower Tutorial
1. Can beginners make crocheted flowers easily?
Yes, crocheted flowers are one of the best projects for beginners because they use basic stitches and work up quickly.
2. What is the best yarn for crochet flowers?
Cotton yarn is often preferred because it holds its shape well, but any yarn type can be used depending on the desired effect.
3. Do I need a magic ring to start the flower?
No, you can start with a chain circle, but the magic ring creates a tighter and neater center.
4. How long does it take to make a crocheted flower?
Most small flowers can be completed in 5–15 minutes, depending on the complexity.
5. Can I wash items with crocheted flowers attached?
Yes, as long as the yarn used is washable. Cotton and acrylic yarns are usually safe for washing.
6. Can I add beads or embellishments to my flowers?
Absolutely. Adding beads, buttons, or pearls enhances the design and gives a custom finish.
Conclusion
This Crocheted flower: learn how to make it-Step by Step Tutorial taught you everything you need to know—from choosing materials and creating the center to shaping petals and exploring creative uses.
Crocheted flowers are simple, versatile, and incredibly enjoyable to make. I hope this guide has inspired you to create your own beautiful pieces and explore your creativity even further.
Please leave your sincere opinion and share your suggestions so I can continue bringing helpful and inspiring tutorials for you!