
Starting a new creative journey often begins with a simple spark of inspiration, and this Crocheted rainbow heart -Step by Step Tutorial is exactly that kind of spark. Whether you are a beginner or an experienced crafter, this project allows you to explore color, texture, and creativity in a fun and calming way. The rainbow heart has become a symbol of positivity and handmade warmth, making it a beautiful piece to create for gifts, decorations, or personal collections. Throughout this article, we will guide you through each step while applying essential techniques that make your crochet experience enjoyable and rewarding. With a humanized approach and simple explanations, this tutorial is designed to make the crafting process truly meaningful.
The Crocheted rainbow heart -Step by Step Tutorial is perfect for anyone searching for an easy yet visually striking crochet project. This pattern helps you understand how colors interact while still keeping the stitches simple enough for beginners. Many people love working with rainbow-themed crafts because they bring an uplifting sense of harmony, and this rainbow heart embodies that feeling. In addition to helping you create something beautiful, you will also learn several essential crochet techniques that can be applied to future handmade items. By weaving together creativity and structure, you’ll discover how enjoyable it is to craft something using your own hands.
Crafting a crocheted rainbow heart is not only about following instructions but also about enjoying the process. Each step encourages patience, attention to detail, and artistic freedom. As you learn to combine the colors of the rainbow smoothly, you will gain confidence in handling yarn changes, shaping, and stitch consistency. This Crocheted rainbow heart -Step by Step Tutorial uses easy-to-follow directions to help you move from simple foundations to a polished final result. Before diving into the structured sections of this guide, take a moment to gather your yarn, prepare your tools, and get excited about the colorful project ahead.
Choosing Materials for the Crocheted Rainbow Heart
To begin this Crocheted rainbow heart -Step by Step Tutorial, selecting the right materials is essential for achieving a smooth and vibrant finish. Choosing high-quality yarn will ensure your heart looks bright, sturdy, and long-lasting. Many crafters prefer cotton yarn for sharp color representation, but any soft and flexible fiber works beautifully. Selecting the correct hook size will also help maintain consistent tension throughout the project.
When selecting your rainbow colors, look for shades that complement one another to create a seamless gradient effect. You can use traditional rainbow colors or personalize the palette to match a theme. This is one of the most enjoyable parts of the creative process because the heart becomes a direct reflection of your style. The materials you choose will influence the softness, shape, and final appearance of your crocheted heart.
Make sure to have scissors and a yarn needle ready before starting. These small tools help you create neat transitions between colors and finish the project with clean edges. A stitch marker is optional but can be useful if you are still building confidence with counting stitches. Preparing all your materials beforehand ensures a smoother crafting experience.
Working with multiple colors may seem challenging at first, but it becomes easier with practice. This Crocheted rainbow heart -Step by Step Tutorial will guide you through each color change in an organized and stress-free manner. With the right yarn, tools, and mindset, you will be fully prepared to begin stitching your rainbow heart.
Before starting your first stitch, take a moment to review your materials and visualize the final piece. Having everything ready helps avoid interruptions while crocheting. Once your workspace is comfortable and organized, you can begin shaping your heart with confidence and creativity.
Finally, keep in mind that materials influence not only appearance but also the emotional feel of the final creation. Soft yarns add comfort, while bright colors bring joy and energy. Your choices will determine how special your crocheted rainbow heart feels when completed.
Step-by-Step Instructions for Crocheting the Heart
This Crocheted rainbow heart -Step by Step Tutorial uses simple stitches that beginners can easily follow. The project starts with a basic magic ring or foundation chain, depending on your comfort level. The first round helps form the base shape that will later be expanded into a recognizable heart form. Even if you are new to crochet, these instructions are written in a clear and friendly tone to help you enjoy every step.
After forming the initial round, you will build the heart shape by gradually increasing stitches. Increases help create the curves and upper arches of the heart, giving it a soft and rounded appearance. This section of the pattern is where you begin to see the project taking shape. Working slowly and counting your stitches carefully will ensure symmetry on both sides of the heart.
Changing colors is one of the most exciting steps in this project. Each new color adds personality and brightness to your heart. This Crocheted rainbow heart -Step by Step Tutorial explains how to switch colors smoothly to avoid knots or uneven transitions. The key is to complete the last stitch of a round with the new color, so the next round begins cleanly and blends naturally.
As you move through the rainbow sequence, the heart grows more vibrant with each row. The project remains easy and enjoyable because color changes give you a fresh sense of progress. Adjust your tension if necessary to keep each color section consistent. Keeping your stitches uniform helps the final heart look polished and professional.
Once the full shape is established, the final rounds will help taper the bottom point of the heart. This is done by working simple decreases to bring the stitches together neatly. Finishing this part may require a bit of patience, but the results are worth it. A clearly defined heart point adds charm and enhances the overall design.
Finally, after completing the last stitch, weave in your yarn tails using a yarn needle. This step ensures your crocheted rainbow heart remains strong and durable. Take your time securing each end, especially where colors changed. A clean finish is the secret to transforming a simple craft into a beautifully handmade keepsake.
Adding Details and Personal Touches
Once your basic crocheted rainbow heart is complete, the next step is adding details that make it uniquely yours. Small embellishments can transform a simple heart into a decorative piece with personality. Whether you prefer a minimalist look or love adding extra flair, this tutorial encourages you to explore creative options.
One fun idea is to add a border around the heart. A single round of stitches in a contrasting color adds definition and gives the heart a polished appearance. The border can be simple or textured depending on your skill level. If you choose a border, remember to keep your tension consistent to maintain the heart’s shape.
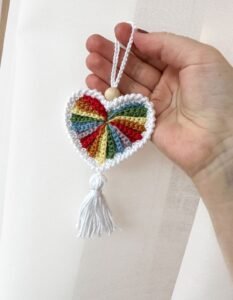
Another great option is attaching a loop or string to turn your heart into a keychain or hanging ornament. This Crocheted rainbow heart -Step by Step Tutorial works well for decorative wall pieces, bag charms, and even gift tags. Adding a loop is very easy and only requires a small chain stitch and a secure knot.
You may also personalize your heart by adding small embroidered details. A tiny face, initials, or simple patterns can make your rainbow heart meaningful and sentimental. These details are perfect for gifts, especially for birthdays, anniversaries, or celebrations.
Stuffing the heart is another creative possibility. Using a small amount of fiberfill transforms your flat heart into a soft, plush design. A stuffed rainbow heart makes a lovely keepsake or a comforting pocket charm. Just make sure your stitches are tight enough so the stuffing doesn’t show through.
Finally, consider making multiple hearts to create a garland or decorative string. A rainbow heart garland adds color to walls, nurseries, craft rooms, or festive events. With this crocheted rainbow heart pattern, you can easily make several hearts in different sizes and combine them to create something truly eye-catching.
Tips for Beginners and Final Adjustments
This Crocheted rainbow heart -Step by Step Tutorial is ideal for beginners, but every crafter benefits from helpful tips. One of the most important things to remember is to crochet slowly and steadily, especially during the first few rounds. Moving too fast may cause uneven tension or missed stitches. Taking your time ensures your heart shape develops correctly.
Count your stitches often to avoid mistakes. Even advanced crocheters rely on counting to maintain symmetry and accuracy. Using stitch markers can make this easier, especially around increases and decreases. This simple habit helps you progress confidently without needing to unravel your work later.
If you are new to color changes, practice switching yarn before beginning the final project. A smooth transition makes your heart look clean and professionally crafted. This Crocheted rainbow heart -Step by Step Tutorial uses several color changes, so practice will help the process feel natural and easy.
Blocking your heart is another finishing technique that can dramatically improve the final appearance. Simply dampen the heart slightly and pin it into shape on a flat surface until dry. Blocking helps straighten edges, unify stitch tension, and give your rainbow heart a crisp, polished look.
You may also reinforce the heart by adding an extra round of slip stitches around the edges. This not only strengthens the piece but also helps highlight the overall shape. Reinforcement is especially useful if you plan to turn the heart into a keychain or bag charm that may experience wear and tear.
Finally, remember that every handmade item is unique. Small imperfections are part of the charm and authenticity of crochet work. Enjoy the process and celebrate each step, knowing that your crocheted rainbow heart is a reflection of your creativity and dedication.
FAQ About the Crocheted Rainbow Heart
What skill level is required to make a crocheted rainbow heart?
This project is beginner-friendly and uses simple stitches. Even new crocheters can follow the tutorial successfully with patience and basic stitch knowledge.
What type of yarn works best for this pattern?
Soft cotton or acrylic yarn works well for this project. Choose yarn that showcases colors vividly to enhance the rainbow effect.
Can I make the heart in different sizes?
Yes, adjusting hook size or adding extra rounds allows you to create larger or smaller hearts. The method remains the same.
How do I prevent gaps when changing colors?
Always complete the last stitch of a round with the new color. Pull the yarn snugly to create a clean transition.
Can the rainbow heart be stuffed?
Absolutely. Adding stuffing turns the heart into a plush decoration or soft charm. Just ensure your stitches are tight.
What can I use my crocheted rainbow heart for?
It makes a beautiful decoration, gift, keychain, wall hanging, or part of a garland. The possibilities are endless.
Conclusion
This Crocheted rainbow heart -Step by Step Tutorial has shown how simple stitches, vibrant colors, and a bit of creativity can come together to form something beautiful and meaningful.
You learned how to choose materials, follow detailed steps, personalize your heart, and finish it with confidence.
Now that you understand the full process, I hope you feel inspired to make your own colorful heart. If you enjoyed this tutorial, please leave a sincere opinion and share suggestions for future guides. Your feedback helps make each new creation even better.