
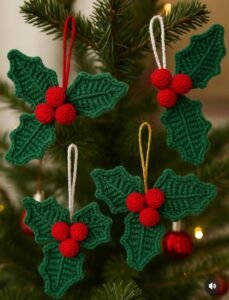
The Easy crochet tutorial for holly leaves and berries.-Step by Step Tutorial is a wonderful way to bring festive charm into your home during the holiday season. These small decorative pieces can be added to Christmas garlands, wreaths, table centerpieces, or even handmade gift wrapping. Starting your crafting journey with this beginner-friendly project is a great way to enjoy crochet while creating something beautiful and meaningful. Using basic stitches and simple techniques, you can make elegant holly leaves and bright berries that look stunning in any Christmas décor.
When learning the Easy crochet tutorial for holly leaves and berries.-Step by Step Tutorial, you will notice how relaxing and rewarding this craft can be. Many people love making these little pieces because they are finished quickly and can be customized with different yarn colors, sizes, and textures. Whether you enjoy traditional green leaves and red berries or prefer a stylish modern look, this tutorial can be adapted to your personal taste. It also allows beginners to practice their skills, including increases, decreases, and small rounds, without feeling overwhelmed.
This project also stands out because it is lightweight, affordable, and eco-friendly. Choosing handmade pieces like crocheted holly leaves and berries adds a personal touch that store-bought decorations cannot offer. As you follow this Easy crochet tutorial for holly leaves and berries.-Step by Step Tutorial, you will discover how simple it is to create festive elements for your home or as gifts for friends and family. Handmade decorations bring warmth and love into any celebration, making your Christmas décor even more special.
Understanding the Materials and Tools Needed
To begin this Easy crochet tutorial for holly leaves and berries.-Step by Step Tutorial, you need only a small amount of yarn. Many crafters prefer cotton or acrylic yarn because they keep their shape well and are easy to work with. Choosing the right green for the leaves and a vibrant red for the berries ensures a traditional Christmas look, but you can experiment with other colors too. A medium-weight yarn is usually perfect for beginners because it is easy to see the stitches clearly.
You will also need a suitable crochet hook that matches the yarn weight. Most crafters use a 3.5 mm or 4.0 mm hook for holly leaves and berries, but this can vary depending on your tension. The hook size affects the tightness of your stitches, which will impact the shape and size of your finished pieces. Beginners may want to try a slightly larger hook to ensure comfort and visibility while practicing.
Another essential tool is a yarn needle, which will be used to weave in ends and assemble the berries. A small pair of scissors is also necessary for cutting yarn neatly as you complete each piece. Stitch markers can be helpful as well, especially for those learning to work in rounds or track increases. These simple tools ensure a smooth and enjoyable crafting experience from start to finish.
Working with the right materials makes a big difference in the quality of your final project. Using soft yarn with good stitch definition helps your leaves look crisp and your berries look round and neat. Good tools also help prevent hand fatigue and allow you to crochet comfortably for longer periods.
Organizing your materials before starting the tutorial is a great habit to develop. Keeping everything within reach makes the process easier and more relaxed. Whether you are a beginner or an experienced crocheter, having your tools prepared keeps your creativity flowing smoothly as you work through the Easy crochet tutorial for holly leaves and berries.-Step by Step Tutorial.
Creating the Holly Leaves
The holly leaves are the highlight of this Easy crochet tutorial for holly leaves and berries.-Step by Step Tutorial. They may look intricate, but they are made using simple stitches and shaped with increases and decreases. You will begin by chaining a small number of stitches to create the foundation of the leaf. From there, you’ll work on both sides of the chain to form the pointed shape.
The curves and points of the leaf are created by carefully placing stitches along the chain. Single crochets, half double crochets, and double crochets may be used in different combinations. This gradual shift in stitch height gives the leaf its natural tapered look. By repeating these steps, you can customize the size of your leaves based on where you want to use them in your Christmas décor.
After shaping the main structure, you will add the iconic holly points. These small peaks make the leaf look realistic and decorative. They are created with small chains and slip stitches. The pattern may look complex at first, but with practice, the movement will feel natural. Beginners often enjoy this stage because it brings the leaf to life.
Blocking the leaf helps it lay flat and stay crisp. Even though this step is optional, it is recommended for a clean and polished finish. Light blocking can be done using steam or a damp cloth. Just be careful with acrylic yarn, as direct heat can damage it. Proper finishing enhances the overall look of your crocheted holly leaves.
Once your leaves are complete, you can make as many as you need. Some people make sets of three for wreaths or garlands, while others create small clusters for gift wrapping. With the Easy crochet tutorial for holly leaves and berries.-Step by Step Tutorial, you can create beautiful decorative pieces that are both charming and versatile.
Making the Crocheted Berries
The berries in this Easy crochet tutorial for holly leaves and berries.-Step by Step Tutorial add a bright pop of color to your holiday decorations. They are typically made using the magic ring technique, which creates a tight and secure center. Starting with this method ensures your berry keeps its round shape and doesn’t have a hole in the middle. Once you master the magic ring, making berries becomes quick and enjoyable.
To form the berries, you will work in rounds, using increases in the first round and then closing the sphere. Small stitches create a dense texture that helps the berry stay firm. Many crafters prefer to lightly stuff the berries with yarn scraps to give them extra volume. This step is optional but recommended for a more realistic look.
Once your berry is shaped, you will close the top using a yarn needle and tighten the stitches to maintain the sphere. This final step creates a neat finish. Each berry should look smooth and round, with no visible gaps. You can make berries of different sizes by adjusting your stitch count or yarn thickness.
Creating multiple berries allows you to build decorative clusters. Typically, holly decorations include three berries together. You can attach them using the yarn tail or sew them together with a separate piece of yarn. This forms a bright, festive cluster that complements the holly leaves beautifully.
Using vibrant red yarn helps the berries stand out against the green leaves. The contrast creates a classic Christmas vibe that works well in many decorations. Whether you are crafting a wreath, ornament, napkin ring, or garland, these berries bring a cheerful touch to your creations.
Assembling Your Holly Leaves and Berries
The assembly stage of the Easy crochet tutorial for holly leaves and berries.-Step by Step Tutorial brings all the pieces together. Start by arranging the leaves in the shape you want. Commonly, two or three leaves are positioned behind the berry cluster. Adjust the angle of each leaf to make the arrangement look natural and balanced.
Next, place the berries in front of the leaves. Ensure the berries sit close together to form a cluster. This is what gives holly its recognizable look. Using a yarn needle, sew the berries firmly to the leaves. Make small, discreet stitches so the assembly looks clean.
Once everything is attached, check the back of your piece for loose ends. Weave in all yarn tails neatly to ensure the decoration lasts for years. Secure weaving also prevents pieces from becoming loose over time. Good finishing work can make even a simple project look professional.
After assembly, you can add the finished holly cluster to a variety of projects. Many crafters sew them onto hats, scarves, Christmas stockings, table runners, or festive pillows. Others use them as standalone ornaments. The versatility of this craft makes it a great addition to your holiday décor.
Experimenting with different yarn textures can enhance the final look. For example, metallic yarn adds holiday sparkle, while cotton gives a clean and natural appearance. This flexibility means you can adapt the Easy crochet tutorial for holly leaves and berries.-Step by Step Tutorial to match any decorating style.
Making several holly clusters is fun and relaxing. They also make wonderful handmade gifts for friends and family. Because each piece is small and quick to make, you can craft multiple clusters in a short time.
FAQ
1. Is this project suitable for beginners?
Yes, the Easy crochet tutorial for holly leaves and berries.-Step by Step Tutorial is beginner-friendly and focuses on simple stitches and easy shaping techniques.
2. How long does it take to make one holly cluster?
Most crafters finish one cluster in 20 to 40 minutes, depending on their skill level.
3. What yarn works best for this project?
Medium-weight acrylic or cotton yarn works well because it holds its shape and offers good stitch definition.
4. Do I need to stuff the berries?
Stuffing is optional, but a tiny amount of yarn scraps helps the berries look rounder.
5. Can I use these holly leaves and berries on gift wrapping?
Absolutely. They make adorable gift toppers that add a handmade touch to holiday presents.
6. How many leaves and berries should I make for one decoration?
Traditionally, holly décor uses two to three leaves and three berries, but you can adjust this based on your project.
Conclusion
The Easy crochet tutorial for holly leaves and berries.-Step by Step Tutorial offers a fun and creative way to enhance your Christmas décor with handmade charm.
Throughout this tutorial, you learned how to choose the right materials, create realistic holly leaves, make vibrant berries, and assemble everything into a festive decoration. This project is simple, enjoyable, and perfect for both beginners and experienced crocheters.
I hope this guide helped you feel confident and inspired to start your own holiday creations. Please leave your sincere opinion and any suggestions you may have—I would love to hear your thoughts!