
The Crochet Pattern: SnowGlobe Ornament-Step by Step Tutorial is a delightful and creative holiday project that brings the charm of winter into your home through handmade craftsmanship. Snow globes have always fascinated people with their miniature worlds and magical snowy atmosphere, and transforming that concept into crochet makes it even more special. This pattern is not only fun to create but also a perfect way to personalize your holiday decorations. As you follow this tutorial, you will discover how simple stitches and thoughtful details come together to form a beautiful ornament that captures the magic of the season.
Many crafters search for meaningful handmade projects to enhance their home décor during the holidays, and the Crochet Pattern: SnowGlobe Ornament-Step by Step Tutorial meets that need perfectly. It allows you to use your creativity while also building your crochet skills. Whether you are crafting for yourself or preparing gifts for loved ones, a crocheted snow globe ornament carries sentimental value that store-bought decorations cannot replicate. Through this project, you can explore color combinations, customize the scene inside the globe, and make each piece truly unique.
This ornament also provides an excellent opportunity for beginners and experienced crocheters alike. The Crochet Pattern: SnowGlobe Ornament-Step by Step Tutorial uses basic techniques such as working in rounds, shaping with increases and decreases, and adding surface details. These techniques ensure that while the project looks impressive, it remains accessible to anyone willing to follow the steps carefully. By taking your time and enjoying the process, you can create a charming, long-lasting decoration that becomes part of your holiday tradition.
Understanding the Materials Needed for the SnowGlobe Ornament
To begin the Crochet Pattern: SnowGlobe Ornament-Step by Step Tutorial, you will first gather the necessary materials. A small amount of worsted-weight yarn is typically used for the background, base, and decorative elements. Choosing bright and contrasting colors helps the miniature scene stand out. Many crafters prefer using cotton yarn for better stitch definition, while others opt for acrylic due to its affordability and wide color range. Both options work well, so the choice depends on your preference and the look you want to achieve.
A suitable crochet hook is also essential for this project. Most snow globe ornaments benefit from a smaller hook size, such as 3.0 mm or 3.5 mm, which helps create a tight fabric that keeps stuffing from showing through. If your tension is naturally loose, you may choose a slightly smaller hook for better results. Selecting the correct hook size ensures your ornament maintains its shape and structure once assembled.
You will also need a small amount of polyester stuffing to give your snow globe ornament a three-dimensional effect. The stuffing helps maintain the round shape and adds a soft touch to the design. Using just the right amount is important so the ornament looks full without becoming distorted. Beginners often learn the ideal balance through practice.
Additional tools include a yarn needle for sewing pieces together and weaving in ends, as well as stitch markers for keeping track of rounds. Stitch markers are particularly helpful for beginners as they prevent confusion when working in continuous spirals. Small scissors are also necessary for cutting yarn neatly. These simple tools contribute significantly to the ease and quality of your project.
Once all materials are prepared, organizing them helps streamline the crafting process. Keeping each color separated and labeling their purpose in the project can save time and prevent mistakes. This preparation ensures that while following the Crochet Pattern: SnowGlobe Ornament-Step by Step Tutorial, you can focus completely on stitching without unnecessary interruptions.
Finally, having a comfortable workspace with good lighting makes a huge difference. Clear visibility helps maintain consistent tension and improves your ability to work small details that are essential to the ornament’s charm. A pleasant crafting environment enhances the overall experience and encourages creativity.
Creating the Snow Globe Background and Shape
The first major part of the Crochet Pattern: SnowGlobe Ornament-Step by Step Tutorial is forming the background circle that represents the snowy sky or scene inside the globe. This begins with a magic ring, which helps create a tight center and clean appearance. Working in continuous rounds, you will add increases to expand the circle gradually. The key to achieving a smooth, round shape is maintaining consistent tension and counting your stitches carefully.
As the background grows, you can choose to adjust the look by changing colors or incorporating simple embroidery details. Some crafters add white stitches for snowflakes, while others prefer a plain background to keep the ornament simple. The flexibility of this design is part of what makes the Crochet Pattern: SnowGlobe Ornament-Step by Step Tutorial enjoyable for all skill levels. You can customize the scenery based on your taste or match it with other holiday decorations.
Once the circle reaches the desired size, you will work a final round to smooth the edges and prepare for assembly. This helps create a polished look and ensures the ornament’s front side is symmetrical. Even simple adjustments such as adding a slip stitch border can make a noticeable difference in the final result. Taking your time with these finishing touches is always worthwhile.
Next, you will create the back piece of the snow globe in the same way. This ensures both the front and back have identical shapes for a clean and professional look once joined. Many crafters enjoy this step because it becomes easier after completing the front piece, offering a chance to relax and enjoy the repetitive motion of stitching.
Stuffing the ornament lightly before joining the pieces adds dimension. Avoid overstuffing, as this can distort the circular shape. A small amount of stuffing gives the ornament a subtle puffed appearance, making it more visually appealing on the Christmas tree. This step helps bring the snow globe to life.
Finally, you will crochet the base of the snow globe, which acts as the stand. This is typically stitched separately and then sewn onto the bottom of the ornament. The base adds structure and enhances the look of the snow globe design. Choosing a warm or neutral color for the base provides a nice contrast to the cool tones of the background.
Adding Decorative Elements Inside the Snow Globe
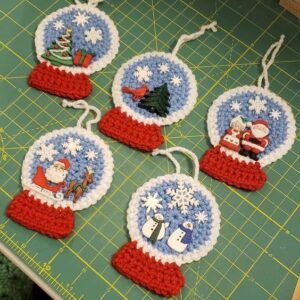
The decorative scene inside the globe is what makes the Crochet Pattern: SnowGlobe Ornament-Step by Step Tutorial truly magical. This part of the project allows you to be creative and personalize your ornament. Many people choose simple winter elements such as a tiny Christmas tree, a small snowman, or a house covered in snow. You can create these miniature pieces using basic shapes like cones, spheres, and triangles.
Creating a small tree may involve stitching a simple triangle and adding a brown rectangle as the trunk. Adding embroidered garlands or tiny ornaments can give it more personality. If you choose to make a snowman, simple circles stacked together with embroidered details for the face and buttons bring it to life. These little touches make each ornament unique.
After making your decorative pieces, you will attach them to the background using a yarn needle. Sewing each element securely ensures they remain in place even with years of use. It is important to position the pieces carefully before attaching them so the scene looks balanced and visually appealing. Taking your time with placement leads to a more polished result.
Adding embroidered snowflakes or tiny white dots simulates falling snow inside the globe. This creates depth and enhances the wintery feel. Some crafters also choose to add metallic yarn touches to mimic twinkling lights or sparkles. These small details elevate the ornament’s overall look.
If you enjoy a minimalist style, you may choose only one central element, such as a lone tree or a single snowflake. The versatility of the Crochet Pattern: SnowGlobe Ornament-Step by Step Tutorial allows room for both simple and elaborate designs. Every ornament reflects the maker’s individual creativity and personality.
Once all decorations are secured, you can move forward with assembling the final ornament. At this stage, seeing the miniature world you created is incredibly rewarding. The combination of colors, textures, and shapes makes the snow globe feel enchanting and handmade with love.
Final Assembly and Finishing Touches
The final assembly of the Crochet Pattern: SnowGlobe Ornament-Step by Step Tutorial brings all your work together into a charming holiday decoration. Begin by placing the front and back pieces wrong sides together. Using single crochet stitches around the edges, join the pieces neatly. This border adds structure while giving your ornament a clean and cohesive finish.
Before closing the last few stitches, add a little more stuffing if needed. This ensures the ornament has the perfect shape without being overly firm. Once fully closed, weave in all loose ends carefully to maintain a tidy appearance. Clean finishing work helps the ornament last for years without unraveling.
Next, sew the base of the snow globe onto the bottom edge. Position it evenly so the ornament appears balanced. The base provides visual grounding and completes the unmistakable snow globe silhouette. Be sure to secure it firmly to avoid any gaps or loose stitching.
After attaching the base, you can add a hanging loop to the top of the ornament. Using a small chain of stitches or a ribbon, create a loop that fits comfortably on a Christmas tree branch. This final touch transforms your project into a functional ornament ready for display.
You may also choose to add optional embellishments, such as a small bow or metallic thread detailing. These decorations enhance the festive feel and allow your personality to shine through. Even small details can make a big difference in the presentation of your ornament.
Once the ornament is complete, take time to admire your work. The Crochet Pattern: SnowGlobe Ornament-Step by Step Tutorial results in a beautiful handmade piece full of charm, creativity, and holiday warmth. Sharing your creation with loved ones or adding it to your seasonal décor brings joy and a sense of accomplishment.
FAQ
1. Is this snow globe ornament suitable for beginners?
Yes, the Crochet Pattern: SnowGlobe Ornament-Step by Step Tutorial is beginner-friendly with simple stitches and clear instructions.
2. How long does it take to complete one ornament?
Most crafters finish within one to two hours, depending on their experience.
3. Can I customize the scene inside the snow globe?
Absolutely. You can create trees, snowmen, houses, or any winter-themed element you like.
4. What type of yarn works best for this project?
Worsted-weight cotton or acrylic yarn is ideal for good stitch definition and durability.
5. Do I need stuffing for the ornament?
Yes, a small amount of stuffing helps maintain the ornament’s shape and adds dimension.
6. How do I attach the ornament to the tree?
You can crochet a small chain loop or use a decorative ribbon as the hanger.
Conclusion
The Crochet Pattern: SnowGlobe Ornament-Step by Step Tutorial is a joyful and creative project that combines simple techniques with artistic expression.
Throughout this guide, you learned how to prepare your materials, create the snow globe shape, design a miniature winter scene, and assemble the final ornament. This handmade decoration adds warmth, charm, and personality to your holiday décor.
I hope you enjoyed this tutorial and feel inspired to create your own snow globe ornaments. Please leave your sincere opinion and share any suggestions—you are always welcome to contribute your ideas!